


 & HDD (Hard Disk Drive)?")


Something About Windows 7, And How To Install It
Windows 7 was launched by Microsoft long back in 2009 that was received by everyone on a highly positive note and still this operating system is being extremely preferred by many consumers and business organizations over other Operating Systems.
At the time it made Windows 7 the fastest-selling operating system in history. Even I’m also a big fan of Windows 7 because that’s the only OS I used for more than 6 years.
The main reason behind which make this operating system famous, is its Aero Theme and the quick boot loading time. I know it’s not faster as compare to the latest versions like 8.1 or 10, but believe me, according to that time it’s ultra-fast.
Not just speed, there are a lot more new things what Microsoft puts in the Windows 7 which never been seen in any kind of competitive operating system;
Like, a new taskbar which being able to “pin” useful items, or a new Action Center, or an optimized windows internal search and a lot more which make itself more useful for any kind of computer user.
 From Dumb to Geek, till 2010 most of the computer run on Windows 7, either using Mac or XP.
So, these are main important stuffs which indicate why Windows 7 has been preferred by people more over the latest version of it including Windows 8 or 8.1
And this stuff is not just true for the individual rather business organization to have responded saying Windows 7 was really great.
And it is really true that still, many firms work on 7 as their hardware and tools are designed to work on 7 more conveniently while migrating to the latest one might cost them a great amount.
Let’s Start With Some Checkups Before Starting Any Process:
1. Hardware Compatibility – The first thing what you’ll need to do is to check the version of Windows 7 what you wanted to install, do compatible with your computer system or not. You can check the Compatibility List online to ensure that your hardware is supported by the Windows 7, or not; Normally, you won’t find any compatibility problem in all the latest computers or laptops, but it might possible that you’ll need to change some of your BIOS setting in order to run the Windows 7. It’s all depending upon on your computer.
Here Are The Minimum System Requirements For Windows 7 To Run On A Machine:
- 1 Gigahertz (GHz) Or Faster 32-Bit (X86) Or 64-Bit (X64) Processor
- 1 Gigabyte (GB) RAM (32-Bit) Or 2 GB RAM (64-Bit)
- 16 GB Available Hard Disk Space (32-Bit) Or 20 GB (64-Bit)
- DirectX 9 Graphics Device With WDDM 1.0 Or With Higher Drivers
2. Product Key – Or you can say “Serial Number” is actually a specific software-based License key for a particular program which certifies that the program you’ve purchased is original. Normally it’s printed on your software’s package, contains 25 characters in a group of 5 characters (each 5 long). And Yes! Just keep in mind that you’ll definitely need that product key in order to complete the Installation.

In case, if you don’t have any;
- Buy Windows 7 Enterprise License: @Amazon
- Buy Windows 7 Ultimate License: @Amazon
- Buy Windows 7 Professional License: @Amazon
- Buy Windows 7 Home Premium License: @Amazon
3. Bootable Disc OR Drive – To install Windows 7, you’ll definitely need a bootable disc or some other bootable USB device in order to start the installation process. In case if you don’t have any or don’t have any idea about what I’m talking, then these links will help you out with that problem.
- What’s A Bootable CD, DVD Or A USB Flash Drive?
- How To Make A Bootable CD, DVD & Blu-Ray Disc?
- How To Make A Bootable USB Flash Drive?
4. Boot Setting – CD, DVD, USB, or whatever you are using for the installation, but to start or to boot that bootable device, you’ll mainly need to change the boot order of your computer so it can recognize the bootable drive of yours. Check out the link below to know more about Boot Order Setting and how to change it:
- How To Change The Boot Order (Boot Sequence) In BIOS?
- How to Quick Boot A USB or CD/DVD Directly From the Boot Menu?
5. Computer System Drivers – it’s actually the most common thing which you’ll need to install for your desktop or laptop computer. So, before doing anything make sure you do have your computer driver’s disc or otherwise you’ll need to download every single one of them from the online server.
6. Extra Bonus Tip – If your OS recently got corrupted and you wanted to recover your personal data back from the internal hard disk or SSD before this current installation process, then check out this tutorial:
Suggested Link: How To Recover, Accidentally Formatted Internal Or External Hard Disk Drive Data?
#Let’s Start the Process Now;
Step 1 – Insert/Plug the Windows 7 CD/DVD/USB into your computer and push the start button.
Step 2 – Your PC should automatically detect the Bootable Drive and shortly you will get a message saying “Press any key to boot from CD/DVD/USB”. So, now you’ll just need to press any key on your keyboard to continue. Make sure you press it quickly or otherwise it will disappear after 5 seconds. 
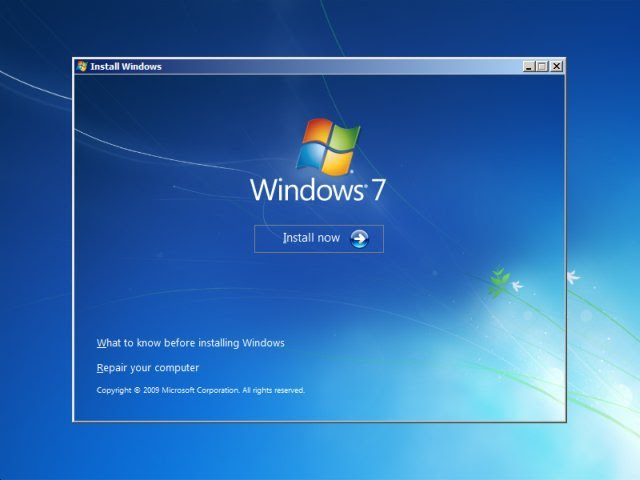
Step 3 – After booting the drive, you’ll see that your Windows Setup started to load the installer. Wait for some minutes and your computer will show some easy options which will help you in an easy way to install a new Windows 7 OS in your computer.
On First menu, you’ll need to select or choose your language and the keyboard’s input setting. Mainly, most of the time, it’s on the default setting according to your region.
So, just click on the “Next” button after selecting your choice. And after then, click on the “Install now” button.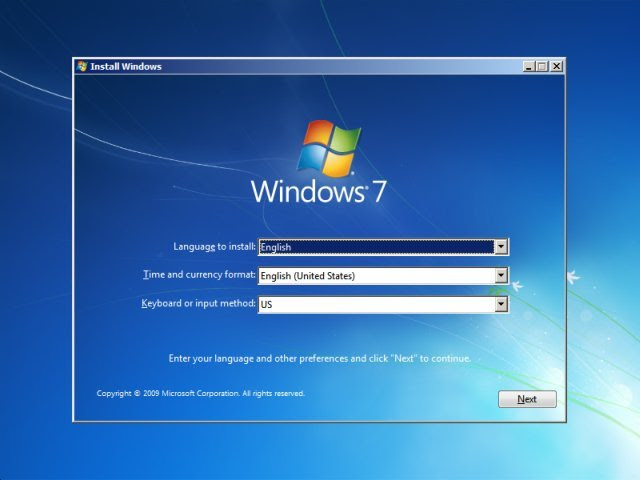
Step 4 – Now, Accept the license agreement page by ticking it and then click on the “Next” button again.
Step 5 – Now you’ll have to decide whether you’re going to “Upgrade” your previous windows or you need to perform a Custom (advanced) installation.
- Upgrade – In up-gradation, the setup will install Windows 7 without making any changes to your current data and softwares. Setup will automatically overwrite your previously installed windows and then restore all your saved softwares and previously stored data.
- Custom (advanced) – It basically installs a new copy of Windows on your hard drive.
In this tutorial I’m only showing you how to perform a custom install;
And personally, I only recommend you to install a new copy of windows because new is always best and your computer does not rely on old leftovers.
Step 6 – Creating partition: here comes the trickiest part of the installation process; and yes, it’s the understanding of the new partition creation, or maybe saving the old one.
This step is really important because now I’m going to show you where actually your Windows OS going be install in your computer, and not just that, I also going to talk something about which partition you might need to leave for the previously saved data.
And right now, there are mainly two different conditions which can possible to manage the partitions differently and yes, you definitely have one of them on your side too.
So, Let’s See What You Can Do About It;
- Only Need To Format The Previous OS Drive And Save Other Driver Data – To do that, first, you’ll need to find out that which one the partition is having your previous OS, and which also might need to format too. It’s possible that the listed C: drive on the setup menu is actually your OLD OS Drive, but you might also need to confirm it by cross-checking the size of your previous OS Partition. In case, if you don’t know about the size of your previous OS drive to cross-check, then I think you should need to click on the “X” button and quit the setup and run your main OS again, just to check the actual Partition Size of your currently installed OS.
- Need To Format Everything And Install A New Clean OS – In that case, you’ll need to delete all the listed partition showing in front of you, by using the “Delete” option. And then it will merge all the local drives into as one, named something like ‘Un-partitioned Space’. Then, just use the menu key “New” option to create the partition and then enter the amount of storage size which you wanted to assign to your New OS Drive. At least make it to 80 to 100 GB.
So, what’s now?
Answering Condition No. 1 – To overwrite the previous installation, first, you’ll need to delete that old local drive who’s containing the old OS, and not just the OS drive you’ll also need to delete the old boot drive too.
Just like most of the times, both of these drives listed on the top of the installation menu. And in case if you still can’t be able to identify it, then the one who named as System Reserved is the one who contains the boot files and for the old OS drive you’ll need to cross-checking the size of the drive by reboot to the previous installation.
I’m only saying this because your computer’s C drive isn’t listed as C in the installation menu, you’ll always need to confirm about the old drive by checking its storage size (mainly in bytes).
Answering Condition No. 2 – To do a clean installation, the only thing what you’ll need to do is to delete all the listed drive in front of you.
Suggested link: How To Recover Data From Corrupted OS Like Windows, Linux & etc.
Do whatever what suits you but after deleting the partition make sure you do recreate them. The minimum recommended space for a partition to install Windows 7 is 10350 MB (10 GB).
You can click on the “Drive Options (Advanced)” to get the partition editing menu.
Step 7 – Now select the partition in which you wanted to install the OS and then click on the “Next” button.
During the installation process, your computer may restart several times, which is completely normal. This will take around 30 to 40 min to finish the process, but it fully depends on your computer’s speed.
Step 8 – After when the installation completes, the first thing it will ask you to provide the username and the name which you wanted to give to your computer. So, just fill this page to proceed next.
Step 9 – Enter the password, in case if you want to secure your account or otherwise leave it blank.
Step 10 – Enter your Product Key and check the “Automatically Activate” mark below the key label. This will automatically activate your windows when your computer connects to the internet.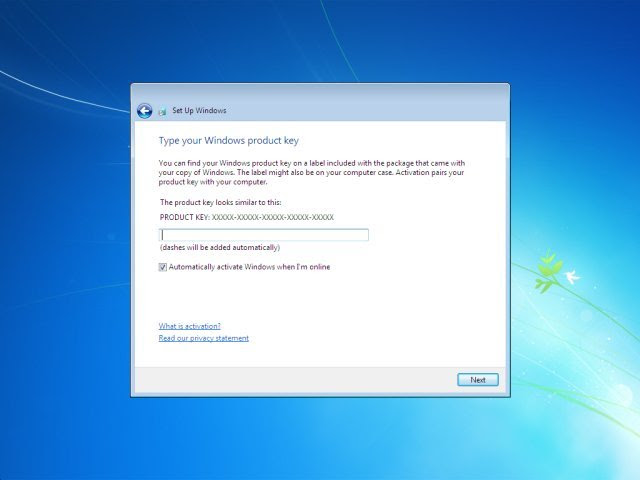
Step 11 – Now it will ask you to configure the windows updates setting. However, I recommend you to choose “Use recommend setting” to run the windows properly.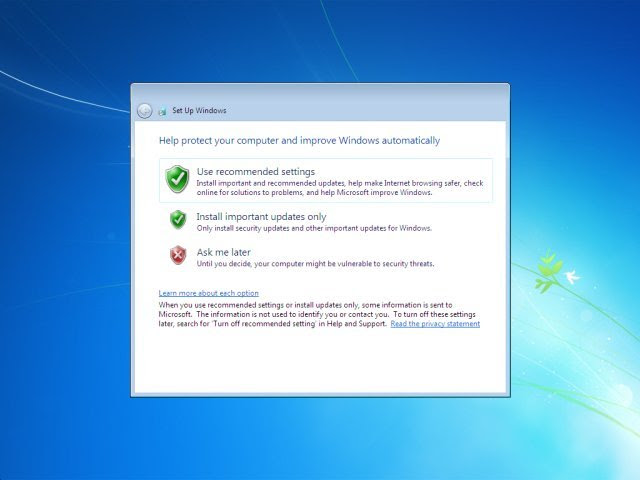
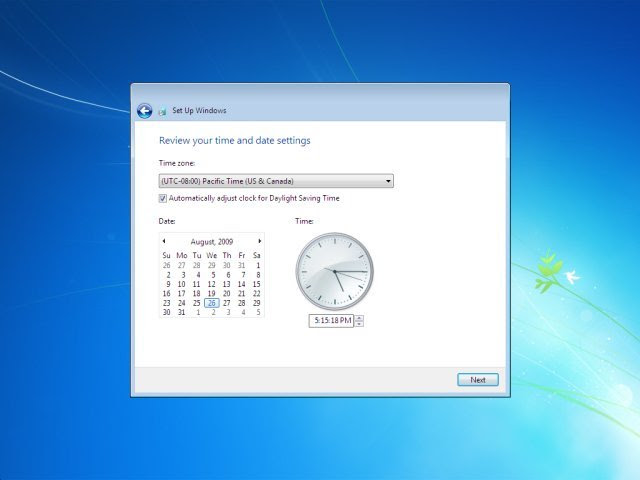
Step 12 – Now choose your country time zone for the display clock setting.
Step 13 – Select your Network Type (Only shows when your computer is connected to the internet).
Congratulations, you have successfully installed Windows 7 on your computer.
 After when the installation completes, install your motherboard’s driver to use the full performance of your computer. Here is a list of those signs, which might get stick with your PC if the drivers aren’t properly installed in the computer:
- System’s Instability
- Malfunctioning Of Hardware
- Unresponsive Hardware
- Computer Errors
Suggested Links:
- Motherboard Drivers – What It is & Mainly, How To Install It?
- How To Automatically Install And Update The Computer Drivers?
- How To Install Windows 8? – Complete Guide
- How To Install Windows 10? – Complete Guide
“And that’s all for now, thanks for sticking with the article, and you know it will always good to let me know about the tutorial, in the comments down below.” 🙂
Still Finding Solution or Need Some Help ?
If you still can’t find your solution then maybe you’ll need to contact us and we will definitely gonna help you out by our technical support.
Click Here For The Technical Support


 Error in Middle of Computer Startup")
You share interesting things here. I think that your blog can go viral easily.
Comments are closed.