


 & HDD (Hard Disk Drive)?")


Hey there fellow tech enthusiasts! Let’s talk about System Restore, the unsung hero of Windows that’s been around since the dawn of the new millennium, starting with Windows ME in 2000. It’s like having a safety net for your precious data and system stability.
Especially for those who’ve recently made the jump to Windows 10, enabling System Restore is like putting on your seatbelt before a wild ride—it’s a must! Microsoft has really leveled up from the days of Windows 7 or 8. With Windows 10 and its flashy successor, Windows 11, System Restore got a serious upgrade. It’s like going from a trusty old bicycle to a turbocharged sports car.
Now, why should you care? Well, imagine this: you’re about to install some funky new software or tweak your system settings, and there’s that little voice in your head going, “What if things go south?” That’s where System Restore swoops in like a superhero, creating checkpoints in time so you can rewind the clock if things get wonky.
But wait, there’s more! System Restore isn’t just for major oopsie moments; it’s also your go-to for minor tech tantrums. Got a pesky driver acting up or some software throwing a tantrum? No worries! Just roll back the changes like it’s yesterday’s bad haircut.
In a nutshell, System Restore is like having a trusty sidekick in your tech adventures, giving you the confidence to tinker and explore without fear of messing things up beyond repair. So, buckle up and let’s dive into the ins and outs of using System Restore across various Windows versions—because a little know-how can go a long way in keeping your digital domain running smoothly.
Table of Contents List
- 8 Different Ways To Open System Restore In Windows
- How To Turn On This System Restore Feature?
- How To Create A Restore Point In Windows?
- How To Perform System Restore In Windows To The Earlier Date Or Restore Point?
- How To Do Restoration When Our Windows Got Corrupted Or Not In Working State?
- How To Use Undo Feature In System Restore?
- What To Do If System Restoration Won’t Works For You?
So, Let’s Start With;
8 Different Ways To Open System Restore In Windows
Here are the various methods to open System Restore in Windows:
- Using the Start Menu:
- Click on the Start button (Windows icon) in the bottom-left corner of the screen.
- Type “System Restore” into the search bar.
- Select “Create a restore point” from the search results.
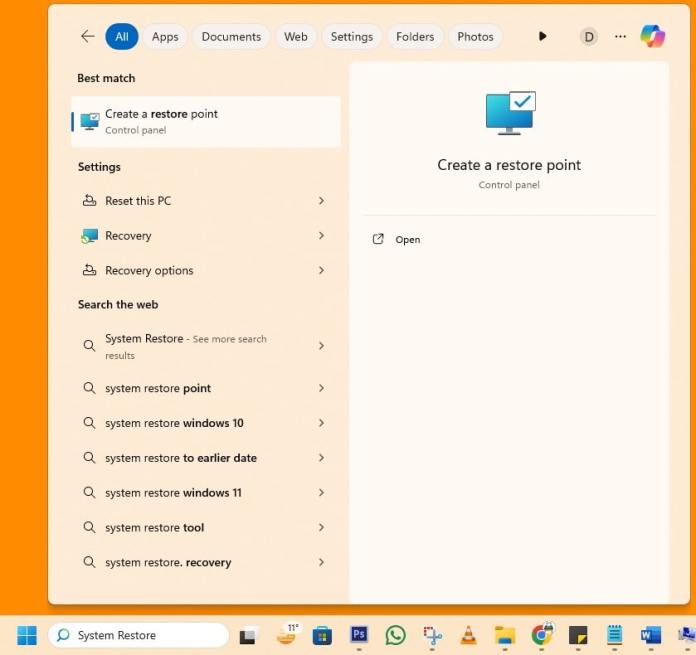
- In the System Properties window that opens, click on the “System Restore” button.

- Using the Control Panel:
- Open the Control Panel by typing “Control Panel” in the Start menu search bar and selecting it.
- In the Control Panel, click on “System and Security”.
- Under System and Security, click on “System”.
- In the System window, click on “System Protection” in the left sidebar in the older version of Windows and “Advanced System Setting” in the latest version of Windows like 11 & 10.
- Click on the “System Restore” button in the System Properties window that appears.

- Using the Run Dialog:
- Press the Windows key + R on your keyboard to open the Run dialog.
- Type “rstrui.exe” into the Run dialog and press Enter.
- This will directly open the System Restore window.

- Using Command Prompt:
- Open Command Prompt by typing “cmd” in the Start menu search bar and selecting it.
- In the Command Prompt window, type “rstrui.exe” and press Enter.
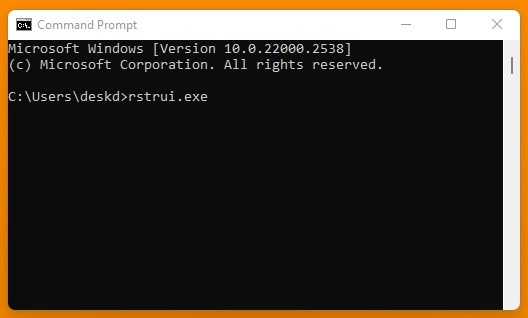
- This will also open the System Restore window.
- Using PowerShell:
- Open PowerShell by typing “PowerShell” in the Start menu search bar and selecting it.
- In the PowerShell window, type “rstrui.exe” and press Enter.
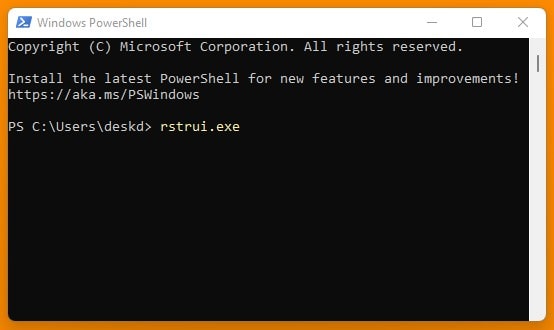
- This will open the System Restore window as well.
- Using File Explorer:
- Open File Explorer by clicking on the folder icon in the taskbar or pressing Windows key + E.
- Right-click on “This PC” or “Computer” (depending on your Windows version) and select “Properties”.
- In the System window that opens, click on “Advanced System Setting” in the left sidebar, then click on the “System Restore” button in the System Properties window.

- Using System Configuration:
- Press the Windows key + R on your keyboard to open the Run dialog.
- Type “msconfig” into the Run dialog and press Enter.
- In the System Configuration window that opens, go to the “Tools” tab.
- Scroll down the list of tools, select “System Restore”, and click on the “Launch” button.

- Using Task Manager:
- Right-click on the taskbar and select “Task Manager”, or press Ctrl + Shift + Esc.
- In Task Manager, go to the “File” menu and select “Run new task”.
- Type “rstrui.exe” into the “Open” field and press Enter.
- This will launch System Restore.
These methods allow you to access System Restore in Windows and restore your system to a previous point in time if needed.
How To Turn On This System Restore Feature?
If you’re rolling with Windows 10 or 11, you’ve got System Restore at your disposal, but here’s the kicker—it’s snoozin’ by default in both OS versions. Translation? It’s not watching your back, and there aren’t any automatic save points happening.
But fear not! Flipping the switch on System Restore is a breeze. Just a few clicks, and voila! You’re in business. Once it’s up and running, System Restore gets busy creating those lifesaving checkpoints at regular intervals or just before you rock the boat with big system changes like software installs or driver updates.
To get System Restore up and running in Windows and tweak those system preferences, here’s your playbook:
- Now, here’s where the magic happens. Summon the Run dialog by tapping the Windows key + R on your keyboard.
- Into the Run dialog, type in “sysdm.cpl” and hit Enter. Abracadabra! The System Properties window appears like magic.
- Now pick the drive you’re keen on for System Restore (mainly C:\) and hit up the “Configure” button.
- In the System Protection settings, flip the switch to “Turn on system protection”.
- If you’re feeling picky about how much space System Restore takes up, slide that slider around. When you’re happy, click “Apply” and then seal the deal with “OK”.

With these moves down pat, you’ll be flipping on System Restore and diving into System Properties like a tech-savvy pro. Time to save those restore points and keep your system in tip-top shape!
How To Create A Restore Point In Windows?
Crafting a restore point in Windows is like snapping a Polaroid of your system’s current vibe—a handy snapshot you can revert to if things hit the fan down the road. Here’s your ticket to restore point creation:
- Get the ball rolling by tapping the Windows key + R Key on your keyboard. That’ll summon the Run dialog.
- Into the Run dialog, type “sysdm.cpl” and hit Enter. Boom! You’re in the System Properties zone.
- Cruise over to the “System Protection” tab—it’s your destination.
- Pick the drive you’re vibing with (usually it’s the ol’ C:\) and hit up that “Create” button.
- Feeling fancy? Toss in a name for your restore point, if you’re into that sort of thing. Then hit “Create”.

- Sit tight while Windows does its thing. Once it’s all said and done, you’ll get the green light—a confirmation that your restore point is locked and loaded.
Whipping up a restore point before you shake things up on your system—like tossing in new software or drivers—is like buckling up before a rollercoaster ride. It’s all about that safety net, buddy. So, don’t skip this step! Be proactive, and ensure you’ve got that easy exit strategy back to a stable system if the need arises.
How To Perform System Restore In Windows To The Earlier Date Or Restore Point?
Performing a system restore in Windows is like hitting the rewind button on your computer, taking it back to a time before things went haywire. Here’s how to do it:
- Open up the System Properties window again, and head straight to the “System Protection” tab.
- Look for the “System Restore” button and give it a click.
- Boom! The System Restore wizard pops up. Hit “Next” to kick things off.
- Now, you’ll see a lineup of available restore points, complete with dates and descriptions. Pick the one that suits your fancy and hit “Next” once more.

- Take a quick peek at the restore point details to make sure everything checks out, then seal the deal with a click on “Finish” to confirm your choice.

- Windows will double-check with you before taking the plunge. Hit “Yes” to give it the green light.

- Your computer will do a little dance with a restart and kick off the system restore process. Just follow any on-screen instructions that pop up along the way.
- Once the dust settles and the restoration is complete, your computer will give itself another little reboot, and Windows will shoot you a message letting you know how things panned out.

Performing a system restore can be a lifesaver when you’re dealing with pesky issues like software clashes, system hiccups, or performance woes. It’s like a trusty troubleshooter, swooping in to bring your system back to its stable, happy place.
How To Use System Restore When Our Windows Got Corrupted Or Not In Working State?
When your Windows decides to throw a tantrum and refuses to boot up properly, System Restore swoops in like a digital superhero to save the day. Here’s how to call upon its powers when things go south:
Using the Windows Recovery Environment (which automatically opens after an unsuccessful boot):
- If Windows keeps stumbling during boot-up, don’t sweat it—it might just trigger the Windows Recovery Environment (WinRE) after a few failed attempts.
- Once you’re in WinRE, hit up “Troubleshoot” to access some serious troubleshooting mojo.
- In the Troubleshoot menu, spot the golden ticket: “Advanced options”.
- There it is! Click on “System Restore” among the advanced options.

- Follow the on-screen breadcrumbs to pick a restore point and kickstart the restoration process.
Using Windows Installation Media:
- If WinRE decides to play hide and seek or simply ghosts you, fear not! Grab your trusty Windows installation USB drive.
- Pop that bootable USB drive into your computer and restart. To boot from the USB drive, you might need to go into the BIOS/UEFI settings and set the boot priority to USB or you can tap a secret startup key like F10 or F12 to directly access the Boot Menu.
- Once you’re booted from the USB, pick your language and keyboard preferences, then hit “Next”.

- Skip the whole “Installing Windows” spiel and opt for “Repair your computer” instead.

- In the “Choose an option” menu, sniff out “Troubleshoot” like a bloodhound.
- Guess what? You’re back at the familiar crossroads of “Advanced options”.
- Click on “System Restore” in the advanced options menu.
- Now just follow those trusty on-screen instructions to select a restore point and get that restoration ball rolling.
With these tricks up your sleeve, you can summon System Restore even when Windows decides to play the villain. It’s your ultimate troubleshooter, ready to bring your system back from the brink. Just remember to pick a restore point from before all the chaos started for the smoothest ride back to stability.
How To Use Undo Feature In System Restore?
The “Undo” feature within System Restore is like having a safety net for your computer—it lets you backtrack to the exact moment just before you hit that restore button. Here’s how to make the most of it:
- Access System Restore: Fire up System Restore using one of the methods we’ve talked about earlier—whether it’s through the Start menu search or cruising through System Properties.
- Select the Undo Option: In the System Restore window, you’ll find the option to undo the recent restore, complete with timestamps.
- Initiate the Restoration: Once you’ve selected the desired restore point, click on “Next” to proceed with the restoration process.

- Confirm the Restoration: Before you dive in, give the details a once-over to make sure you’re rolling back to the right spot. Once you’re sure, seal the deal with a click on “Finish” to get the ball rolling.
- Wait for Completion: System Restore gets to work, rewinding your system back to its former glory. Depending on how much stuff it’s undoing, this might take a bit, so sit tight and let it do its thing.
- Verify the Results: Once the dust settles and your system gets a reboot, it’s time for the moment of truth. Check to see if those pesky issues are gone or if any new surprises have cropped up.
By tapping into the “Undo” feature in System Restore, you’ve got the power to hit rewind on any changes made by the system restore. It’s your ticket to undoing those tweaks that didn’t quite hit the mark or ended up causing more trouble than they solved. Just remember to tread carefully, and always double-check that you’re picking the right restore point before you hit that undo button.
What To Do If System Restoration Won’t Works For You?
If your attempt to use System Restore hits a snag and fails for a particular restore point, don’t throw in the towel just yet. Sometimes, a single restore point might be on the fritz—corrupted or incomplete—which can throw a wrench in the restoration works. But fear not! You can give it another shot by opting for a different restore point instead.
Here’s the drill: Head back to the System Restore window and scan through the available options. Pick out a different restore point that catches your eye. Once you’ve got your pick, dive back into the restoration process and see if this time around, it does the trick to iron out the kinks and bring your system back to its former glory.
Certainly! Utilizing the System File Checker (SFC) and Deployment Image Servicing and Management (DISM) is crucial for troubleshooting in Windows, especially when dealing with corrupted system files or the Windows system image.
To run SFC, start by opening Command Prompt as an administrator. You can do this by searching for “Command Prompt” in the Start menu, right-clicking on it, and selecting “Run as administrator”. Once in the Command Prompt window, type “sfc /scannow” and hit Enter. This command will kick off a scan and repair process. Let it run its course, following any on-screen instructions provided by SFC. If it discovers and fixes any issues, it may prompt you to restart your computer to apply the repairs.

As for DISM, the process is quite similar. Again, open Command Prompt as an administrator and type “DISM /Online /Cleanup-Image /RestoreHealth” before hitting Enter. This command will check for and mend any corruption in the Windows system image. Hang tight while it does its thing, and once it’s done, go ahead and restart your computer to ensure the repairs take effect.
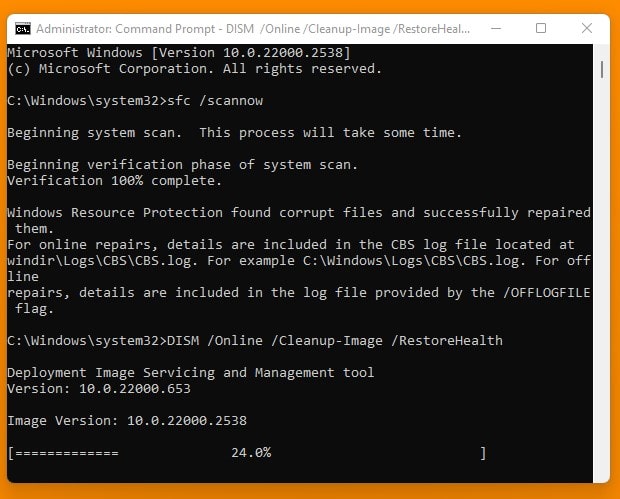
By using SFC and DISM, you can tackle issues stemming from corrupted system files or a wonky Windows system image, potentially clearing the path for System Restore to work its magic. These tools are indispensable for keeping your Windows OS in tip-top shape and ensuring its stability.
And you’ve tried everything under the sun to fix those pesky System Restore problems, but nothing seems to be doing the trick. Well, fear not, because it might be time to bust out the big guns: Reinstall or Reset of Windows. These babies are your secret weapons for taking down those underlying OS issues that are causing System Restore to throw a fit.
Now, let’s talk about the Repair Install first. This bad boy involves reinstalling Windows right on top of your current setup. It’s like giving your OS a spa day—fixing up all those corrupted or missing system files while keeping your personal stuff safe and sound. Think of it as a refresh button for your operating system, minus the hassle of losing your data and apps.
- How To Install Windows 10? – Complete Guide
- How To Install Windows 8/8.1? – Complete Guide
- How to Install Windows 7? – Complete Guide
- How To Install Windows XP? – Complete Guide
On the flip side, we’ve got the Reset option. This one’s a bit more hardcore. It’s like hitting the nuclear button and starting from square one. Say goodbye to all your personal files, settings, and apps because this reset is about as clean slate as it gets. Only go for this option if you’re truly at your wit’s end with troubleshooting.
Now, before you dive headfirst into either of these options, you’ll need some tools of the trade—a.k.a. a Windows installation media like a USB flash drive or DVD. Once you’ve got that, just boot from the installation media and follow the on-screen instructions to get the repair or reset party started.
Just a heads up though, both of these options might throw a wrench in your workflow. You might need to reinstall a few apps or tweak some settings afterward. But hey, desperate times call for desperate measures, right? And when it comes to tackling those stubborn System Restore issues, sometimes you gotta do what you gotta do.


 Error in Middle of Computer Startup")


