


 & HDD (Hard Disk Drive)?")


In the ever-changing world of digital tech, keeping our systems stable and reliable is a big deal. Cue System Restore – a key player in Microsoft Windows, here to rescue us from software disasters and unexpected hiccups. Since it tagged along with Windows Me back in 2000, this nifty tool has been a lifesaver for users facing system troubles.
But what’s the deal with System Restore, and how does it work its magic? Let’s demystify it: it’s like a superhero cape, shielding us from disasters and giving hope to struggling systems. Basically, System Restore is like a tech ballet, gracefully fixing files and sorting out registry messes caused by dodgy installations or rogue updates.
And it’s not just about time travel – it lets you jump to specific moments in your system’s history, finding that sweet spot of stability. It’s seamlessly built into Windows, quietly standing by until you need it. But it’s not just reactive – savvy users can set up checkpoints to armor their systems against the unexpected. So, as we dive into the world of System Restore, let’s unpack its features and see why it’s a must-have for keeping our systems running smoothly.
# So, Let’s Start With; How System Restore Works?
System Restore is like a digital time-traveler, constantly taking snapshots of your computer’s important bits—like system files and settings—at different times. It relies on a robust system called the Volume Shadow Copy Service (VSS), built into Windows, to handle the job of creating and managing these snapshots. VSS is crucial because it ensures that even if files are being used by the system or other programs, they can still be neatly packaged up without causing any data hiccups when creating the snapshots.
When System Restore decides it’s time to make a new snapshot, it meticulously documents the pristine condition of these essential elements, locking them away in a kind of time capsule for safekeeping. And when you decide it’s time to hit the rewind button and restore your system to a previous state, Windows gets to work, sorting through these snapshots like a maestro conducting a symphony, bringing back all the files and settings to how they were before.
On your end, it’s like browsing through a museum exhibit of your computer’s past. Each restore point is neatly labeled with a timestamp and description, giving you a range of options to choose from. So not only does System Restore let you undo any mistakes, but it also gives you the power to explore and choose exactly where you want to go back to in your computer’s history. It’s like having your own time machine, right there on your desktop.
Even though these snapshots don’t take up much room individually, they can start to hog your disk space if you accumulate too many of them. But fear not! You’re not at the mercy of your system’s appetite for disk space. You have the power to tame it. By delving into your system settings, you can adjust how much disk space System Restore gets to use. This means you can tailor it to fit your needs perfectly, finding that sweet spot between saving enough snapshots to feel secure and not hogging too much space.
# Advantages & Disadvantages Of System Restore
System Restore, a fundamental feature of Microsoft Windows operating systems, comes with its share of pros and cons, serving as both a handy tool for system upkeep and troubleshooting, and posing certain limitations and risks.
Pros:
- Picture this: you accidentally install some wonky software or drivers, and your system starts acting all wonky too. Well, System Restore swoops in to save the day by rolling your system back to a time when everything was peachy. Say goodbye to those pesky errors!
- Don’t you just love it when tech stuff is easy to use? System Restore gets it. It’s got this super simple interface that even your grandma could navigate. Just pick a restore point, and voila! Your system is on its way to its former glory.
- System Restore isn’t just about set-it-and-forget-it. Nope, it’s all about putting the power in your hands. Want to tweak the schedule to match your usage patterns? Go for it. With System Restore, you’re the boss.
- Ain’t nobody got time for lengthy troubleshooting sessions. System Restore cuts through the drama and gets straight to the point. With a few clicks, it can whisk your system back to stability faster than you can say “blue screen of death”.
Cons:
- While System Restore does its best to save your personal files, it’s not so keen on keeping your installed apps around. You might have to bid farewell to your favorite programs and reinstall them post-restoration.
- As much as we wish it could, System Restore can’t work miracles. It’s great for fixing software snafus, but it won’t help you out if your hardware decides to throw a tantrum or if some sneaky malware crashes the party.
- Brace yourself for some disk space munching. System Restore likes to hog some space for its precious restore points. Keep an eye on it, or you might find yourself in a storage space showdown.
- Desktop systems are all about user experience and keeping things stable, while servers have to juggle robustness, scalability, and performance. So, Microsoft made a conscious call to leave out System Restore from Windows Server editions, aligning features with the unique demands of server environments.
After all, System Restore is a lifesaver when your system is on the fritz, but it’s not without its quirks. In addition to the advantages and disadvantages, there are still a few more points worth noting about System Restore:
- Compatibility Check: Before you rely on System Restore to work its magic, it’s wise to consider its compatibility with any third-party software or tweaks you’ve got going on. Sometimes, certain apps like to mess with System Restore’s mojo, causing hiccups or inconsistencies during the restoration process. Keep an eye out for potential conflicts.
- Restore Point Roulette: Ever wonder how often System Restore decides to snap a quick pic of your system? Well, it’s a bit like a paparazzi frenzy, but less invasive. Windows typically snaps a restore point selfie before major system changes, but you can also play director and manually cue the camera for specific snapshots of your system’s finest moments.
- Beyond Restore: System Imaging: While System Restore is like the quick-fix ninja of system recovery, it’s not the be-all and end-all. Enter system imaging: the heavyweight champ of backup solutions. With system imaging, you’re not just rolling back changes—you’re taking a full-on snapshot of your system, from your cherished files to your beloved settings. It’s like a safety net for your digital life.
- Safe Mode Saviors: Picture this – your system decides to throw a temper tantrum and refuses to boot up properly. Enter Safe Mode, the superhero sidekick to System Restore. By booting up in Safe Mode, you’re essentially putting your system on a diet, trimming away the excess fluff to focus on the essentials. From there, you can call in System Restore for backup and recovery duty, all while keeping the chaos at bay.
- System Integrity Matters: Now, let’s get real for a sec. While System Restore is a handy troubleshooter, it’s not your one-way ticket to system security. Think of it like a trusty wrench in your toolbox—it’ll help you tighten those loose screws, but it won’t build the whole dang house. To truly safeguard your system, you’ll need to team up with regular maintenance routines, like antivirus sweeps, software updates, and system tune-ups.
By delving into these extra tidbits, you’re not just scratching the surface of System Restore—you’re diving deep into its inner workings, armed with the knowledge to navigate any tech turmoil that comes your way.
# 8 Different Ways To Open System Restore In Windows
Here’s how you can open System Restore in Windows using eight different methods:
- Using the Start Menu:
- Click on the Start button (Windows icon) in the bottom-left corner of the screen.
- Type “System Restore” into the search bar.
- Select “Create a restore point” from the search results.
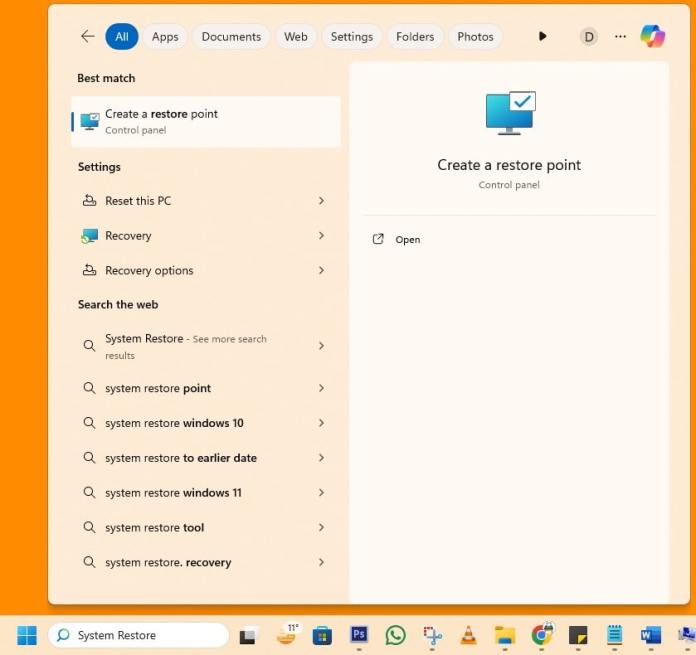
- In the System Properties window that opens, click on the “System Restore” button.

- Using the Control Panel:
- Open the Control Panel by typing “Control Panel” in the Start menu search bar and selecting it.
- In the Control Panel, click on “System and Security”.
- Under System and Security, click on “System”.
- In the System window, click on “System Protection” in the left sidebar in the older version of Windows and “Advanced System Setting” in the latest version of Windows like 11 & 10.
- Click on the “System Restore” button in the System Properties window that appears.

- Using the Run Dialog:
- Press the Windows key + R on your keyboard to open the Run dialog.
- Type “rstrui.exe” into the Run dialog and press Enter.
- This will directly open the System Restore window.

- Using Command Prompt:
- Open Command Prompt by typing “cmd” in the Start menu search bar and selecting it.
- In the Command Prompt window, type “rstrui.exe” and press Enter.
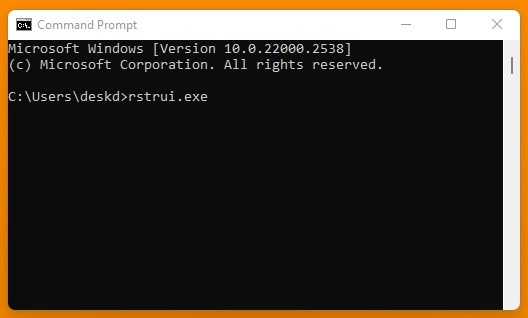
- This will also open the System Restore window.
- Using PowerShell:
- Open PowerShell by typing “PowerShell” in the Start menu search bar and selecting it.
- In the PowerShell window, type “rstrui.exe” and press Enter.
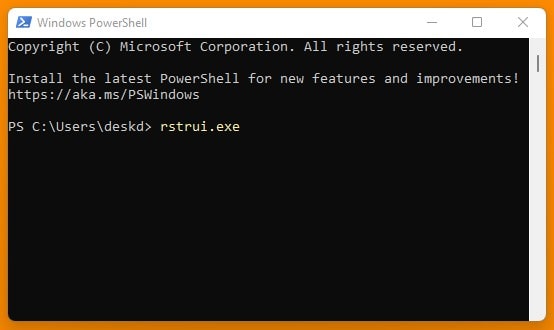
- This will open the System Restore window as well.
- Using File Explorer:
- Open File Explorer by clicking on the folder icon in the taskbar or pressing Windows key + E.
- Right-click on “This PC” or “Computer” (depending on your Windows version) and select “Properties”.
- In the System window that opens, click on “Advanced System Setting” in the left sidebar, then click on the “System Restore” button in the System Properties window.

- Using System Configuration:
- Press the Windows key + R on your keyboard to open the Run dialog.
- Type “msconfig” into the Run dialog and press Enter.
- In the System Configuration window that opens, go to the “Tools” tab.
- Scroll down the list of tools, select “System Restore”, and click on the “Launch” button.

- Using Task Manager:
- Right-click on the taskbar and select “Task Manager”, or press Ctrl + Shift + Esc.
- In Task Manager, go to the “File” menu and select “Run new task”.
- Type “rstrui.exe” into the “Open” field and press Enter.
- This will launch System Restore.
These methods allow you to access System Restore in Windows and restore your system to a previous point in time if needed.
# How To Turn On This System Restore Feature?
If you’re rolling with Windows 10 or 11, you’ve got System Restore at your disposal, but here’s the kicker—it’s snoozin’ by default in both OS versions. Translation? It’s not watching your back, and there aren’t any automatic save points happening.
But fear not! Flipping the switch on System Restore is a breeze. Just a few clicks, and voila! You’re in business. Once it’s up and running, System Restore gets busy creating those lifesaving checkpoints at regular intervals or just before you rock the boat with big system changes like software installs or driver updates.
To get System Restore up and running in Windows and tweak those system preferences, here’s your playbook:
- Now, here’s where the fun begins. Summon the Run dialog by pressing the Windows key + R Key on your keyboard.
- In the Run dialog, type “sysdm.cpl” and hit Enter. Voila! The System Properties window magically appears.
- Next, select the drive you want for System Restore (usually C:) and hit the “Configure” button. In the System Protection settings, toggle the switch to “Turn on system protection”.
- If you’re particular about how much space System Restore occupies, adjust that slider. Once you’re satisfied, click “Apply” and then seal the deal with “OK”.

With these tricks up your sleeve, you’ll be activating System Restore and navigating System Properties like a seasoned techie. Time to stash those restore points and keep your system in tip-top shape!
# How To Create A Restore Point In Windows?
Creating a restore point in Windows is akin to taking a snapshot of your system’s current state—a handy fallback you can return to if things go haywire later on. Here’s your guide to creating a restore point:
- Let’s kick things off by pressing the Windows key + R on your keyboard. That will summon the Run dialog.
- In the Run dialog, type “sysdm.cpl” and hit Enter. Voila! You’re now in the System Properties area.
- Navigate to the “System Protection” tab—that’s where you want to be. Select the drive you’re working with (typically it’s the trusty C:) and hit the “Create” button.
- Feeling a bit creative? Give your restore point a name, if you’re inclined. Then click “Create”. Now, sit tight while Windows does its magic.

- Once it’s finished, you’ll receive the green light—a confirmation that your restore point is good to go.
Creating a restore point before making significant changes to your system—like installing new software or drivers—is like fastening your seatbelt before a rollercoaster ride. It’s all about that safety net, my friend. So, don’t skip this crucial step! Take proactive measures and ensure you have an easy way back to a stable system if the need arises.
# How To Perform System Restore In Windows To The Earlier Date Or Restore Point?
Performing a system restore in Windows is akin to rewinding the clock on your computer, taking it back to a time before everything went awry. Here’s how to make it happen:
- Open the System Properties window once more and head directly to the “System Protection” tab.
- Look for the “System Restore” button and give it a click.
- Boom! The System Restore wizard pops up. Hit “Next” to get started.
- Now, you’ll be presented with a list of available restore points, each with dates and descriptions. Choose the one that suits your needs and hit “Next” again.

- Quickly review the restore point details to ensure everything looks good, then confirm your selection by clicking “Finish”.

- Windows will prompt you for confirmation before proceeding. Give it the green light by clicking “Yes”.

- Your computer will perform a little dance with a restart and commence the system restore process. Simply follow any on-screen prompts that appear along the way.
- Once the dust settles and the restoration is complete, your computer will give itself another quick reboot, and Windows will notify you of the outcome.

Performing a system restore can be a lifesaver when faced with troublesome issues like software conflicts, system glitches, or performance troubles. It acts as a reliable troubleshooter, swooping in to return your system to its stable, happy state.
# How To Use System Restore When Our Windows Got Corrupted Or Not In Working State?
When your Windows system decides to throw a fit and refuses to cooperate, System Restore steps in as a digital superhero to save the day. Here’s how to harness its powers when things take a turn for the worse:
Using the Windows Recovery Environment (which automatically opens after an unsuccessful boot):
- If Windows keeps stumbling during boot-up, don’t panic—it might trigger the Windows Recovery Environment (WinRE) after a few failed attempts.
- Once in WinRE, navigate to “Troubleshoot” to access powerful troubleshooting options.
- Within the Troubleshoot menu, locate the lifesaver: “Advanced options”.
- There it is! Click on “System Restore” among the advanced options.

- Follow the on-screen prompts to select a restore point and initiate the restoration process.
Using Windows Installation Media:
- If WinRE seems elusive or fails to appear, don’t fret! Retrieve your reliable Windows installation USB drive.
- Insert the bootable USB drive into your computer and restart. To boot from the USB drive, you might need to enter the BIOS/UEFI settings and adjust the boot priority to USB. Alternatively, you can directly access the Boot Menu by tapping a specific startup key like F10 or F12.
- Once booted from the USB, select your language and keyboard preferences, then click “Next”.

- Skip the “Installing Windows” process and opt for “Repair your computer” instead.

- In the “Choose an option” menu, locate “Troubleshoot”.
- You’re back at the familiar crossroads of “Advanced options”.
- Click on “System Restore” within the advanced options menu.
- Simply follow the on-screen instructions to choose a restore point and initiate the restoration process.
With these techniques at your disposal, you can summon System Restore even when Windows decides to act up. It serves as your ultimate troubleshooter, ready to rescue your system from the brink of disaster. Just remember to select a restore point from before the chaos ensued for the smoothest journey back to stability.
# How To Use Undo Feature In System Restore?
Unlocking the potential of the “Undo” feature within System Restore is akin to having a fail-safe mechanism for your computer—a reliable parachute ready to soften the impact of any unintended changes. Here’s a step-by-step guide to harnessing its capabilities effectively:
- Access System Restore: Launch System Restore using any of the previously discussed methods—whether it’s via the Start menu search or navigating through System Properties.
- Select the Undo Option: Within the System Restore interface, locate the option to undo the most recent restoration, conveniently accompanied by timestamps for clarity.
- Initiate the Restoration: Once you’ve pinpointed the desired restore point for undoing, proceed by clicking “Next” to kick off the restoration process.

- Confirm the Restoration: Take a moment to review the restoration details before committing. Ensure that you’re rolling back to the correct configuration. Once satisfied, confirm your choice by clicking “Finish” to set the wheels in motion.
- Wait for Completion: System Restore springs into action, diligently rewinding your system to its previous state. Depending on the extent of the changes being undone, this operation may take some time, so exercise patience as it works its magic.
- Verify the Results: As the dust settles and your system reboots, it’s time for the moment of truth. Assess whether the problematic issues have been alleviated or if any unforeseen consequences have emerged in the process.
By leveraging the “Undo” functionality within System Restore, you gain the ability to effortlessly revert any modifications introduced by previous restoration actions. It serves as a safety net, allowing you to rectify missteps or troubleshoot unforeseen complications with ease. Just remember to proceed with caution, ensuring that you select the appropriate restore point before initiating the undo process. With this invaluable tool at your disposal, you hold the power to navigate through system changes with confidence and precision, safeguarding the stability and integrity of your computer environment.
# What To Do If System Restoration Won’t Works For You?
Encountering hiccups with System Restoration not cooperating as expected can really get under your skin, but fear not! There’s a bunch of tricks up our sleeves to tackle this pesky problem. Let’s dive into the troubleshooting arsenal:
- Free Up Disk Space: System Restoration needs elbow room on your disk to do its thing. If it’s feeling cramped, clear out the clutter or stash it on an external drive.
- Disable Antivirus Software: Sometimes, those protective antivirus programs can be a bit overzealous. Try switching them off temporarily and give System Restore another go.
- Try Safe Mode: Booting in Safe Mode can weed out any software conflicts that might be throwing System Restoration off-kilter. Restart your machine and hit F8 (or Shift + F8 for newer Windows versions) during startup to hop into Safe Mode.
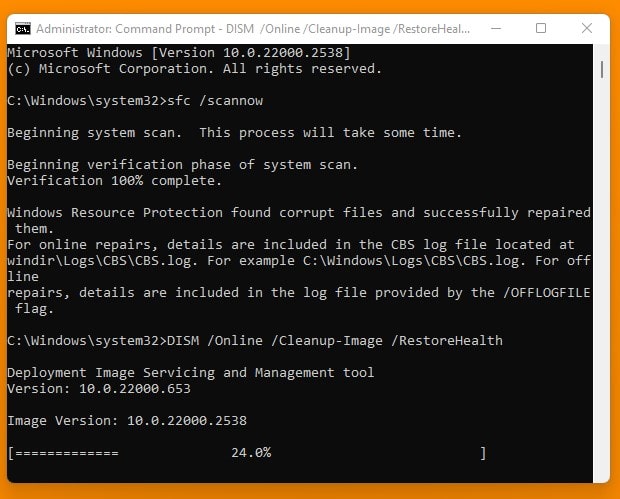
- Perform System File Checker (SFC) Scan: Let the System File Checker work its magic to fix any wonky system files. Open Command Prompt as an admin and type in sfc /scannow.

- Perform Deployment Image Servicing and Management (DISM) Scan: As for DISM, the process is quite similar. Again, open Command Prompt as an administrator and type “DISM /Online /Cleanup-Image /RestoreHealth” before hitting Enter.
- Check for Windows Updates: Keep your system fresh with the latest updates from Microsoft. They might just have the fix you need.
- Perform a Clean Boot: Now you’re going to temporarily shut down those pesky startup programs and services that might be causing trouble in paradise. First things first, you need to get into the System Configuration utility. Easy peasy, just type “msconfig” into your Start menu search and hit Enter. Once you’re in, head over to the “General” tab and pick “Selective startup”. Now, here’s the fun part: uncheck that box next to “Load startup items” to keep all the non-essential stuff from crashing your startup party. Also, move on to the services tab and then select “Hide all Microsoft services” and then click “Disable all” button. Once you’ve done that, hit “Apply” and then “OK” to lock in your changes. Now, all that’s left to do is give your computer a nice, refreshing restart. Voila! You’ve just given your system a sleeker, more efficient startup process that’ll help sniff out any performance or stability issues lurking in the shadows.


- Restore from Backup: When all else fails, go back in time. Restore your system from a previous backup using either backup and recovery software or Windows’ built-in tools.
- Check System Restore Service: Make sure the System Restore service is up and running smoothly. Open the Services tool by typing “services.msc” in the Start menu, locate the “Volume Shadow Copy” and “Microsoft Software Shadow Copy Provider” services, and ensure they are set to “Automatic” startup type and are running.

- Check Disk Errors: Scan and repair any drive errors. Open Command Prompt as an admin and run chkdsk /f /x /r.

- Perform a System Reset or Refresh: When all else fails, give your system a fresh start. Access this option from the “Recovery” section in Settings or through Windows Installation Media.
- Seek Professional Help: If you’ve hit a brick wall, it might be time to call in the cavalry. Reach out to a pro or contact Microsoft Support for that extra boost.
By working through these steps, you’ll be back to smooth sailing in no time, with System Restoration back on track and your system feeling stable and snappy again.
Conclusion
System Restore, a key feature of Microsoft Windows since its inception alongside Windows Me in 2000, serves as a vital lifeline during software mishaps, rescuing users from disasters and restoring system stability with precision. Seamlessly integrated into Windows, it awaits activation, offering intuitive usability and customizable scheduling options. However, it has limitations, such as potentially requiring reinstallation of certain applications and being powerless against hardware failures or malicious intrusions. Recognizing the differing needs of desktop and server environments, Microsoft has excluded System Restore from Windows Server editions. Beyond its surface-level functionality, System Restore involves compatibility considerations with third-party software and the rhythm of restore point creation. Accessible through various pathways, it allows users to create restore points, execute system restores, and undo unintended modifications effectively. Troubleshooting strategies range from disk space management to utilizing Safe Mode or seeking professional intervention. Ultimately, System Restore remains a reliable guardian in the dynamic digital landscape, offering users a means to navigate through software-induced woes and restore system stability with confidence.


