


 & HDD (Hard Disk Drive)?")


Let’s talk about RAM, the real MVP in your computer squad. RAM, or Random Access Memory, ain’t just another component; it’s like the turbocharger, revving up your computer’s performance. Imagine it as your computer’s personal workspace—where all the magic happens, apps run wild, and multitasking is the name of the game.
But, oh boy, when RAM goes haywire, it’s like chaos in the motherboard neighborhood. A bad RAM stick? Say hello to frequent crashes, bizarre errors, or worse, your computer giving up on life.
And the real kicker? Sometimes, RAM’s problems are ninja-level stealth—hiding inside, making your computer go bonkers without a visible clue. Unlike a cracked screen or a busted keyboard, RAM issues play hide-and-seek, making life hard for users dealing with a wonky system.
But hold up, don’t hit that panic button just yet! I’ve got a wild yet surprisingly effective trick up my sleeve to maybe bring that faulty RAM stick back to life in just 10 minutes. It involves something unexpected—your good ol’ household oven. Yep, you heard me right.
The idea is to give that RAM stick a controlled heat treatment. By doing so, we’re aiming to kickstart a ‘Reflow Process’ that might just patch up any wonky solder joints on the Printed Circuit Board (PCB) and fix up any busted connections inside the RAM module. Wild, huh?
So, if you’re feeling adventurous and your computer’s not playing nice, grab that oven mitt and let’s give this a whirl. But hey, remember, this ain’t your typical recipe—proceed with caution and at your own risk. Cheers to tech wizardry and maybe resurrecting that RAM stick of yours!
# How Reflow Can Help?
You know how manufacturers stick electronic stuff onto circuit boards? They use this special heating process called reflow soldering. It’s like making the components stick by melting a metal paste (solder) with high heat until it becomes liquid and then solid again, forming secure connections.
But guess what? Our method here is like a homemade version of that. Instead of fancy machines, we’re using an oven to heat up the circuit board, focusing on the solder under the RAM chips, at around 200 degrees Celsius. This helps fix any broken connections in the RAM by melting the solder and letting it reconnect the bits that got messed up.
I tried this weird baking trick on a busted RAM stick, and surprisingly, it worked! The RAM kept working fine for a good 8 months after I baked it. Shocking, right?
Note: Hold up before you go on a baking spree with your RAM! If your RAM’s still under warranty, don’t tinker with it yourself. Take that RAM out of your computer and hit up the manufacturer’s service center or get in touch with their customer care for some help. Most RAM sticks come with at least a 3-year warranty, and you definitely don’t want to mess that up. Stick with the pros and keep that warranty intact!
So, Let’s See How To Fix A RAM Stick
Before diving into anything big, try giving your RAM a good clean and putting it back in your computer. Sometimes, it’s the little things like dirt or gunk on the connections that mess things up. A thorough cleaning might just do the trick without needing to bake it in the oven.
Cleaning a RAM stick needs to be done right, though. There’s a proper way to do it to avoid making things worse. If you’re not sure how to do it, check out this tutorial on cleaning a RAM stick. Here’s the link: “RAM Cleaning – One Solution To Fix Memory Related Problems” It’ll guide you through the steps!
I’ve got a problem with two RAM sticks that don’t seem to work at all. Every time I try putting either of them into my computer, it refuses to start and just shows a black screen. So, I’m thinking of trying to fix at least one of these RAM sticks to see if I can get it working again.
- Initial setup: Begin by preheating your oven to a minimum temperature of 150°C for 3-5 minutes. Ensure that you’re not utilizing a microwave oven, as it can potentially harm the printed circuit board of your RAM, thereby exacerbating the issue.
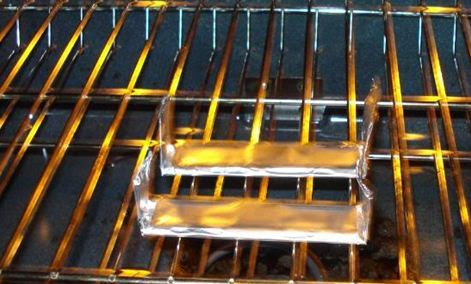
- Preparation: While the oven is preheating, procure two 10-inch foil papers. Position each RAM module on the edge of separate foil papers and tightly wrap them. Ensure the remaining space is folded into upward flaps.

- Repair process: Assuming the oven is adequately preheated, proceed to insert your RAM Stick directly into the oven. Set the timer for approximately 2 minutes at 200°C. After the initial 2 minutes, increase the heat to 230°C for an additional 2 more minutes.
- Allowing cooling time: Post 4 minutes of baking, avoid hastily removing the RAM from the Oven. Instead, open the Oven door and permit it to cool down for a brief period.
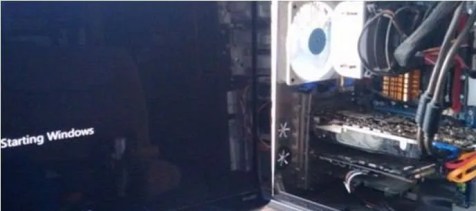
- Verification: Subsequently, open your computer’s case and reinstall the RAM into its designated slot. Proceed to initiate your computer. If the computer starts up seamlessly, it indicates a successful repair of your RAM Stick, resulting in significant cost savings.
If not, then here are some suggested articles:
- RAM Stick Buying Guide For Laptop & Desktop Computer?
- How Much RAM Do I Need?
- RAM Compatibility With Motherboard: Identifying Supported/Installed Types
- Ram Upgrade – Why, How, and How Much?
- Top & Best RAM Available For Laptop And Desktop – Recently Updated


I wanted to thank you for this excellent help!!
I cant believe it worked! But i did it in 200° celcius for 5 minutes. Thank u!
Does it actually work tho?
Most of the times.
Didn’t work for me… too bad.
I hope my laptop has no developed serious problem..I’m have d same problem with my system..I have tired everything possible.
What will I do now..plz reply
It ducking worked like a charm. I can’t believe…
Wow man this is awesome i really struggled man but it did work .it works it works it work dnt waste ur money
Is it safe to put ram with foil in oven
yes, but only when your ram is dead.
That’s the reason why we do that>> http://www.deskdecode.com/reflow/
Can i try this with microwave oven?
no!!!
Which oven work good for this tips?
Non-microwave oven
that’s good
i will try it too
Can i do this for my motherboard? considering without processor and anything except motherboard
of course yes you can,
http://www.deskdecode.com/reflow/
This is NOT a joke as it may seem at first!!
My 8gb ram stick died and I followed these steps and it incredibly WORKED
THANK YOU SO MUCH
please make video
I will. 🙂
Mine is work ..what next
I actually didn’t get your problem. So, can you describe it a little bit more?
Where is the vid? Please. I’m begging this is my last hope. 🙏🙏🙏🙏
Sorry, but I don’t have any video about it right now.
Please make a video.i’ve already spent more money by upgrading my system.and now i’m in a big trouble ,my new 8gb ram stick dead,so I have to fix it before my dad sees.i beg u pls help me
If it’s new, why don’t you call the manufacture’s service center.
It FreaKen Worked! You’re A Dark Wizard My Friend!
ha ha, thanks man.
Thankss man … It works perfectly بفضل لله 😀😀😀
thanks man…i will try
What if it doesn’t work?
Just buy a New One.
can i use this on a daily use oven or an abandon one
just use any kind of oven, but make sure you don’t use any microwave.
what kind of oven do i use tho the used one in the kitchen or the abandon one but still kicking ??? answer so i can do it now
just use any kind of oven, but make sure you don’t use any microwave.
Im seeing a lot of people worried about the metal contamination, how was your experience around this, and would it be wise to use a toaster oven instead?
Toaster oven is good and read this.
https://www.deskdecode.com/reflow/
So you can bake a RAM even with its heatsink/heatspreader still attached?
Yes, of course.
Thank you so much !!! Madhur Tj it really brings life to my Kingston Hyperx black …
Hi, Mr. Madhur? Man, You are very technical and hot, i love your skills. You can’t imagine you have pinned my heart so hard. I love you very much, may God bless you soo much.
thank you for sharing this…:)
How about using hot air blower? Can it works? Thanks
no
sir whats your contact no…?
Thought this was a joke when I first saw it but man, I cant believe it worked! Read your article on reflow but still, dude, that was true insight to be able to apply the concept to your oven at home. Anyway thank you so much, it helped me revive my dead RAM (laptop RAM btw – for anyone who wants to know).
Thanks again!
I am getting blue screen memory dump error and pc reboots after installing new ram. can i fix it by using the same method?
No, it’s only applicable to the dead ram
Does it really works? I’m afraid to test it but I will….. Thanks for the tip!
Awesome Technic..Mr Madhur .. Its working properly. After bake the RAM , when I see the booting screen on my screen, I laughed as lunatic.
(Thinking.. wonderful..)
I’m also an IT Professional in Defence Forces …
But this …technic.. is… awesome.
Thank you.
my oven toaster is no temperature control,
only timer control.
this is ok?
or i need to use oven with temperature control???
please answer
thankss…
Only use oven with temperature control.
Hi,do you refer to aluminium foil?
Yes.
sir i dont have microwave oven ….which is more preferable oven toaster or soldering air gun?
The toaster oven is good.
Can you Bake Rams With Heatspreaders like Corsairs LPX ddr4?
Yes.
my ram is functional at the moment but sometimes get bsod. memtest test gives quite a few errors so guessing faulty ram ? or not?
Error simple means faulty. 🙂
Hi Madhur, I recently upgraded my pc having 4gb RAM with an additional 4gb RAM with 64bit OS. It worked fine for 4 days. then the old ram got faulty. I tested in both the slots but didnt work. I tried the OVEN method yet it didnt work. is it a case of incompatibility. Can this RAM be repaired or should i go for a new one
I think it’s time for the new one.
Hi, Can I use a blower instead?
Yes, but at very low air speed.
sorry, but enough with the sticks, you know the definition of sticks, it is not a computer ram card ,or module
I currently have a Toaster Oven, without any temperature control. Only timer control, is their anyway that I can try to heat my RAM using just this toaster oven? Like set the time to and such.
No, you can’t use that.
Please, can I use the method on RAM with heatskinks?
No, remove the heatsink first.
I put my ram, wrapped in two layers of paper towel, in the toaster oven, @ 175 deg F, for 30 minutes, to get rid of any moisture, then I just used my hot air gun on high in circular motion, around the chips, for about 10 seconds per chip. Don’t know if that was too high, or too long. Afterwards, I put back in the toaster oven, @ 150 deg F, for 10 minutes, and it works like a charm. No more vibrations crashing my laptop, after 5 minutes of playing a game, or Youtube.
I know that a more permanent fix, is to add flux afterwards, but I’ve never used flux. Can it just be sprayed on?
Also, only use your oven, if you never plan on eating out of it, for a while, and a couple heat ups afterwards, to clean it.
I only used my toaster oven to preheat, and for the cooling down process. There’s should not be hardly any flux, or residue. Nevertheless, It would be a good idea to heat up the oven afterwards, and allow it to air out.
Always preheat, and cool down. Also, must not allow any vibrations after the reflow to the oven, to cool down.
I think the pros use two spare toaster ovens. one for preheating and cooling down, and the other for reflow.
I have an 8gb Ballistix sport LT ddr4. Do I need to remove the heatsink before doing the reflow process or is it ok to put the heatsink in the oven with the ram?
It is very good post on repairing dead RAM because everyone has computer and this information is very helpful to repair our dead RAM.
There was a time when most of the people used to think that if the ram is not working then the whole system is not going to work and this is still relevant. In this context I want to say that by now we can fix or repair a dead ram and will continue the use of the system.
The dead RAM sticks can be repaired by the method post has given and this can be applied by those who are working in the hardware field and learning about the methods of the hardware repairing.
Good steps mention in this post to Repair a Dead Memory Stick. thanks for sharing this post. it helps the user to repair dead memory stick.
You really described in detail to repair a dead RAM stick. I applied all these steps and successfully resolved this issue. Thanks.
If you are feeling that your laptop RAM is going to be dead and it need an upgrade then try to update the system first. It may solve the RAM issues. But if it does not work, then remove the RAM and replace it with a new one.
Hello brother, my laptop uses 2 rams of 2gb each. Last week I went to a technician he removed one of the upper sticks and cleared it with an eraser and placed it back. The system worked fine till now. But again when I am booting up the windows, the leds blink up and go off within a few seconds. Should I try to clean the second stick also or should I try your method. Also can you please tell me how to chevk whether the ram is dead. Thanks.
Try it clean both of the RAMs and then test it.
https://www.deskdecode.com/how-to-clean-a-ram-stick/
https://www.deskdecode.com/ram-test-how-to-test-pc-ram-working-properly-or-not/
can I use a heat gun?
No.
It wont to work this is a really shit !!!!!!
This fixed my ram but my pc now only recognise one of the two. Both are working just fine alone.
I bought a pair of DDR3 ram off of EBay and was disappointing that one of the sticks was bad. There was no return and I thought I was out $50. I tried the oven trick on the bad stick and it worked!! Thanks 100x man you are a genius!
Would it work in a hot cup of tea?
Surely after the oven. 🙂
One of my two ram sticks did not show up, I isolated the broken one, didn’t boot. I tried your method and it didn’t work. I understand why it should work and I read that IC’s can sustain damage over 250 celcious so I cooked at 220 celcious for 10 minutes.
And to my absolute surprise it boots, fantastic article giving me the spark to do this.
But I think I may have damaged it, my PC is really slow with high CPU use and lag for no obvious reason, currently running memtest86+ but I don’t understand how technically it is causing performance issues with no other serious issues, hopefully I can resolve it.
Maybe you have any suggestions?
Try to run the os in ‘Safe Mode’.
Hehe i dont have oven or anything to bake it Looks like frypan would work for me .
NO
Can I add salt and pepper? What about some onions and carrots?
Do I need to remove the outer plastic casing on Corsair vengance
Yes.
didn’t believe at the first place but yes it worked ….You saved me at least 80$.. thank you …
I had a faulty DDR3 stick. It gave me random reboot loops after powerup and blue screens. It couldnot handle the overclock. It’s been sitting in 1st slot next to CPU for 7-8 years.
I thought it degraded beause of CPU heat. But who woulde have been thought that it needs MORE HEAT to get fixed. IT WORKS.
Holy f*ck this actually worked! I had a faulty stick that was laying on my table for half a year, tried this and it’s working!!!!!! Thank you so much, you saved me 70 bucks!
Good to know, it works for you.
Bruh thanks for telling me to try and clean it 1st. I had 8gp stick laying around for a year under my bed that wasnt working i just cleaned it and now it’s working lmao. Ty
dear si yesteray im replaced the ram in my pc ..pc is oning but no showing the display
Try to use some different RAM on your motherboard, just for the testing purpose.
Do you have to remove the heat sink ?
Yes
It worked on a Mac Pro 3.1, incredible. I tried once placing the Motherboard of a Power G5 in the oven, but it didn’t work. Now, surprise…it worked.
Can we use an open fire
no
I would also like to thank you! I had nothing to lose: one of my 2 Corsair DDR2 RAM sticks caused my PC not to start, and Corsair told me that they would love to help me, but they no longer make DDR2 RAM. I love my PC that I built in 2008 — it’s totally still what I want and need, and I don’t want anything newer. I had already decided to buy a GSkill replacement RAM stick but thought I’d give your method a try.
I honestly didn’t think it would work. But: I baked it for 2 minutes on 400°F, left it inside while raising the heat to 450°F and then timed 2 more minutes. After letting it cool down, I put it into the 2nd RAM slot. And was super excited when I turned it on and heard the beep and then saw the POST running on my screen. Yeah! Thank you so much!!
I have to write an update – sadly the revived RAM stick only worked for a few more minutes after I’ve finished writing my previous comment. 🙁 Too bad. Off to buy some new sticks. Thanks anyway, Madhur, for letting me learn about reflowing. 🙂
Holly shit . This method is really work. At the first place i thought it was a joke
But by anyway my Ram was pass away , so I decided put it in my Airfrier . Maximum is only 200•c .
Firstly, i tried 200•c – yeah its a joke
Secondly, i tried 200•c -wait A moment its boot my pc up .myy man its incredible. But after that when i shut it down and turn it up I totally blank black screen.
3rd , 200•c 15minutes . Now its live long life .
OMG thank you so much, it worked!
Just a reminder: check if your RAM module has lifetime warranty and just ask for a free replacement (you’ll only pay return) before you try this
Hello, can I use Air Fryer instead?
Hi sir. Can I do this on RAM that makes my computer turn on and off repeatedly. This RAM is new but without warranty
Wow there are some really stupid people out there. I cant believe some guy asked if he could do this in a microwave. Lmfao what an idiot! Btw, great advice. I actually alrwady knew this trick from way back in the day. As well as putting hard drives in the freezer for a temporary fix. I just started cracking up when a guy asked about the microwave and your reply was, “NO!”
Also a heat gun just might work if it is done correctly. I wouldnt trust an average joe to do it, but im sure i could pull it off.
work soo good bro keep it up
i have Corsair vengance and it didn’t work.
I have a laptop Asus and 1module of ram had many errors, i scaned it with memtest. i made the reflow following this tutorial and once i put the memory back to the laptop and tested, the laptop doesn’t turn on again, then i tried whit another module that was working well and laptop still doesn’t turn on, i think my mother board gets damaged because of the ram which i made the reflow.
can i use a pressure cooker with foil paper and preheat?