


 & HDD (Hard Disk Drive)?")


Booting is the first operation done by your computer’s “Bootloader” to starts itself. It tends to be started by pressing the power button, or you can do it by the software command also.
At the point when a PC is turned off, all its user’s softwares – like Operating System, working frameworks, application code, and data – remains stored on the non-volatile memory of your computer system.
Mainly, your PC’s BIOS executes a bit of coded program from “Bootloader” (which is already stored in the first block of the bootable medium) to the computer’s memory, along with some required information. Just to let the RAM know to access the nonvolatile devices (like, HDD, SSD, or a Flash Drive) from which the data can be loaded.
Mainly, in computer language “Boot” means Startup;
On the other hand, “Boot Sequence”, “Boot Order” or you can say “Boot Priority” is a set of instructions saved in the BIOS memory – which can be configured as required – to boot the selected hardware.
Normally you don’t need to change this setting until you are using a Bootable CD, DVD or USB Drive to install an Operating System, or to boot a Bootable Utility Tools, or maybe wanted to run a Live Operating System on your computer.
What is Boot, Booting and Bootable Devices?
In a general language, bootstrapping mainly refer to a self-starting process of your computer which doesn’t need any external input command to perform itself. So, in technical language people starts to use the word called booting for… Read More

#Let’s See How to Manage the Boot Setting;
Changing the configuration requires you to open the “BIOS Menu“ first. To do that, make sure you press the designated BIOS key set by your computer’s manufacture which could be anything between ‘Esc to F12’, or maybe the ‘Delete’ key.
If you’re lucky the BIOS key can be visible on the first boot screen of your computer;

Mostly it’s the F1, F2, or DEL Key, but;
Here’s the list of designated Keys according to different PC brands:
- ASUS: F2 or DEL
- Acer: F2 or DEL
- Dell: F2 or F12
- Gigabyte: F2 or DEL
- HP: F10
- Lenovo (Laptops): F2 or Fn + F2
- Lenovo (Desktops): F1
- Lenovo (ThinkPad): Enter then F1.
- MSI: DEL
- Samsung: F2
- Toshiba: F2
If these suggested keys won’t work, you can surely take some help from the user manual or search the internet.

You also have to make sure that you press the BIOS key right after when the power button is pressed.
Or otherwise, the Bootloader will load the predefined boot configuration. Sometimes it is possible that pressing the key a single time won’t work for you. In that case, pressing it multiple times works like a charm.
If your screen looks similar to the picture given below. Congratulation, you’ve successfully opened the BIOS menu of your computer.
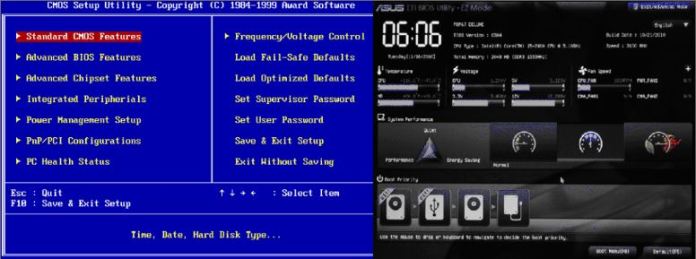
Now as you can see in the above-given picture, there are two types of BIOS menus. The first one is just the normal ‘BIOS Menu’ (which can be seen on the older desktop or laptops) and the other one is ‘UEFI BIOS Menu’ (which is standard nowadays). Functionality, adaptability, and speed are the three major differences between these two.

Here’s a suggested link ‘Boot Setting for old BIOS’ if you have the older one on your computer. Or otherwise, just continue;
#So, What to do next? 🤔
After getting into the menu, now look for title headings such as boot option or boot sequence. Often the setting can be found under the “Boot Options”, but sometimes it tends to be under the “BIOS Features”.
Each brand UEFI BIOS is different, you’ll have to dig into the whole menu to find the correct configuration options that you’re looking for.

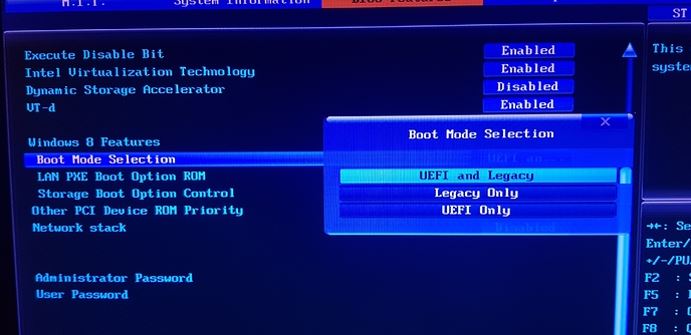
Here’s another example picture;
But before touching that setting, make sure that the ‘Boot Mode configuration’ is configured correctly.
‘Boot Mode configuration’, ‘Storage Boot Mode Option Control’, ‘Boot Option Priorities’ or whatever it calls on that Boot menu page, it surely needs to be set according to the operating system you are trying to install. Changing the boot mode can impact the ability of the computer to boot to the installed operating system.
Generally, you set the boot mode configuration just for once, prior to introducing your computer to a new operating system. If you try to change the boot mode option after the installation, then your computer can’t be able to load the OS for you.
Both boot sequence and boot mode options can be found on the same page, but it’s crucial to check the boot mode setting first.
In the boot mode, there are three options to choose from:
- Legacy Boot Mode: As its name indicates, is a sort of old-style boot mode. It was commonly used in computer systems before Windows 8 was introduced. It claims great compatibility and can be utilized on both 32-bit and 64-bit systems. It can support up to four primary partitions, but it can’t be able to support disks beyond 2 TB. Nowadays the setting can be only useful on old operating systems, as some hardware (like GTX660), OS (like XP), and some bootable softwares (like Live OS, Data Recovery, etc.) supports Legacy mode only.
- UEFI Boot Mode: UEFI is the perfect replacement to Legacy and presently it’s the standard boot mode configured by default. As compared to the Legacy mode, UEFI has better programmability, more prominent versatility, better and higher security. It supports up to 128 primary partitions. It breaks the disk size limitation of 2TB and supports up to 18EB. UEFI offers a secure boot option to prevent viruses from loading while booting. Windows starts to uphold UEFI from Windows 7 and Windows 8 begins to utilize UEFI by default. And you know, to install Windows 11 on your PC, UEFI is required to offer enhanced security.
- UEFI + Legacy Boot Mode: Not every UEFI BIOS has this option, but you’ll find it in most of the latest motherboards. This particular setting allows the computer to switch between Legacy or UEFI mode as per their needs. At the point when the BIOS detects something introduced under Legacy, it will begin the Legacy boot mode. In the same way, if it detects something introduced under UEFI, it will begin the UEFI boot mode as well.
After when you get done with the boot configuration, then it’s the time when you should move to the next crucial setting called boot sequence.
Setting up the boot priority is simple;
You’ll just have to put that device on 1st boot option that you want to boot from, and your system will boot that particular device first when every time it starts itself.
Mainly the primary storage drive is set by default in the first place, but you can change it though for any other type of installation or external software uses.
Suppose you have a bootable flash drive that has ‘Windows Installation Setup’ in it. So, you need to put that ‘Removal device’ on the 1st Boot Option and your Hard drive or SSD on the 2nd. Then it will automatically boot the OS setup on the next startup so you can install it nicely without even having any trouble.
Also make sure to put the primary storage drive back on its first option, just to make sure that the boot process becomes faster. Or otherwise, the system will try to boot the flash drive first – even if that drive is not connected – and then boot the HDD/SSD.
You know, you can directly open the Boot Menu on the first screen of your computer. It can be used if you only wanted to boot something once for any kind of installation or executing software.
How to Quick Boot A USB or CD/DVD Directly from the Boot Menu?
By using the Boot Menu, booting actually made easy for you. i’m saying this becasue with the help of this BIOS Shortcut tool you really don’t need to make those Boot Sequence changes in order to boot snything… Read More

#What To Do, If You’re Having Some Trouble While Booting Something;
- BIOS is not saving my preference setting: In that case, it is a possibility that your BIOS CMOS Battery is Dead, which is responsible for powering the BIOS Chip because of its volatile memory nature. To confirm that, make sure your computer’s clock is running correctly.
CMOS Battery – Everything You Need to Know, and How to Replace It
A computer whether it is a laptop or a desktop has a Motherboard where a small amount of memory known as CMOS (complementary metal-oxide-semiconductor) stores the BIOS settings.. Read More
- Flash Drive isn’t able to boot: It’s conceivable that the software you use to make your drive bootable isn’t working with the adaptation of BIOS that your PC has. You can try to use some different boot transfer software like Rufus, Yumi, or WinToFlash and it will work for you.
How To Make Bootable USB Flash Drive – Explained
Nowadays USB drivers are actually quite famous for the booting purpose, even Microsoft is supplying the pre-installed live Windows 10 OS into the USB which you can boot on any computer… Read More

Also, there is a possibility that your computer is assuming your flash drive as a hard drive and not booting it because the first boot option is set to the ‘Removable Storage’ and the 2nd one is for HDD/SSD. In that case, you need to put the hard drive on the first boot option and change the hard drive sequence in the ‘Hard Drive Priorities’.

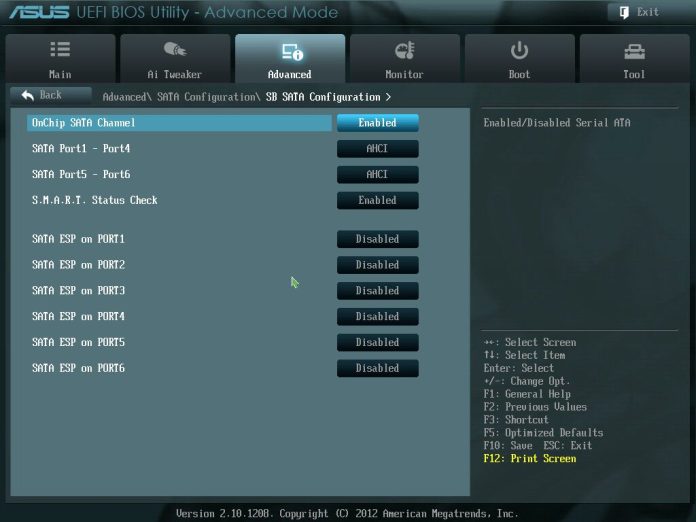
- If HDD/SSD/Optical Drive Not Found in BIOS: Checking the SATA Ports are Enabled in the ‘BIOS’s Advance Options’ is the first thing you need to do. Otherwise, checking the SATA/IDE cable connection can help. You can try to unplug and plug the SATA cable back, but using a new one can make sure things are better. Usually, laptops don’t use any SATA or IDE Cable, using a different storage drive can help to find the fault easily.
Suggested Links:
- How to Change HDD, SSD, and Optical Drive’s SATA Or IDE Cable?
- Old/New HDD Not Recognized or Showing up by Computer or Laptop
- Fix for – Old/New SSD Not Recognized or Showing up by Computer or Laptop
“And that’s all for now, thanks for sticking with the article, and you know it will always be good to let me know about the tutorial in the comment box down below.”


