


 & HDD (Hard Disk Drive)?")


Ah, the DPI, the superstar of document scanning! It’s like the megapixels of the scanning world, making everything sharp and clear. Let’s unravel this tech gem without diving into the deep-end tech jargon, shall we? Think of DPI as the magic wand that maintains all the nitty-gritty details when you scan stuff.
Choosing the right DPI is like finding the perfect seasoning for your dish—it’s crucial for that top-notch scan quality. Once you grasp DPI’s mojo, you’re in control, making savvy scanning choices and crafting top-notch digitized documents and photos. Let’s geek out on this scanner sorcery without getting lost in the labyrinth of tech talk, empowering you to wield the scanning magic like a pro!
Understanding DPI Resolution
DPI, which stands for dots per inch, is all about how packed those dots are in just one inch. This directly affects how detailed and clear your scanned images will turn out. Getting a grip on this basic idea helps you understand how changing DPI settings can affect what you scan.
Now, when it comes to scanning documents versus photos, there’s a bit of a tug-of-war with DPI. Documents usually do okay with a lower DPI to keep them readable and the file sizes manageable. But hey, photos are pickier; they often need a higher DPI to keep all those tiny details looking sharp and crisp.
Factors Influencing DPI Selection
The intricate dance of DPI selection—a waltz between resolution and practicality!
Selecting the perfect dots per inch (DPI) resolution for scanning documents and photos is akin to crafting a gourmet dish—tailored to individual tastes. Here, we dissect the multifaceted forces influencing DPI selection, guiding you toward scanning nirvana.
Purpose of Scanning: Ah, the raison d’être! The intended use of your scanned goodies wields substantial power over DPI selection. Text-based documents for archival or optical character recognition (OCR) purposes? A modest DPI (300-600) will do, sparing you colossal file sizes while ensuring clear readability. However, if you’re chasing high-quality prints or intricate digital reproductions, buckle up for a higher DPI (think 1200 or more) to preserve those fine details. if mixing things up? Text, illustrations, and images mingling together call for a balancing act. Hitting that DPI sweet spot—somewhere between 600-900—keeps text clear and visuals detailed. 
Type and Quality of Content: It’s a wild jungle out there! Simple text docs can laze about with lower DPI settings, but oh, the complex illustrations, graphs, or mixed media? They demand higher DPI to seize every intricate detail. And let’s not forget the nuances—color depth, graininess, and texture. They all nudge the ideal DPI, making adjustments a necessity to keep that quality top-notch.
Output Size Requirements: Size does matter! Your final output—whether for printing, digital displays, or online sharing—holds the DPI reins. Larger prints or high-res displays? Cue the higher DPI for that sharpness and clarity. But if it’s a snug fit for a smaller canvas or web usage, lower DPI might just do the trick without sacrificing visual oomph.
Scanner Capabilities and Limitations: Know Your Scanner! Older or less savvy scanners might throw a wrench in your DPI dreams, limiting those sky-high settings. Understanding your scanner’s capabilities shapes realistic DPI goals. After all, you don’t ask a tortoise to sprint like a cheetah!
Balancing these factors is akin to a high-stakes juggling act. It’s the art of compromising between image quality and file sizes. Users must weigh their scanning needs, finding harmony between clarity and storage space.
DPI Vs. Scanning Speed
Let’s delve into the intriguing relationship between DPI (dots per inch) and scanning speed, shall we? This connection is key for those looking to streamline their scanning workflows efficiently. Brace yourselves for a rollercoaster ride of tech tidbits!
The DPI settings directly wield their influence on the time taken for a scan, significantly affecting productivity and resource allocation.
When you crank up the DPI, you’re essentially telling the scanner, “Hey, capture and process more data, will ya?” Consequently, higher DPI settings often mean slower scanning speeds. Imagine this: scanning at a jaw-dropping 1200 DPI versus a modest 300 DPI. The scanner works four times as hard, grabbing four times more data per inch and thus stretching out the scanning time.
But fear not, fellow scanner aficionados! Advanced scanners armed with top-notch hardware and software have mastered the art of handling higher DPI settings with finesse. This minimizes the usual tug-of-war between quality and speed. Modern scanners are generous enough to offer adjustable DPI settings, letting users fine-tune the resolution according to their whims without sacrificing speed too much.
Now, here’s the tricky part: finding the perfect equilibrium between DPI and scanning speed. Picture this dilemma: a time-sensitive project looms large, demanding speedy scans. Your best bet? Opt for lower DPI settings to zoom through the process, even if it means sacrificing a tad bit of resolution. On the flip side, projects yearning for high-quality, detailed scans might throw a tantrum if you skimp on DPI, despite the scanner taking its sweet time.
Let’s Not Forget About The Interpolated DPI Resolution
Interpolated DPI is like a magician waving a wand to make your image seem sharper than what your scanner’s lenses can capture naturally. It’s the digital hocus-pocus, where software algorithms work their magic to beef up an image’s apparent detail beyond what the hardware can handle.
Imagine your scanner boasts a slick 1200 DPI optical resolution, but then, surprise! It flaunts an ‘interpolated’ 19000 DPI. Hold your horses though, because it’s not a guarantee of top-notch quality. Nope, it’s more like a pixel party thrown by software, often resulting in an enlarged file with little genuine detail boost.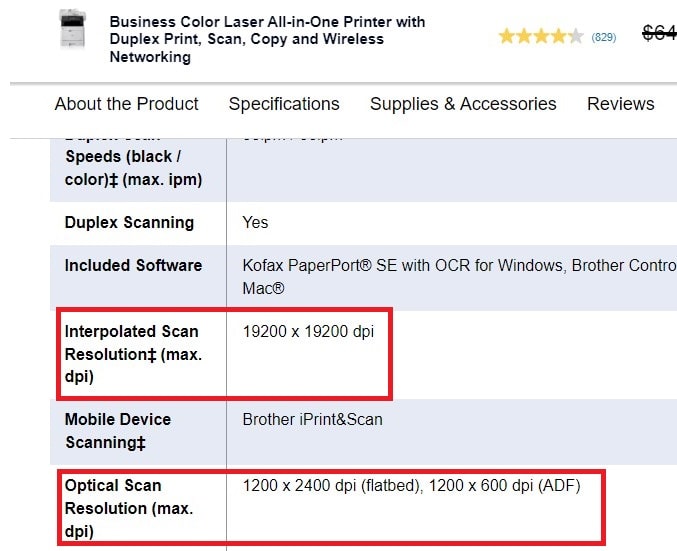
Sure, it’s handy when you need bigger files or want to give the impression of a higher-res scan. But here’s the catch: it’s not the real deal. Think of it as wearing fancy glasses that make things look crisper, but in reality, they’re just for show.
Beware, fellow scanners! Don’t be hoodwinked by the siren call of interpolated DPI. It might bulk up your files without beefing up actual image quality. Know the differences between optical and interpolated DPI settings! One’s the real deal, and the other’s just a pixelated illusion.
Knowing the ins and outs of interpolated DPI arms you with the power to separate the wheat from the chaff, the real resolution from the digital fluff, in the scanning world. Stay savvy, tech amigos!
What’s Scanner DPI? – Optical Resolution Vs. Interpolated Resolution
Optical Resolution? That’s the real deal, my friend. It’s all about a scanner’s hardware prowess, making sure every tiny detail gets captured. But hold your horses! Interpolated Resolution swoops in, digitally sprucing up those scanned images and offering size upgrades. But beware, sometimes… Read More

Adjusting DPI for High-Quality Scans
Getting those crisp, high-quality scans isn’t just about hitting the ‘scan’ button. Tinkering with those dots per inch (DPI) settings is like adding the perfect seasoning to your scans for that extra oomph. We’ve got two main scanner types in the ring: the flatbed champs and the sheet-fed contenders.
For Flatbed Scanners:
- Fire up the scanning preferences on your computer—the control panel for your scanning kitchen.

- Just go to the “Control Panel” and look around for “Devices and Printers”. Now under that category, just right click on the printer or the scanner that you currently need to scan with and click on the option called “Scan Settings”, “Scan Properties” or “Advanced Scan Options”. They’re the secret ingredients you’re after for.
- Hunt down the DPI settings, sometimes lurking under labels like “Resolution” or “Scan Quality”.

- Now, the fun part – tweak the DPI value. Choose from the pre-set options (300, 600, 1200) or cook up your custom DPI blend.
- Save those changes, and you’re done!
For Sheet-fed Scanners:
Now, onto the sheet-fed scanners – Just follow steps similar to the flatbed scanner method, but keep an eye out for an option called “Documents Source” and select the “ADF”, instead of “Scanner Glass” and then adjust the dpi resolution according to your needs.
Remember, the key to mastering DPI settings is like being a chef – experiment, taste-test (well, in this case, scan-test), and find what suits your palate (uh, scanning needs).

Conclusion
Selecting the right DPI (dots per inch) resolution is pivotal in achieving optimal results when scanning documents and photos. Understanding the nuanced relationship between DPI settings and various scanning purposes ensures clarity, readability, and image quality. By balancing factors like document type, intended use, and scanner capabilities, users can make informed decisions. Experimentation with DPI settings while considering trade-offs empowers individuals to achieve the desired quality without compromising efficiency or storage space.
Suggested Articles:
- What is Printhead on Printers & Why It’s So Important for Printing?
- What is A Duplex Printer — Double Sided Printer?
- 4 Ways To Know If Your Printer Supports Duplex Printing Feature
- Difference Between in PPM and IPM Print Speed – Pages Per Minute Vs. Images Per Minute
- What’s the Difference Between Toner vs Ink Cartridges – Explained

