


 & HDD (Hard Disk Drive)?")


Whether you’ve just signed up for a new broadband service and want to set up your modem without dealing with those hefty installation fees or you’re thinking about getting a new router modem to upgrade your current connection and want to handle the installation yourself, you’re in the right spot. Don’t worry – this guide is here to help you breeze through setting up your modem, so you can quickly get back to enjoying your internet without burning a hole in your wallet.
In the upcoming steps, I’ll guide you through the simple process of configuring your modem, unraveling any complexities that might have seemed overwhelming at first. By the end of this guide, you’ll have the knowledge and confidence to manage the setup on your own, giving you the power to take charge of your network.
So, Let’s See How to Do It;
First things first, you’ll want to gather up all the gear you need to make sure your connection is top-notch and trouble-free. Having everything ready to go will make setting up a breeze.
Here’s the lowdown on what you’ll need:
- Phone Line Splitter (Optional, depending on your connection needs): If your broadband setup involves a phone connection, you might need one of these. But if your connection is all about the internet and doesn’t bother with phones, you can skip this one.
- Phone Line Filter (Optional): This one’s up to you and your specific setup. A phone line filter can help cut down on interference, giving you a cleaner signal for both your phone and modem. Figure out if your setup calls for one.
- Two/Three RJ-11 Cables (Length as per your setup): These cables are the lifeline connecting your modem to the phone line. Grab as many as you need based on your setup, and make sure they’re long enough to span the distance between your modem and the phone jack.
- One/Two RJ-45 Cable(s): These are the MVPs for connecting your modem to other devices like computers or routers. Depending on your setup, snag at least one RJ-45 cable to link up your modem with the devices of your choice.
- Modem (ADSL or ADSL + Wi-Fi Router): The star of the show is your modem. You can go for a standalone ADSL modem or one with a built-in Wi-Fi router depending on what floats your tech boat. Just make sure you’ve got the right model ready to roll.
With this gear lineup, you’ll be all set to dive into the modem setup. It’s all about making the process a piece of cake and ensuring your internet connection gets up and running without a hitch. Happy configuring!
Alright, now that you’ve got all your gear ready, let’s break down the setup process step by step:
Step 1: Plug in the Phone Line Splitter Start by plugging the phone line splitter into your broadband line, the one that goes straight to your Internet Service Provider (ISP). This little gadget splits the main line, so you can use both your telephone and your modem. If you’re not into Voice over Internet Protocol (VoIP), you can skip the splitter.
Step 2: Connect the Cables Grab an RJ-11 cable and connect one end to the splitter or main line, and the other end goes into your modem. Do the same for your telephone. If there’s some funky noise during calls, think about tossing in a ‘Phone Line Filter’ to up your voice quality game.
Step 3: Link Up Your Devices Now, take an RJ-45 cable and connect one end to the modem and the other end to your computer. This is the data highway between your computer and the modem. If your ISP only hooked you up with a modem but you’re dreaming of wireless internet, throw in a WiFi Router. Connect the router to the modem and your computer to the router using an extra RJ-45 Cable.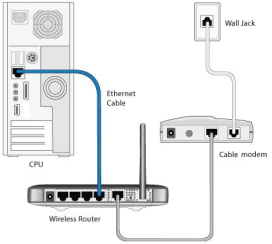
Step 4: Get Configuring With all the physical stuff sorted, it’s time to configure the modem. Find the gateway IP – it’s usually “192.168.0.0” or “192.168.0.1,” hanging out on the back of the modem or the manufacturer’s website. Access the configuration page using that IP. Now, pick the right connection type and plug in the details your ISP gave you. Your options are usually:
- PPPoE: If your Internet Service Provider (ISP) is into DSL, you might find yourself choosing PPPoE. This method sets up a direct point-to-point connection over Ethernet. To get things rolling, you’ll punch in a Username and Password provided by your ISP. The authentication protocols here are PAP (Password Authentication Protocol) and CHAP (Challenge Handshake Authentication Protocol). It’s like having a secret handshake to make sure only the right folks get into your internet party.
- Dynamic IP: Going for Dynamic IP is the move if your ISP likes to mix things up by assigning your router a new IP address every time it connects to the internet. This hands-off approach is handy for those who don’t need a fixed IP address, like in the ever-changing world of residential internet. It’s like a digital game of musical chairs with IP addresses.
- Static IP: Opting for Static IP is the way to go if your ISP has handed you a golden ticket – a fixed, unchanging IP address for your connection. In this scenario, you get a special IP address that stays the same every time your router connects to the internet. Static IP addresses are like the VIP passes of the internet world, perfect for hosting a website, running a server, or reaching out to remote devices. It’s the stable, reliable choice for those who want a consistent point of access.

Save the settings and give your internet connection a test run.
Step 5: Wireless Magic After you’ve got your ADSL settings sorted, jump into setting up the wireless router. Slap a password on your Wi-Fi to keep it safe from nosy neighbors. This step ensures your wireless network is Fort Knox-level secure. And for that, read this: How to Change Wi-Fi Router Password?
And there you have it! Follow these steps, and you’ll be the master of setting up your modem connection, tweaking the right settings, and enjoying smooth internet access whenever you please.
RJ45 Cable Starts From: @Amazon US ($5.99), @Amazon UK (£4.99), @Amazon IND (₹99.00), @Walmart US ($6.99), @Newegg ($9.99).
Phone Line Splitter Starts From: @Amazon US ($6.99), @Amazon UK (£4.99), @Amazon IND (₹149.00), @Walmart US ($7.99), @Newegg ($8.99).
Modem + Wi-Fi Router Starts From: @Amazon US ($59.99), @Amazon UK (£36.99), @Amazon IND (₹1,599.00), @Walmart US ($99.99), @Newegg ($69.99).
Suggested Article:
- 6 Best Wireless WIFI 6 Router Under 200$ US Dollars
- 7 Best Wireless WIFI Router Under 150$ US Dollars 3
- 5 Best Wireless WIFI Routers Under 100$ US Dollars
- 5 Best Wireless WIFI Router Under 50$ US Dollars
- 7 Best WIFI 6E Routers For Multiple Devices (Up To 200+)


thank you.
I know it is very simple thing but it help me.
Mode: static Ip link does no longer exist can you repost the link please.
I’ll do, when i get free.