


 & HDD (Hard Disk Drive)?")


Navigating the complex world of digital efficiency, where every microsecond counts and processing power is king, delving into the art of speeding up and optimizing your Windows system is an essential adventure. Picture a symphony of algorithms working together, each note complementing the other to elevate your device’s performance to unparalleled heights. This blog is your guide to unlocking the secret techniques, a collection of digital sorcery, that will unleash the hidden potential within your Windows ecosystem.
From the mysterious depths of system registries to the magic of power management, we’re embarking on a journey to decipher the elusive language of computational prowess. Get ready for the intricate dance of background processes, where careful tuning and strategic elimination are the cornerstones to move from the ordinary to the extraordinary. Revealing the mystery behind CPU affinity adjustments and the subtle choreography of virtual memory allocation, these insights promise to enhance your computing experience beyond traditional boundaries.
Embark on an adventure into the enigmatic realm of startup programs and scheduled tasks, where distinguishing the essential from the unnecessary is the key to a faster system startup. Dive into the mysterious art of file system optimization, where fragmentation encounters its nemesis, propelling your system into a state of smooth data traversal. As we navigate through this intricate tapestry, every detail, every adjustment, becomes a brushstroke in the masterpiece of a finely tuned Windows environment designed for peak performance.
So, Let’s Speed-Up Your Desktop or Laptop PC
But, first thing first—restart your computer! Think of the routine restart as the unsung hero of digital maintenance—a simple yet powerful practice that, if embraced every couple of weeks, can do wonders for your computer’s longevity and performance. It’s like giving your computer a regular check-up, preventing a chain of digital ailments.
When we let our computers run continuously without the occasional restart, we unintentionally expose them to prolonged stress. This ongoing operation leads to the buildup of lingering processes, memory leaks, and fragmented resources—a bit like a cluttered workspace affecting productivity. A routine restart acts like a cleansing breath for your system, clearing away accumulated digital debris and revitalizing its functionality.
Solution #1: Uninstall Programs That You Barely Use
When it comes to optimizing your Windows this method proposes a straightforward strategy: say goodbye to programs that linger in the shadows of disuse. By systematically purging your system of rarely used programs, you not only make space for more relevant applications but also enhance the efficiency of your Windows ecosystem.
This meticulous approach ensures that your computer operates with optimal resources, free from the digital remnants of neglect. So, bid farewell to the unnecessary, and let your Windows system breathe with newfound agility and responsiveness.
Step-by-Step Guide: Removing Unused Programs in Windows
- Open the Control Panel: Press the Windows key on your keyboard, type “Control Panel”, and then hit Enter.
- Navigate to “Programs”: In the Control Panel, select “Programs”. and then click on “Programs and Features”.

- Identify the Unused Program: Now browse through the list of installed programs. Identify the program you want to uninstall, focusing on those seldom utilized.
- Initiate the Uninstall: Right-click on the chosen program and select “Uninstall” from the contextual menu.

- Follow Uninstallation Wizard: An uninstallation wizard will prompt you. Just follow the on-screen instructions and confirm your decision to uninstall the program.
- Complete the Uninstallation: Allow the uninstallation process to run its course. Some programs may require you to restart your computer – comply if prompted.
- Repeat as Necessary: Repeat these steps for each program you wish to remove. Exercise caution to avoid uninstalling critical system components.
Solution #2: Shutdown Unnecessary Background Services
Let’s shed some light on the often-overlooked world of background services, providing a strategic approach to enhance efficiency and eliminate potential system sluggishness. By judiciously pruning unnecessary background services, you enable your computer to allocate its resources more efficiently, reducing the strain on its processing capabilities.
Executed services through the System Configuration utility, this method empowers you to selectively customize your system’s operational framework. Remember to tread carefully and refrain from disabling critical services to maintain the robustness and security of your Windows environment.
Step-by-Step Guide: Shutdown Unnecessary Background Services
- Access System Configuration: Press the Windows key + R to open the Run dialog box. Then type “msconfig” and press Enter.
- Navigate to the “Services” Tab: In the System Configuration window, select the “Services” tab.
- Hide Microsoft Services: Check the “Hide all Microsoft services” box at the bottom left. (This ensures critical Windows services remain untouched.)
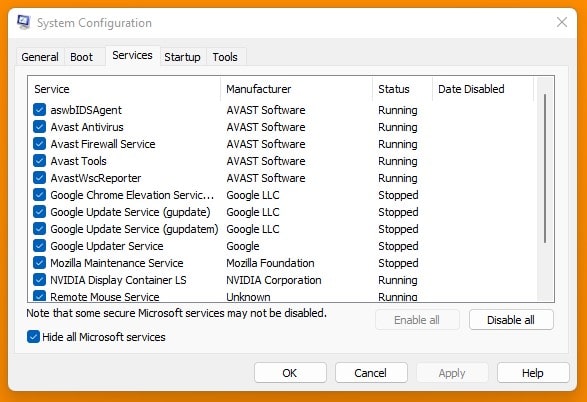
- Review and Uncheck Unnecessary Services: Peruse the list of remaining services. Untick services that are not essential for your regular computing activities.
- Exercise Caution: Avoid disabling services crucial for antivirus protection or video/audio drivers. Prioritize the preservation of services integral to system stability.
- Apply Changes: Click on the “Apply” button to implement the changes. Press “OK” to exit the System Configuration window.
- Restart Your Computer: A system restart may be required for changes to take effect and ensure your system functions smoothly post-reboot.
Solution #3: Disable Unnecessary Start-Up Application
Now, let’s turn our attention to the overture—the startup applications that enthusiastically welcome your computer upon ignition. While these applications are designed to enhance the user experience, they can inadvertently slow down your system’s boot times and reduce overall responsiveness. By selectively disabling unnecessary startup applications, you not only speed up your computer’s awakening from dormancy but also ensure that system resources are allocated judiciously.
To do so, you’ll again need to use “System Configuration” utility and head straight to the Startup tab. In this digital cockpit, selectively disable those unnecessary startup applications that loiter as dormant companions during your computer’s ignition.

Solution #4: Use Disk Cleanup Windows Utility Tool
Revealing the prowess of the Disk Cleanup utility, a stalwart in the Windows arsenal for decluttering and rejuvenating your storage space. Much like an attentive custodian, this tool meticulously scours your system, identifying and expunging unnecessary files that accumulate over time, potentially encumbering your disk space and diminishing overall system performance.
This straightforward yet potent process allows your Windows environment to breathe anew, unburdened by the weight of superfluous files, ensuring a sprightly and responsive computing experience. Your system will thank you for the digital detox!
Step-by-Step Guide: Using Disk Cleanup Windows Utility Tool
- Open Disk Cleanup: Press the Windows key on your keyboard and type “Disk Cleanup” and select it from the search results.
- Choose Drive to Clean: The utility prompts you to select a drive. Now, choose the OS Drive of your computer (usually the C: drive).
- Initial Cleanup: Disk Cleanup will calculate how much space you can free up. Then, a dialog box appears, displaying categories of files to clean. Check the categories you want to include in the cleanup (it’s best to tick all). Additionally, if you find a button labeled “Clean up system files” in the Disk Cleanup Utility window, be sure to click on it. This action will uncover additional unnecessary files that should be cleaned up.

- Click “OK”: Click “OK” to initiate the cleanup. Once completed, Disk Cleanup will inform you of the amount of space recovered.
Solution #5: Defragment Your Hard Disk
Championing the age-old practice of hard disk defragmentation—an artful orchestration of your data to boost the efficiency of your storage system. As files are added, deleted, and modified over time, they can become fragmented, scattered across the hard disk.
By periodically defragmenting your hard disk, you rearrange data for optimal access, preventing the performance degradation associated with fragmented files. This practice is particularly beneficial for traditional Hard Disk Drives (HDD). Embrace this proactive measure and witness a more streamlined data retrieval process, ultimately contributing to a swifter and more responsive Windows computing experience. It’s like giving your hard disk a spa day—refreshed and ready for peak performance!
Step-by-Step Guide: Defragmenting Your Hard Disk in Windows
- Open the Optimize Drives Utility: Press the Windows key on your keyboard. Then type “Defragment and Optimize Drives” and select it from the search results.
- Choose the Drive to Optimize: In the Optimize Drives window, select the drive you wish to defragment.
- Click “Optimize”: Click the “Optimize” button to initiate the defragmentation process.

- Monitor Progress: The utility will display the progress of the defragmentation process. You can observe the percentage of fragmentation that has been reduced.
- Completion and Analysis: Once the process is complete, the “Current status” column will indicate “OK” for the optimized drive.
- Schedule Optimization (Optional): To automate the process, click on “Change settings”. Check the box that says “Run on a schedule” and set the frequency.
- Close the Window: Click “Close” to exit the Optimize Drives window.
Solution #6: Disable Shadows, Animations & Visual Effects
In the pursuit of a more streamlined performance, this method suggests delving into the realm of visual aesthetics by strategically disabling shadows, animations, and other graphical effects. While these visual embellishments can add charm to your Windows interface, they come at a cost – consuming valuable system resources.
By judiciously turning off these visual effects, you not only enhance the efficiency of your system but also allocate precious resources to more critical tasks. It’s a savvy way to balance aesthetics and functionality, ensuring that your Windows environment runs smoothly with a focus on essential operations.
Step-by-Step Guide: Disabling Shadows, Animations, and Visual Effects in Windows
- Open System Properties: Right-click on “This PC” or “Computer” on your desktop and select “Properties” from the context menu.
- Access Advanced System Settings: In the System window, click on “Advanced system settings” on the left.
- Navigate to Performance Settings: Under the Advanced tab, click on the “Settings” button within the Performance section.
- Adjust Visual Effects: In the Performance Options window, you’ll see options for visual effects. Choose “Adjust for best performance” to disable all visual effects.
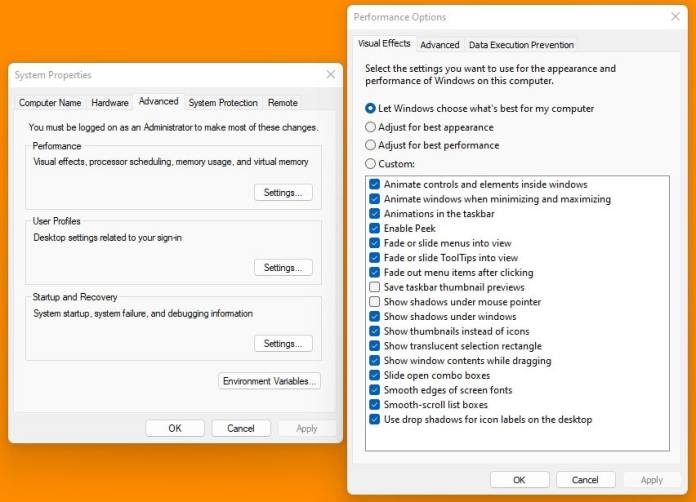
- Customize Visual Effects (Optional): If you prefer a middle ground, select “Custom” and manually uncheck specific effects. Common effects to disable include shadows, animations, and transparent glass.
- Apply Changes: Click “Apply” to enact your chosen settings. You may notice an immediate change in your system’s visual aesthetics.
- Confirm Changes: Click “OK” to confirm the changes and close the Performance Options window.
- Restart Your Computer: A restart may be required for the changes to take full effect.
Solution #7: Keep Your Windows Virus Free
Let’s immerse ourselves in the critical landscape of cybersecurity, underscoring the absolute necessity of cultivating a virus-free Windows environment. This imperative goes beyond being a commendable practice; it stands as a foundational principle essential for safeguarding the integrity and peak performance of your computer.
In an era where digital threats loom omnipresent, the act of fortifying your system against malicious entities becomes a non-negotiable commitment. The resonance of this safeguarding endeavor reverberates in the resilience of your digital infrastructure, ensuring not only the longevity of your technology but also the unwavering reliability that underpins a secure and optimized computing experience.
Consider initiating a comprehensive boot scan for your PC using a reliable antivirus solution. This proactive measure involves scanning your system for potential threats at the very outset, before the operating system fully loads. A boot scan is a robust strategy to detect and eliminate stubborn malware that may attempt to embed itself deeply within your system.
Solution #8: Upgrade the Bottlenecking Hardware
If you’re tired of your computer playing hard to get and moving at a snail’s pace, I’ve got some savvy tips to supercharge your system. We’re talking about tackling those sneaky hardware bottlenecks that can throw a wrench into your computer’s mojo.
First off, meet your new best friend: Task Manager. It’s like the Sherlock Holmes of your PC, helping you uncover the mysteries behind sluggish performance. To summon it, either right-click on the taskbar and hit up “Task Manager” or flex those keyboard muscles with Ctrl + Shift + Esc.
Once you’re in, cruise over to the “Performance” tab. Here, you’ll find a juicy breakdown of how your system is flexing its muscles – CPU, memory (RAM), and disk sections. Keep an eye out for components hitting their limit; that’s your cue that bottlenecks might be crashing the party.
Next move? Dig into the nitty-gritty of those graphs and figure out if your components are pulling their weight. If you’re still rocking a traditional Hard Disk Drive (HDD), consider leveling up to a Solid State Drive (SSD) for faster data access and an instant boost in system responsiveness.
By being the Sherlock Holmes of your tech world and strategically upgrading your hardware, you’re ensuring your system keeps up with the fast-paced demands of modern computing. Cheers to peak performance in your Windows wonderland! 🚀
Suggested Articles:
- How To Buy A Processor (CPU) For Desktop PC?
- How To Buy Perfect RAM Stick For Laptop & Desktop Computers?
- How to Buy A Perfect SSD (Solid State Drive) For Laptop & Desktop Computer?


