


 & HDD (Hard Disk Drive)?")


The error message “Windows Can’t Access \\ Computer Name” is like that annoying network ghost haunting us all. It’s a head-scratcher linked mostly to Local Area Connection hiccups. This glitch pops up for reasons like skimpy network permissions, wonky network drivers, messed-up TCP/IP NetBIOS settings, and a bunch of other gremlins.
This is what error looks like on your screen:
Network error
Windows cannot access \\ XYZ Computer Name
You do not have permission to access \\ XYZ Computer Name Contact your network administrator to request access.
This drama usually kicks off right after you’ve created a new LAN connection in your network. You’re all pumped up, ready to dive into shared folders on other computers, but bam! The universe throws this error curveball. And it’s not just folders; it’s like the network is playing hide and seek with your files or even the whole shared drive.
Now, here’s the kicker – figuring out what’s causing this mess and how to fix it is like finding a needle in a haystack blindfolded. This error doesn’t stop at blocking folder access; it spreads its chaos to all kinds of network files, turning troubleshooting into a cryptic puzzle. Spotting the real issue and nailing down a solution becomes this epic quest in tackling this network riddle.
So, Let’s See How to Troubleshoot This Network Error
This gremlin doesn’t play favorites when it comes to Windows versions. Whether you’re rocking the shiny new Windows 11 or cruising with the classic Windows 7, the “Access Denied Network Error” can crash the party. It’s like the bouncer at the network club has some serious permission issues.
So, why does this error show up uninvited? Well, most of the time, it’s the network permissions throwing a tantrum. But hold on, there’s more to this drama. Here’s a rundown of suspects who might be guilty of causing this error to pop up on your computer screen:
- Incorrect LAN Connection Configuration: It’s like plugging the wrong cable into the wrong socket. Things just don’t connect the way they should.
- Inaccurate LAN Sharing Settings: Sharing is caring, but if your settings are off, it’s more like a one-way street with a “Do Not Enter” sign.
- Incorrect Drive or Folder Security Settings: Your drive and folders might be feeling a bit insecure. Time to boost their confidence with the right security settings.
- Unconfigured TCP/IP NetBIOS Setting: It’s like the network language is getting lost in translation. Someone needs to tune in the settings.
- Issues with UAC Remote Restrictions: The User Account Control (UAC) might be playing hard to get. It’s time to check if it’s causing remote restrictions.
- Corruption in Network Driver: Your network driver might be having a bad day. A little corruption can go a long way in causing this hiccup.
So, there you have it – a lineup of potential troublemakers. Now, the challenge is figuring out which one is causing the network drama on your computer.
Solution #1: Checking LAN Cable
So, you’ve just birthed a LAN connection into existence, and suddenly, bam! The “Access Denied Network Error” decides to gate-crash your tech party. Before you start panicking, let’s take a stroll down the cable lane. First things first, check your cable connections. Make sure you’ve played matchmaker right and hooked up the right cable to the right gadget. Mixing them up is like sending a love letter to the wrong address—things just won’t connect, and you’re left in the lurch with a tech headache.
Now, let’s talk cables. Not all heroes wear capes; some come in the form of RJ45 cables. Understanding the cosmic difference between crossover RJ45 cables and straight RJ45 cables is key to unraveling connectivity mysteries.
When you’re playing matchmaker between different devices, like a modem and computer or a router and computer, the straight Ethernet cable is your go-to wingman. But, hold on! When you’re connecting similar devices, like router to router, computer to computer, or hub to hub, it’s time for the crossover cable to shine. Why? Well, these cables have some secret wiring mojo that lets similar devices chat it up directly, compensating for their unique data chit-chat style.
So, in the quest to conquer the “Access Denied Network Error”, take a breather, reevaluate, and maybe do a little cable untangling dance. Odds are, straightening out those cables configuration might just be the magic potion your network needs for a glitch-free existence.
Got a spare straight cable lying around? Well, you can make it work like a crossover cable with a cool converter adapter! This nifty gadget transforms your regular cable into a crossover one, so you can hook up similar devices without a hitch.
RJ45 Crossover Adaptor Starts From: @Amazon US ($5.99), @Amazon UK (£5.99), @Amazon IND (₹229.00), @Walmart US ($9.99), @Newegg ($7.99).
RJ45 Cable Starts From: @Amazon US ($5.99), @Amazon UK (£4.99), @Amazon IND (₹99.00), @Walmart US ($6.99), @Newegg ($9.99).
Solution #2: Fixing Network Sharing Configuration
The next step is like diving into the mysterious realm of ‘Network Sharing Configuration’. First off, double-check them snazzy IP Address settings on all the PCs hooked up to your network. We’re talking about making sure there’s no showdown of conflicting IP addresses. You know, like when two computers decide to throw a party with the same IP address – big no-no!
Now, watch out if the Internet Protocol Version 4 (TCP/IPv4) IP setting is set to “Obtain the IP Address Automatically”. That’s a mouthful, huh? You better manually give unique IP addresses to each connected PC to avoid any mess-ups.
To tinker with these settings, take a stroll to the ‘Network and Sharing Center’. Then, hit up the “Change Adapter Settings” in the left sidebar. Right-click on your network adaptor, hit up “Properties”, and slide into the “Internet Protocol Version 4 (TCP/IPv4)”. Click on that “Properties” button to adjust the settings like a tech maestro.

Now, slide on over to the “Change advanced sharing settings” option in the Network and Sharing Center. Grab it from the sidebar, you know, that thing on the left. This step spills the beans and lets you play around with your computer’s network-sharing setups.

Then, make sure everything is configured as listed below:
- Turn on network discovery.
- Turn on file and printer sharing.
- Allow windows to manage homegroup connection (recommended).
- Turn on sharing so anyone with network access can read and write files in the public folders.
- Use 128-bit encryption to help protect files sharing connections (recommended).
- Turn off password protected sharing.
Make sure these changes happen for all network types—Private, Guest, and All Networks.

Alright, after the mystical journey into the Network and Sharing Center, now it’s time to ensure all your shared PCs are on the same network Workgroup. It’s like making sure everyone’s speaking the same network language. Moreover, consider opting for a distinctive name instead of simply using “WORKGROUP” as the workgroup identifier.
So, pop into your ‘Computer properties’ – think of it as the ID card of your computer. Look for the “Change setting” button under the “Computer name, domain, and workgroup settings”. Click on it, and then hit “Change…” – it’s like entering the secret passage to the backstage of your computer’s identity.

Alright, for the next step. Click on the “Network ID” within that same pop-up window. Then just follow the instructions laid out in the picture below:

For a comprehensive and detailed guide on configuring IP and sharing settings, refer to our article titled “Setup Two or More Computers via LAN for File Sharing in Windows“. This resource provides step-by-step instructions and valuable insights to assist you in effectively establishing file-sharing capabilities between two or more computers on your local network.
Solution #3: Fixing Drive or Folder Security Setting
Alright, so here’s the deal – a lot of folks mess up when it comes to dealing with network headaches. They forget about the security settings—you know, the VIP section, where you decide who gets in and who’s left out. Ignoring this can mess up your network vibes, and around 80% you guys facing these issues can fix them by just tweakingsome changes in the security settings.
Now, if this glitch is haunting all your network drives, files, and folders, you have to hand out permissions to everyone, one by one. Follow the steps I lay out for each spot to make sure your whole network is on the same page. Pro tip: If all your shareable stuff hangs out in a single local drive, then just give permission to that single drive, and bam! Your other devices can access all the files and folders stored on that local drive. Easy, right?
Just follow the steps listed below:
Step 1 – Give Sharing Permission to Everyone: So, first things first – give that drive, file, or folder a right-click and from the fancy pops up menu, hit ‘Properties’. Now, inside the properties window, slide over to the “Sharing” tab, and click on the “Advanced Sharing …” button. Make sure to check the box that says “Share this folder”. Then, slide on over to the “Permission” button, where you’ll play Santa and gift the “Everyone” user with some “Full Control” love. Just tick that checkbox, and you’re in business!
Step 2 – Add “Everyone” Username in Security Tab: Alright, it’s time to add that new username, “Everyone”, the one you just made the big boss with full control, into the Security Tab of your file, folder, or drive’s properties. This move ensures everyone on your LAN gets the green light to access it.
Go back to that properties window, find the Security Tab, and hit the “Edit” button. Another window pops up – stay with me. Click on “Add…” and in the next pop-up, hit “Advanced …”. Now, in the fourth pop-up, hit “Find Now” and your computer will roll out the red carpet, showing off all the usernames in the joint. Hunt down “Everyone” in the mix, give it a little click, and hit “OK” to seal the deal.

After that, another “OK” is in order, wrapping up the whole shebang. Now, you’ll spot the new kid on the block, “Everyone”, proudly hanging out under the “Group or user names” settings box.
 Step 3 – Allowing Permission to the Username “Everyone”: So, you’ve successfully added the “Everyone” username in the Security Tab – high five! Now, let’s take the next stride, a crucial one at that. Navigate to the Security Tab, hunt down the “Everyone” username, and give it a solid click. Once you’re there, make absolutely sure that the “Full control” box is ticked, and then hit that magic “Apply” button.
Boom! Post this, brace yourself for the grand entrance of the “Windows Security” pop-up. It’s like the VIP access to your files – granting permission in style. And remember, no impulsive clicks on the cancel button during this spectacle. Let the system do its dance, applying these settings to all files in the shared drive or folder.

Solution #4: Configure TCP/IP NetBIOS Setting
Let’s dive into the mind-blowing world of ‘TCP/IP NetBIOS’, or as the cool kids call it, “NetBT”. This bad boy is like the rockstar of network protocols, chilling in the session layer of the OSI model. It’s the VIP pass for apps on different computers to gossip and share stuff over a local area network (LAN).
So, why should you care about NetBT? Well, it’s the ultimate wingman for sharing files, printers, and logging onto the network. But here’s the deal – if you don’t set up NetBT right, some functions might ghost you. And if you straight-up ghost the NetBT service, anything relying on it will throw a tantrum and refuse to start.
Making sure ‘NetBIOS over TCP/IP’ is flexing its muscles on every computer in your network is key. It’s like the secret sauce for smooth communication and sharing resources. Now, let’s crack the code on this:
- First off, hit up the Windows Services party by searching “services.msc” in the Start Menu. This is where you manage your Windows services like a boss.

- Find a dude called “TCP/IP NetBIOS Helper” in the Services shindig. Double-click on him, go to the General tab, and pimp up the “Startup type setting” to ‘Automatic’.
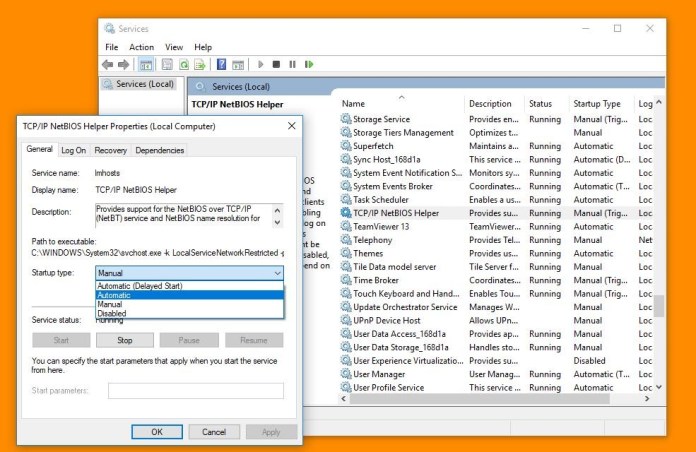
- Once you’ve aced the services setup, slide over to your Network Adapter’s setting.
- Now again, pop into the “Internet Protocol Version 4 (TCP/IPv4)” properties. Click “Advanced…” like you’re entering a secret club, then hit up the “WINS” tab.
- In the WINS tab, pick “Enable NetBIOS over TCP/IP” as your main squeeze.
Boom! Follow these mind-bending steps, and you’re not just configuring but also activating the NetBIOS over TCP/IP service on your networked computers.

Solution #5: Disable UAC Remote Restrictions
We’ve got our eyes on protecting the VIPs – users hanging with the local Administrators group. How? Enter User Account Control (UAC), our knight in shining armor. It’s the ultimate defender, blocking loopback attacks and putting a lockdown on local malicious software trying to flex its muscles remotely with admin privileges.
But, hold up – there’s a plot twist. Enabling UAC restrictions can throw some hurdles for our users trying to have fun with shared files on the network. In a basic low-level Local Area Network (LAN) setup, where the risk of super-fancy security threats is kind of low, the iron grip of UAC might feel like overkill. It’s like bringing a tank to a water gun fight.
If you’re feeling rebellious and want to kick UAC remote restrictions to the curb, follow this guide:
- Click on the Start menu, then select Run. Type “regedit” and press ENTER.

- Navigate to the following registry subkey:HKEY_LOCAL_MACHINE\SOFTWARE\Microsoft\Windows\CurrentVersion\Policies\System
- If the registry entry “LocalAccountTokenFilterPolicy” is not present, follow these additional steps:a. On the Edit menu, hover over New, then choose DWORD Value.
b. Type “LocalAccountTokenFilterPolicy” and press ENTER.
c. Right-click on “LocalAccountTokenFilterPolicy” and select Modify.
- In the Value data box, type “1” and click OK.

- Close the Registry Editor.
Congratulations! You’ve just disabled UAC remote restrictions.
Solution #6: Clean RDP Client’s License Cache
Picture this: You’ve got an uninvited guest knocking on your Terminal Server’s door. The server, being a gracious host, hands out a temporary Terminal Server Client Access License (CAL) token—it’s like a backstage pass for the unlicensed party crasher.
Now, the user waltzes into the session, and the Terminal Server makes a hotline call to the License Server. It’s the digital bouncer checking if that temporary pass is the real deal. The License Server nods approvingly, validating the temporary CAL token – green light for the party.
But wait, there’s more! The next time our unlicensed buddy tries to sneak in, the Terminal Server is on high alert. It’s not satisfied with just a temporary pass this time. Oh no, it’s aiming for the full VIP experience. Another call to the License Server, an upgrade attempt from a temporary CAL token to a full Terminal Server CAL token – it’s the official membership card for the long-haul stay.
And If that stored license token decides to throw a tantrum, brace yourself for some network drama. You might find yourself face-to-face with the dreaded “Windows Cannot Access \ Shared Drive” error on your computer.
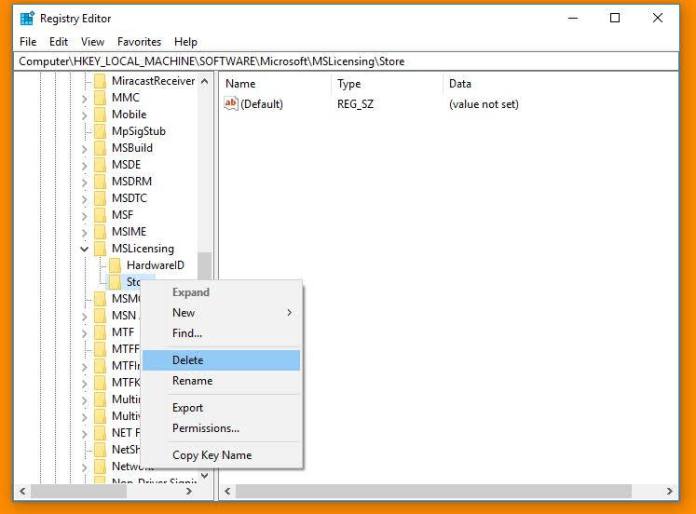
So, let’s see how to clean the RDP client’s old license cache:
- Upon opening the registry editor, navigate to the location “HKEY_LOCAL_MACHINE\SOFTWARE\Microsoft\MSLicensing” in the database.
- Expand the ‘MSLicensing’ folder, and proceed to delete both the “HardwareID” and “Store” sub-folders found under this expansion. It is important to note that you should only delete the specified sub-folders and refrain from removing the entire ‘MSLicensing’ folder to avoid unintended consequences.
Solution #7: Update Network Card Drivers
Feeling stuck in the never-ending maze of network problems? If your troubleshooting escapades are hitting dead-ends, it’s time to turn your attention to the unsung heroes of your digital world—Network Drivers. These are the behind-the-scenes maestros that make sure your operating system and network hardware speak the same language.

But here’s the plot twist – if these drivers are living in the past (we’re talking outdated or incompatible), they can wreak havoc on your network symphony. Think connectivity nightmares, sluggish performance, and worst-case scenario, total network meltdowns.
So, here’s the game plan: march over to your windows device manager, the commander-in-chief of your hardware army. Find the network adapter— it’s the unsung hero we’re looking to upgrade. Check for available updates like you’re on a treasure hunt, and when you strike gold, download the latest and greatest version straight from the manufacturer’s website.

What Is a Network Driver, And How To Install It?
As a PC user at some point, you have heard of Network Drivers. Have you ever wondered what network drivers is all about? Prior to figuring out what a network driver is, let us get to know few things about something called Network Adapter… Read More

ads


Totally and excellent helpful
Yes, thank you. But I still have the issue of computers asking me for an id and password when I click on a shared folder. What gives? It works and then it doesn’t. I hate windows networking. Is there an app that can do this better?
try this sharing setting, which all I listed in the link http://www.deskdecode.com/how-to-setup-two-computers-via-lan-in-windows-7-for-sharing/2
THANK U VERY MUCH MY PROBLEM IS SOLVED
You’re the best! This worked a treat! Thank you.
After doing this all things m still getting erro, what should I do now?
try this,
http://www.deskdecode.com/how-to-setup-two-computers-via-lan-in-windows-7-for-sharing/
and make sure you do everything right.
Thank u so much…. excellent way of explanation……
مشكور اخي على الشرح الوافي …جزاك الله خيرا
thank you so much, really help full…
It worked. Thanks a lot!
I have applied both methods but in vain. 🙁
Thanks a lot! It worked wonders.
Thanks! you’re a star.
i thought I was very computer literate but I have been messing around unsucessfully trying to get my Windows 7 and Windows 10 systems linked. Your 2 tutorials got me up and running within 30 mins. All disks available to all systems. Many thanks. Much appreciated.
Thanks very helpful
thanks a lot man very helpful
Thank you, Madhur. The settings you outlined above worked perfectly. Even Microsoft’s own guides omit the security settings in step 3. When I first installed W7, I never did get sharing to work and finally gave, resorting to “sneaker-net” for the last several years.
‘
Madhur – Thank you for your excellent concise and complete explanations! I have now been able to set up a number of shared folders between my Windows 7 and 10 laptops. You’ve made my life easier. Way to go!
Thank you, Madhur. I can now wirelessly access my main work folder on my new Surface Pro 4 from my desktop Core2Quad and work with it normally. You really know your stuff!
hi im getting this kind of error what i can do for it
\\10.0.*.* is not accessible. You might not have permission to use this network resource. Contact the administrator of this server to find out if you have access permissions.
logon failure: account currently disabled.
try this
https://www.cnet.com/forums/discussions/solved-is-not-accessible-you-might-not-have-permission-to-use-this-network-resource-344370/
Thank you it’s really work
100000000000 THANKS!! You made my day! I spent so much time before finding your site! Thanks again.
11111111111111111111111111 thanks
Problem solved, thanks!
Thanks buddy, problem solved….
Thank you ! Was struggling for some time.
Step 2 solved it for me.
This is such a simple and brilliant guide !
Thank you, Madhur, what a hero you are! But I’ve been sharing laptops on a wifi network for years and never had to go thru these hoops before. Never mind, steps 2&3 have solved my problem and I am very grateful.
This has fix access to second computer. Now to figure out how to delete Default,migrated.
thanks a lot, thanks for being good
Helpful, many thanks!
Thanks very much helpful
A big thank you for your number two 😀
Madhur, in the internet world of everybody just throwing out guesses and wasting everyone’s time by making them read through post after post of “try this”…”try that”, you have cut through all of that BS and went straight to an ACTUAL SOLUTION! I was ready to throw my computer out the window before I found your article. Within 5 minutes of working through your steps, all of my networking issues are solved and all of my computers are able to share data again. THANK YOU MADHUR! 😀
Thanks man. 😀
THANK YOU FOR THIS!!!
#2 Solution did the trick! Thank you! Spent a few hours online trying to figure it out.
solution 2 fix the problem thanks a lot!
i have tried all these options but i can cannot have access to my folders/drive, i keep having the same error message popping up. so please find a way of helping me.
..
OH MY GOD! THANK YOU SO MUCH MADHUR! I HAVE BEEN TRYING TO SET UP A CROSS OVER NETWORK THE WHOLE DAY, AND YOUR TUTORIAL WAS THE ONLY ONE WHO ACTUALLY SOLVED MY PROBLEMS!!
YOU’RE AWESOME!
Thank you for your posting. Really good works!
Thank you sooooooooooooo much dear
really very helpful tutorial and not only for me . . . . .
very best thing
using very simple language and every step with picture
well done
OH MY GOD THANK YOU SOOOOOO MUCH. I have spent days trolling post looking for a solution to this.
hi there, thank you very much! it worked well for sharing with everyone. but what if i just want to share a folder with a particular person? not everyone for security concerns?I tried to follow your instructions and change everyone to the person i want to share with,but it didn’t work.
Thanks
Thank you so much it was really very helpful !!!
It worked bro but transfer speed is very low. any advice to increase it? Thank you.
Use fiber optics. 🙂
Step 2 Worked like a charm for me!
This is wonderful, thank you so much!
Problem: Have multiple computers that I am trying to linked, and I keep getting in due to ‘Do not have permission…..’ in Share File.
Solution:
Step 2 – Add The “Everyone” Username In The Security To Make That Shared Drive Accessible From Any Computer.
if i use router device must use static ip as you explained, or can use dynamic ip?
Hi Madhur,
I have admin rights in my AD account. I have shared a drive with everyone but I’m not able to access that drive on a specific system and able to access rest of all the system’s.
Please suggest.
you can contact me on my mobile number : 9752460610
Thank you so much my problem is also resolved by this technique 🙂
Dude this knocks crap put of microsoft forums lack of info and stock, unrelated answers from their supposed experts. First time I have seen adding everyone in security tab anywhere. You rock,Thanks!
Thank you chief it has worked for me Good keepup
hi I am facing a problem working as IT support person facing many computers with laptops desktops with error windows licence will expire soon message did many things but cant solved
by the wy thanks for above information really great help to people like me
thanks
Thank you SOOO much. Solution 2 worked.
Thank you…..wasted a lot of time before finding the solution here.
Make the system enabled for accessing for Everyone from the Windows registry. It will help to access the windows to access the specific computer names.
thanks a lot it work for me
I went through all steps but I still get the message when I click on the network share. However, I can access subdirectories on the share if I type in the address of it directly. Any advice on how I can fix it?
Thank you so much!
BTW – when sharing folders only, one has to do the steps under “Give Sharing Permission to Everyone” for each individual folder, one by one.
Don’t know if an entire PC can be done this way, i.e. including all the folders, sub folders and files, or an entire partition?
If the list of sharable File/folder contains in a single drive, then granting permission for that single drive can make all the internal File/Folder read and writeable for the other network computer.
step 2 helped me out.. good to know there are some honest indians out there.. but in all seriousness your government should take care of the scammers before the country’s image is forever tarnished
Step 2 helped me.Thanks for that! I just want to ask, for security purposes, instead of “Everyone”, would it be possible to add just a particular PC or Laptop? Again, thank you so much.
Yes, you can.
hooraaahhh
Fantastic! This works! My problems were the regedit which I thought would never be problematic.
Thank you so much! I tried so many other things before finding this page. Worked great! You are appreciated!
Thank you, thank you, thank you. I have been trying all day to fix this problem and your solution(s) finally resolved it. My issue was fixed after carrying out all the solutions 1-4. Solution 4 eventually worked.
Thank you for helping me
The regedit part is what did it for me. Worked for Windows Server. No reboot even necessary. Thanks for the helpful post.
Thank you. Solution #2 worked for me.
Thanks a lot solution 2 worked.
also i have another issue, i have connected two PC directly with a cable and i can veiw and transfer files but only when my internet connection through mobile hotspot is turned on.
when i switch off the internet the other PC is lost from network. Do you have any idea?
Madhur… Well done, clear and concise explanation that actually worked for me. I had this problem on my home network and with several of my IT customers with small to mid-sized peer-peer networks & sharing. Been working on and/or looking for a solution to the problem on the web for almost a month with no luck. Following every step of your explanation, found some incorrect settings, fixed them and I’m up and running. Well Done!!
Thanks, man.
Thanks. Also, since I’m connecting with a mac, I enabled SMB features in Programs & Features > Turn Windows features on or off > “SMB 1.0/CIFS File Sharing Support
thanks
I did solution 2 step 3 to allow access to everyone in the security tab.
now I can access the files on another computer.
my situation is:
1. in my workplace have 1 win10 pc, 2 win7 pc, and my boss just buy 1 more NEW pc with win7 inside.
2. the old 3 pc has share network monthly,
my problem is:
1. I can’t access the win10 pc with my newest pc, but the win10 pc have access into my new one.
2. other 2 win7 pc can access my new pc and otherwise.
my question is:
how can I connect all pc in my workplace?
You can try to re-design the network again.
https://www.deskdecode.com/how-to-setup-two-computers-via-lan-in-windows-7-for-sharing/
It worked, I’m sending the <3
😉
Didn’t work.You know what is the problem with you computer ‘experts’? You make these complicated tutorials with many steps and the result is is just the same as is before! In other words, FAIL.
What a waste of time and effort. As Einstein once said, things should be as simple as possible but not any simpler.
Thanks a lot but still not working on my end. I’m using windows server to make a file sharing to specific domain account.
still not able to access my network files
my pc is on same workgroup, but only in one pc i am unable to see any shared network folder,the network section is all empty,ple help me out
I have tried all of the above.
I still have I this issue with computer 3
I have 3 computers networked together comp 1 sees and access all, comp 2 sees and access all, comp 3 can see all can access comp 2 but not comp 1
help please
Hi , I need some helps. I have shared my co-worker computer so I can access his files and help each other. Last Friday everything okay. But on Monday, when we back to work, suddenly I cannot access my co-worker computer. I have tried to ping, it looks like no issue. The computer name actually show up on the Network, but when I click, then it error. Even the public folder cannot see.
Please help me.
Thank you worked for me and much better than the MS Help pages
Nothing on this page worked for me. I eventually found the comment below on another page and it worked:
I came right using regedit. Locate: HKLM\SYSTEM\CurrentControlSet\Services\LanmanWorkstation\Parameters and make sure “AllowInsecureGuestAuth” value is set to 1
I just want to let you know how much this has helped me. I was running into issues at my company where certain users could not run installer from shared folder for certain application updates…..and I had a few users who were experiencing runtime errors from applications that run via shared folder path to server.
This solved all of my issues and I now keep this page on my bookmarks bar. I can not tell you how much I appreciate you.
Thank you
Excellent…..you saved me, thank you so much
Well done. Very simple and easy to understand 👍
Muchas Gracias, Thank you Very Much!
Why do they make this stuff so non-intuitive?? Your instructions got me through it. Thanks!
You’re absolutely terrific! the regedit did the trick, still working in 2021! GREAT! THANKS!
it has worked for me thank you
i am glad i did not have to type this up
After 2 years of having my network drive (WD MyBookLive) keep going off line, using solution #3 I have now had 2 weeks without that happening. Many thanks for your solutions, much appreciated!
it worked ..thank you …error was rectified at. 4# Solution – Corrupted Windows Registry