


 & HDD (Hard Disk Drive)?")


Ah, the Wild West of the internet! Ever stumble upon a Security Certificate Error and wonder, “What’s the deal with that?”
You might get hit with cryptic messages like, “The site security certificate is not trusted” or “There’s an issue with this website’s security certificate”. Don’t panic! It’s not the internet throwing a tantrum; it’s actually a safety net keeping cyber nasties at bay.
So, what’s the fuss about? HTTPS, our trusty shield in the digital realm, leans on SSL/TLS certificates to cloak data and ID websites. When a site’s certificate doesn’t make the cut, browsers like Internet Explorer or Google Chrome play the role of protective parents, giving you a stern warning before you waltz in.
You might be tempted to hit “Continue to this website (not recommended)” on Internet Explorer or “Proceed anyway” on Chrome, but tread carefully; it’s like crossing a digital street blindfolded.
Let’s break it down. SSL/TLS certificates are the digital bouncers of the web, verifying a website’s authenticity and scrambling your data as it zips around. A slip-up here could spill your personal info to unwanted eavesdroppers or cyber tricksters. So, tackling these Security Certificate Errors head-on with some savvy and the right tools is a must.
Think of troubleshooting these errors as solving a tech puzzle. Update your system’s clock, clear out the browser’s junk drawer (cache and cookies), and you’re already on the right track. Some snags might need you to tweak your browser’s security settings or get fresh certificates from trusted bigwigs. For the trickier ones, verifying a site’s legitimacy or dropping a line to the website guru might be your best bet.
So, Let’s See How To Fix This Problem
Quick Tip
So, you stumble upon an SSL network error while browsing a site, huh? Well, don’t sweat it too much; that’s usually on the website’s admin or webmaster to sort out. As a user, your move is pretty straightforward—report the glitch and then, well, play the waiting game hoping they sort it out.
Want to streamline that reporting process and get the lowdown on what’s going on with that finicky website’s SSL? Look no further than “https://www.ssllabs.com/ssltest/” .This tool is a gem—it doesn’t just give a cursory glance but dives deep into the nitty-gritty of the website’s SSL certificate. Just pop in the URL that’s been causing you all this SSL-induced stress, hit go, and bam! You’ll be treated to a comprehensive breakdown, covering everything from validity and encryption protocols to any lurking vulnerabilities.
Solution #1: Fix Data and Time
Alright, let’s get this straight—having accurate date and time settings on your computer isn’t just about avoiding the embarrassment of wishing someone ‘Happy New Year’ in July. Nope, it’s crucial for a slew of digital operations and keeping those cyberbaddies at bay.
Messing up your date or time? That’s like showing up to a party a week late. You risk running into synchronization snafus with servers, messing up time-sensitive apps, and even triggering those pesky SSL/TLS certificate validation hiccups when you’re trying to browse securely.
And hey, don’t overlook your computer’s time zone setting! Imagine setting your watch to Tokyo time when you’re actually in Toronto. That mismatch can lead to a wild goose chase, with your local time playing hide and seek with what’s displayed on websites, emails, and all things online. Talk about a scheduling nightmare, especially when juggling time-sensitive stuff or collaborating with folks across different time zones.
So, what’s the fix? Head over to your system settings or control panel and fine-tune the date, time, and time zone settings. Get those set right, and you’re not just making your computer happier—you’re boosting its accuracy and reliability, cutting down on those facepalm-inducing errors, and elevating your overall user experience.

Solution #2: Clear SSL State
SSL State—sounds fancy, right? But what’s it really about? Think of it as your browser’s secret stash of SSL certificates, session keys, and all that jazz, working behind the scenes to keep your web connections safe and sound.
But here’s the kicker—over time, this stash can get a bit dusty. Outdated, mismatched, or just plain wonky data can throw a wrench in the works, causing connection hiccups, SSL certificate dramas, and a whole bunch of other head-scratchers.
So, what’s a savvy netizen to do? Time to give that SSL State a good ol’ spring cleaning! Here’s your trusty step-by-step guide:
- Fire up your Internet properties using the “inetcpl.cpl” run command, or you can just search for the “Internet Properties” on the Start Menu.
- Once there, click on the Content tab—you know, the one where all the cool settings hang out.
- Now, hunt down that “Clear SSL state” option. It’s your golden ticket!
- Click that button and watch the magic happen as your browser hits the reset button on its SSL state.

Solution #3: Update SSL Configuration
Let’s talk SSL—Secure Sockets Layer, for those not in the know. Keeping this bad boy up-to-date is like giving your browser’s security a VIP pass to the internet party. With new versions of SSL and its cool cousin, TLS (Transport Layer Security), hitting the scene, you want to make sure your browser isn’t stuck in the digital Stone Age.
Why? Because an updated SSL/TLS configuration is your ticket to dodging those pesky connection snafus, SSL certificate dramas, and other cyber hiccups. Plus, it’s all about staying in tune with the latest and greatest security protocols that modern websites are rocking.
Ready to give your SSL configuration a makeover? Here’s your step-by-step guide:
- Hit Win + R keys like you’re playing a high-stakes game of keyboard bingo to open the Run dialog box.
- Type inetcpl.cpl and either hit Enter or give that OK button a click—let’s get this Internet Properties party started!
- In the Internet Properties window, strut over to the Advanced tab like you own the place.
- Now, make sure these options are strutting their stuff:
- Use SSL 3.0
- Use TLS 1.0
- Use TLS 1.1
- Use TLS 1.2
- Use TLS 1.3
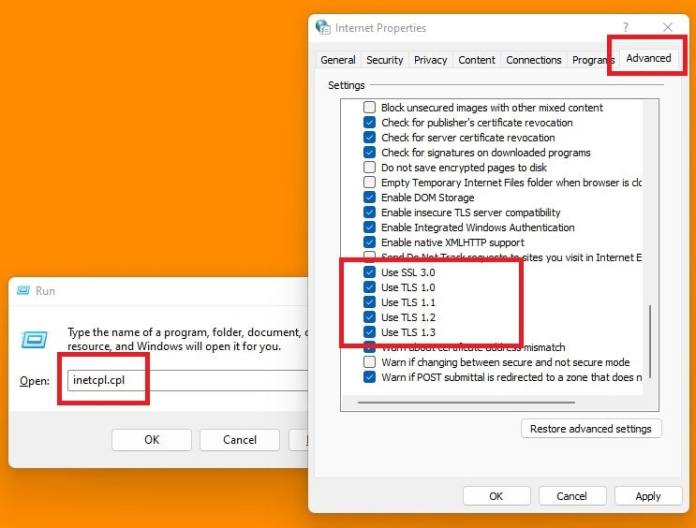
By flipping these switches, you’re basically telling your browser to be the ultimate security chameleon, adapting to whatever SSL/TLS protocol a website throws its way. This proactive approach isn’t just about avoiding cyber-awkward moments—it’s about elevating your browsing game, forging secure connections left and right, and making the internet a safer playground for everyone.
Solution #4: Try Disabling Firewall
Alright, brave internet explorer, thinking about disabling your firewall? Hold onto your digital horses—it’s not a decision to take lightly! But sometimes, you’ve got to roll up your sleeves and tinker a bit to get to the bottom of those pesky connectivity or access woes.
You see, firewalls are like the bouncers of the internet world, deciding who gets in and who stays out based on a set of rules. But just like a bouncer who’s had one too many caffeinated drinks, a firewall can sometimes get a bit too aggressive and block your VIP internet connections.
Ready to take the plunge? Here’s your quick-and-dirty guide to disabling that firewall:
- Head over to the Control Panel like you’re going to a digital town hall meeting.
- Navigate to System and Security > Windows Defender Firewall.
- Click on ‘Turn Windows Defender Firewall on or off’—it’s like the big red button of internet security.

- Choose ‘Turn off Windows Defender Firewall (not recommended)’ for both Private and Public networks. Living on the edge, huh?

- Click OK and pat yourself on the back for taking the plunge.
After disabling the firewall, give your internet browsing or troublesome website another whirl. If everything starts working like a charm, congrats! It’s a good sign that your firewall was playing hard to get with your connections. Now, remember to re-enable that firewall pronto to keep your digital fortress intact.
What To Do If Nothing Works
So, still scratching your head over those pesky SSL/TLS errors or weird connectivity glitches? If you’ve tried all the tech wizardry in your arsenal and come up empty-handed, it might be time to point the finger at your browser’s settings—or maybe throw a lifeline to your trusty Internet Service Provider (ISP).
Your ISP is like the Sherlock Holmes of internet mysteries—they can dive deep into the digital trenches and unearth any sneaky network gremlins that might be messing with your browsing mojo.
But while you’re waiting for your ISP to don their detective hat and solve the case, there’s a nifty trick you can use to silence those relentless SSL/TLS certificate error warnings. It’s like putting your browser on ‘silent mode’ so you can browse in peace while the tech experts do their thing.
Ready to dive into the browser settings labyrinth? Here’s your step-by-step guide:
- Inside the Internet Properties window, strut over to the Advanced tab like you own the place.
- Now, scroll through the settings jungle until you spot these three troublemakers:
- “Check for publisher’s certificate revocation”
- “Check for server certificate revocation”
- “Warn about certificate address mismatch”

- Give them a swift click to uncheck or deselect them—consider it a digital eviction notice.
- Click ‘Apply’ like you’re sealing the deal on a secret pact.
With those settings tweaked, go ahead and test the waters—try accessing those previously stubborn websites or online services. Voila! No more pesky certificate error messages interrupting your browsing bliss.
Just remember, this is a temporary fix. Once your ISP sorts out the real issue, don’t forget to re-enable those certificate warnings to keep your digital fortress secure and sound.
Suggested Articles:
- ERR_SSL_VERSION_OR_CIPHER_MISMATCH – Solutions From Users End
- ERR_SSL_PROTOCOL_ERROR – Solutions Encyclopedia


