


 & HDD (Hard Disk Drive)?")


In today’s fast-paced digital realm, Windows Defender stands tall as the guardian angel of our systems, fending off digital threats with unwavering dedication. But lurking within its protective embrace is a common headache – the mysterious resource-hogging Antimalware Service Executable service.
For many users, this seemingly harmless process turns into a resource-hungry monster, gobbling up CPU, RAM, or Disk usage and leaving our devices sluggish and unresponsive. It’s the kind of annoyance that can test even the most zen-like patience.
But fear not, my fellow tech enthusiasts, for there’s a light at the end of this tech tunnel. By unraveling the mysteries of the Antimalware Service Executable and its dance with Windows Defender, we can reclaim our system’s performance. With a few savvy tweaks in settings, smart resource management, and just a sprinkle of digital wizardry, we can banish those performance-sapping woes.
So, buckle up as we embark on a journey through the maze of system optimization. We’ll uncover the secrets to taming those pesky CPU, RAM, or Disk Usage spikes caused by our elusive friend, the Antimalware Service Executable. Together, armed with knowledge and determination, let’s conquer the digital landscape and bid adieu to sluggishness once and for all!
What Is Antimalware Service Executable And Why It’s Taking That Much System Resources?
The Antimalware Service Executable, a crucial component of Windows Defender, works behind the scenes to shield your system from malicious software threats in real-time. While its constant vigilance is commendable, it can sometimes get a bit overzealous, hogging up your CPU, RAM, or disk usage.
This resource-heavy behavior usually stems from either Windows Defender being set to scan everything under the sun in real-time or from some pesky bugs lurking within the system. When Windows Defender goes on a scanning spree, it unwittingly becomes the cause of those annoying slowdowns and performance hiccups. Plus, if there are any glitches in the Antimalware Service Executable itself, things can get even worse.
Thankfully, there are a few tricks up our sleeves to tackle these nuisances. You can try dialing down Windows Defender’s settings to prioritize speed over thoroughness or patching up any bugs in the Antimalware Service Executable with updates. Also, scheduling those system scans for off-peak hours can help keep your system humming along smoothly.
So, let’s delve into the necessary steps to address this issue effectively;
Solution #1: Disable Real-time Protection and Reschedule Scans
Alright, so here’s the deal: if your system feels like it’s doing the limbo every time Antimalware Service Executable decides to hog all your resources, there are a couple of tricks up your sleeve that might just save the day.
First off, let’s talk about real-time protection. Yeah, it’s like having a guard dog on constant patrol, but sometimes, that pup gets a bit too excited and starts barking at everything. Temporarily putting that guard dog on a leash—by turning off real-time protection—can give your system a breather. Trust me, it’ll thank you for it.
Now, onto the scheduling front. You know how timing is everything? Well, that applies to scans too. Instead of letting them crash the party during peak hours, why not reschedule them for when your system’s kicking back with a piña colada? That way, your scans can do their thing without crashing your Netflix binge or slowing down your work hustle.
Here’s a step-by-step guide to disabling real-time protection and rescheduling scans in Windows Defender to tame that pesky service hogging your resources:
- Let’s kick things off by opening the Run Dialogue. Just press the WIN + R keys together (that’s the Windows key followed by the letter R).
- Now, type “taskschd.msc” into the Run Dialogue box and hit “OK”. Boom! You’ve just launched the Task Scheduler app.

- Inside the Task Scheduler app, head over to the left-hand pane and expand these tabs in order: “Task Scheduler Library”, “Microsoft”, and “Windows”.

- Keep scrolling down until you spot “Windows Defender” in the list of tasks.

- Right-click on “Windows Defender Scheduled Scan” and pick “Properties” from the menu that pops up.

- In the Properties window, go to the “General” tab. Make sure to uncheck the box next to “Run with highest privileges”.

- Now, switch to the “Conditions” tab and uncheck all the options listed there.

- Time for the “Triggers” tab! Click on “New”.

- Set up the new trigger to schedule when Windows Defender should run its scans. Pick how often, what date, and what time you want the scans to happen, then hit “OK”. After that, click “OK” again to seal the deal.

- Last but not least, give your computer a little nap. Restart it to make sure all those changes stick. With these tweaks in place, the Antimalware Service Executable won’t be gobbling up your CPU resources like it’s Thanksgiving dinner. Your system will thank you for it!
Solution #2: Stop Antimalware Service Executable From Scanning Its Own Directory
Every now and then, a quirky bug pops up, especially when the Windows Defender decides to give its own directory a once-over. This little glitch can throw a wrench into Defender’s smooth sailing and mess with your whole system.
But fear not! There’s a smart fix for this: simply exclude the directory where Windows Defender lives from its own scans. By doing this, you’ll dodge the disruptive effects of the bug and keep Windows Defender running smoothly, ensuring your system stays stable and secure.
Let’s fix that without breaking a sweat:
- First things first, hit that shiny WIN key on your keyboard, then search for the “Settings” option.
- Inside the Settings app, head over to “Update and Security” from the menu tiles.
- Once you’re in the update and security section, go for “Windows Security”, then tap on “Virus and threat protection”.

- Boom! The Windows Security app is now staring back at you. Look for “Virus & threat protection settings”, then give a good ol’ click on “Manage Settings”.

- Keep scrolling until you spot the “Exclusions” section, then hit up the “Add or remove exclusions” option.
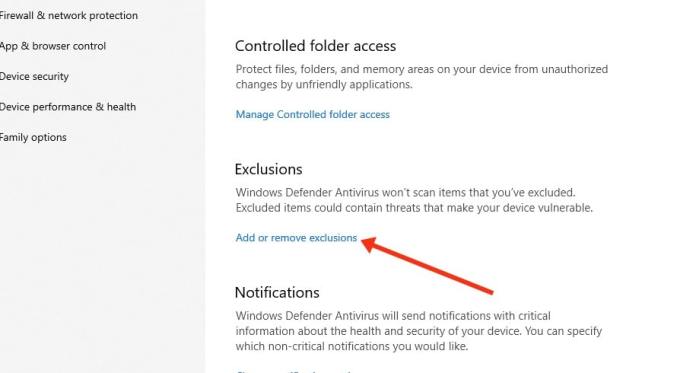
- Here’s where the magic happens. Click on “Add an exclusion”, then pick “Folder” from the list that pops up.

- Now, in the editor, drop in this path: “C:\Program Files\Windows Defender”. Once you’ve done that, seal the deal by clicking on “Select Folder”.
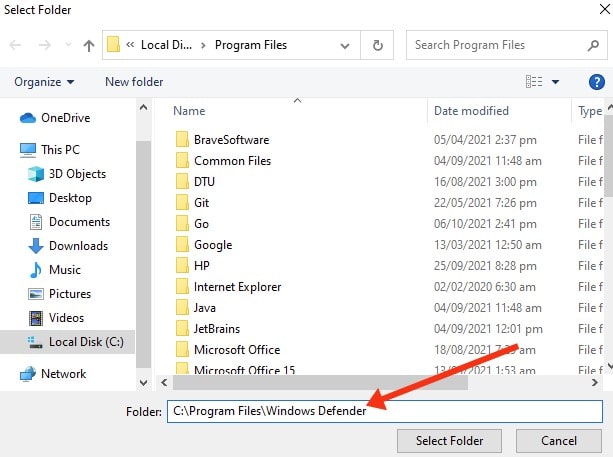
- Just when you thought it couldn’t get any easier, a confirmation prompt pops up. Hit “Yes” like you mean it to seal the deal.
Boom! With those steps nailed, you’ve officially given that folder VIP treatment, keeping it off the Antimalware Service Executable’s radar. Say hello to smoother operations and system stability, and bid adieu to those pesky scanning headaches!
Solution #3: Update Windows
Keeping your Windows system up to date is key to keeping Windows Defender running smoothly. Microsoft regularly rolls out updates packed with fixes, patches, and improvements for various parts of your system, including Windows Defender. By staying on top of these updates, you make sure any glitches or weaknesses in Windows Defender get sorted out pronto, making it more reliable and efficient.
Plus, updates might even bring in new features or tweaks that make Windows Defender even better at protecting your system from nasty threats. So, it’s crucial to keep your Windows system up-to-date to keep Windows Defender sharp and your whole system running smoothly and securely.

Solution #4: Disable Windows Defender
When all else fails to fix issues with Windows Defender or if its constant problems make it impossible to use, the last option might be to turn it off altogether. While Windows Defender is vital for keeping malware at bay, there are times when keeping it running can make system problems worse or clash with other software.
In these cases, disabling Windows Defender—either temporarily or permanently—can be a lifesaver for restoring your system’s stability and functionality. But here’s the catch: turning off Windows Defender means your system is wide open to malware and other security nasties. So, it’s crucial to have other security measures in place or be confident in your ability to handle security risks before taking this step.
Now might be the perfect time to think about getting yourself some top-notch antivirus software for your computer. While Windows Defender does its job as a built-in security feature for Windows, external antivirus software brings extra layers of protection and more advanced features to keep your system safe from a wider range of threats.
A good antivirus suite can do a lot for you: it’ll spot threats in real-time, stop malware before it even gets a chance to do anything, make sure your web browsing is safe, set up a firewall, and more. Basically, it’s like putting your computer in a protective bubble against all the bad stuff out there.
Here’s how to disable Windows Defender using the Registry Editor:
- Press the Win+R keys to open the Run dialog box.
- In the Run dialog box, type “regedit” and click OK to open the Windows Registry Editor.

- Navigate to the following path in the Registry Editor: HKEY_LOCAL_MACHINE\SOFTWARE\Policies\Microsoft\Windows Defender
- Right-click on an empty space within the folder, then select New > DWORD (32-bit) Value from the submenu.

- Name the new DWORD key “DisableAntiSpyware”.
- Double-click on the newly created “DisableAntiSpyware” key to edit its value.
- In the Value data field, enter 1 to permanently disable Windows Defender.

- Click OK to save the changes.
Following these steps will effectively disable Windows Defender via the Registry Editor, giving you the flexibility to use alternative security software or troubleshoot system issues as necessary.


 Error in Middle of Computer Startup")


