


 & HDD (Hard Disk Drive)?")


Everything You Need to Know About Ubuntu Linux
Linux was an established enterprise server when it decided to make software and operating systems more accessible to the people. This is when Ubuntu was ideated.![]()
The word Ubuntu is an ancient African word which means humanity and compassion for others. Mark Shuttleworth, founder and CEO of Canonical Ltd, hoped the bring the spirit of Ubuntu into the world of computers since back in 2004 when he thought about creating Ubuntu, there weren’t many software programs that were available for free.
So Shuttleworth gathered developers from the best Linux projects and teamed them up to develop a user-friendly Linux desktop – Ubuntu.
The vision behind creating Ubuntu was that more people should be able to access free software on the same terms.
It is different from Linux in the way that it does not have separate versions for commercial uses and community members. There is one high-quality version that is released for use for all. All updates that follow the release are also free for all users.
Every Ubuntu release is supported for 18 months and new releases are usually shipped every 6 months. It has a number of applications available for the users which range from word and spreadsheet editing applications to games and email software programs.
#Here Are The Steps To Download And Install Ubuntu:
Try Ubuntu or Install Ubuntu: Before I proceed to talking about the steps of installing Ubuntu, here’s a tip that I want to share with everyone. When you will begin the installation process, you will get two options – Try Ubuntu and Install Ubuntu. It is suggested that you click on Try Ubuntu so that you can run a trial of Ubuntu which will show you the same interface as when you install Ubuntu.
By clicking on try, you have the option to check whether your computer works fine on it or not by checking all the functions and connecting it to the Wi-Fi or LAN.
IF anything is out of place then you can restart your computer to go back to your previous operating system and look up the Ubuntu forums to identify the problem and look for a solution. You can also search Google or look up YouTube videos to find a solution for the problem you are facing.
This is one of the good things about using the Try Ubuntu option. On the other hand if you install it directly, then all previous data will be wiped off of your computer and you will have the fresh Ubuntu OS to yourself.
You will see an icon to install Ubuntu on your desktop when you use the try Ubuntu option. If you are satisfied with the interface and if your laptop is working fine on it – all the keys are responding properly and the Wi-Fi is working too – then you can click on the install option and complete the installation.
Clicking on Try Ubuntu saves you a lot of hassles and is a precautionary method to ensure that Ubuntu will work fine.

Preparing Your Computer: Begin by creating a backup of all your current data so that you do not lose any important data in the process of installing a new operating system. When you install Ubuntu all data stored in your computer will be wiped clean. You will not have access to any of that data any longer. So make sure that you make all necessary backups of important files.
Those who are using a laptop must make sure that their laptop is connected to the power source so that the laptop battery does not die before the installation is complete.
The computer should have at least 5GB of free storage for Ubuntu to be installed.
Other Requirements: You will require a flash drive on which you can copy the Ubuntu in a bootable form. If you don’t have a flash drive to make it bootable, then you can also use a DVD on which you can boot the operating system as well too.
Booting From A DVD: Put the DVD on which you have downloaded Ubuntu into your computer’s optical or DVD drive and then restart the computer. When the computer starts up and the desktop loads, the welcome window will pop up on your screen. Pick the language that you want to install Ubuntu in and then you will have the choice to either try Ubuntu or install it. Like we discussed, click on Try Ubuntu and if it works well, click on the Install Ubuntu icon.
Booting From A Flash Drive: Insert the USB flash drive to your computer and restart it. Most computers will take you to the welcome screen where you can choose the language and click on Try Ubuntu to proceed. But a few computers may not take you to this screen directly. Then restart the computer and hold the F12 key. This will open a window from which you can choose the USB device on which you have loaded Ubuntu. The next screen will give you the option to try or install Ubuntu. Click on Try Ubuntu and check if everything is working fine on Ubuntu before you proceed to install the OS.
Suggested Links;
- How To Make Bootable USB Flash Drive – Explained
- How To Make A Bootable CD, DVD & Blu-Ray Disc?
- What’s A Bootable CD, DVD Or A USB Flash Drive?
- How to Quick Boot A USB or CD/DVD Directly From the Boot Menu?
- What is Boot, Booting and Bootable Devices?
#Installation Screens That You Will Come Across:
- Once you click on install Ubuntu you will be asked to choose the language and then press continue.
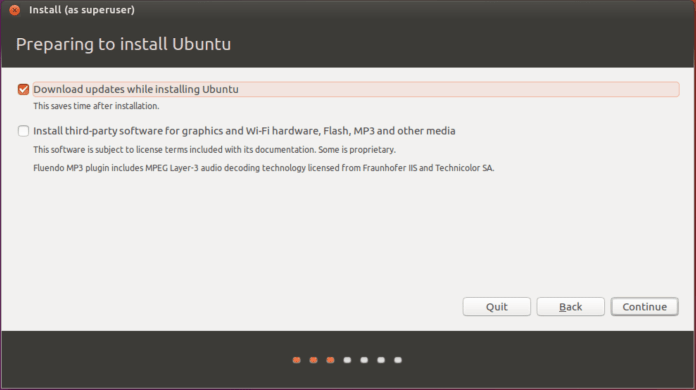
- The next screen will ask you about updates and third-party It is advised to check on both boxes – Download Updates and Install Third-Party Software. This will help Ubuntu to automatically check for updates after installation and install the updates too. Your laptop may also require third party software like Wi-Fi drivers so clicking on these two checkboxes will make things smooth for you.
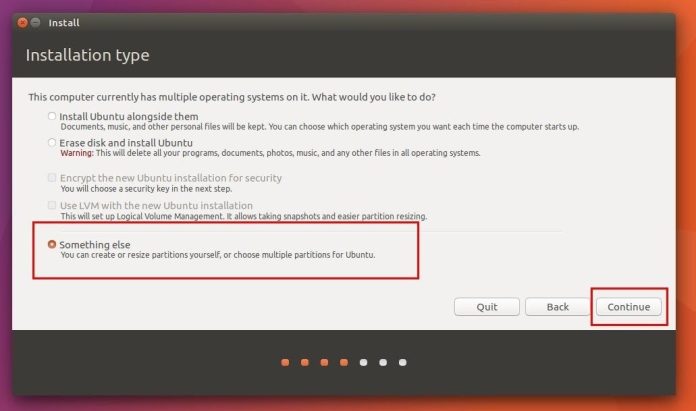
- The next step will ask you to choose a drive on which Ubuntu will be installed. It will erase previous data and wipe your current OS from the system and install Ubuntu. If you would like to encrypt your data so that no one can access any of your information when you are not near your computer then you can choose the option that says ‘Encrypt the new Ubuntu installation for security’. If security is not a concern then you can let the default option stay selected before you click on ‘Install Now’.
- You will notice a small window pane that confirms your selections for you and warns you that changes will be written on the disk. Click on Continue to proceed with the installation of Ubuntu on your computer.
- Now you will be asked to enter your location to choose the time zone and the keyboard layout that you want for your computer. You have the option to change these after the installation is complete.
- The next screen will ask you to enter your credentials. Here you get the chance to pick a name for your computer and a username and password. There are options where you can choose either to log in automatically or to ask for your password when you login. For those who chose not to encrypt the installation have another measure of security on this screen where they can encrypt the home folder. You will notice a warning that if you forget your password then you will not be able to access the data in your home folder.
- Clicking on continue will take you to a window which will talk about Ubuntu’s features while the installer runs in the background complete the installation on your computer.
- The installation should complete in a few minutes depending on the speed of your internet connection and your computer.
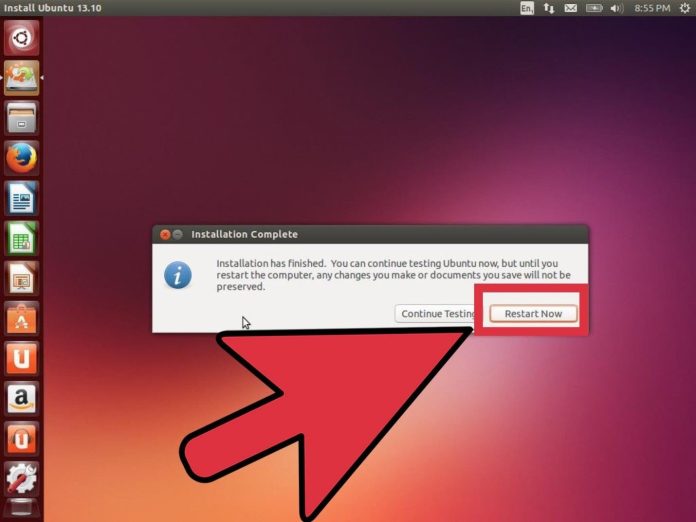
- When the installation completes, you will get a message confirming that the installation is done and you must restart your computer. Click on Restart Now and Ubuntu will be ready for you to use.
Installing Software on Ubuntu: With the OS installed, you may be eager to installing new software on your system. Before you begin installing the software, make sure that the following is done:
- Click on the Ubuntu icon and go to Software and Updates
- On the window that opens, makes sure that under the first tab – Ubuntu Software, multiverse and universe are checked.
Method 1: To install a software using the software center follow these steps:
- Click on the Dashboard which is a purple color icon on the sidebar.
- Use the search option to look for Ubuntu Software Center and open it.
- Use the search option to find the software you want to download. If you are surfing through different software options then you can select different categories from the left side of the screen.

- Click on the software that you want to install and click on install.
- You will be asked to enter the password for the computer to proceed. Enter the password and click on Authenticate.
- The software will be installed.
Method 2: To install the software using the Terminal, follow these steps:
- Press the keys Ctrl, Alt and T together to open the Terminal. You can also access the Terminal by going to the Dashboard and then searching for Terminal.

- If the name of the software is x, then you must enter the following command in Terminal: sudo apt-get install x
- You can put the name of whichever software you want to install in place of x. For example, to install Firefox you will have to enter sudo apt-get install Firefox.
#3 Things To Do After Installation
The Launcher: The sidebar which has a number of icons on your screen is known as the launcher. It usually sits on the side of the screen but here are a few ways in which you can modify things to make them more user-friendly for yourself.
First of all, if you would like to change the size of the icons then click on the Control Gear icon from the launcher and then click on System Settings. Now choose Appearance which is under Personal and then from the Look Tab, change the size of the icons by dragging the slider for Launcher Icon Size. Moving it to the left will make the icons smaller and taking them to the right will increase the size of the icons.
You also have the option of auto-hiding the launcher. For this, you follow the same steps as above to till you reach the Appearance section. Now click on the Behavior Tab and you can switch on or switch off the button for ‘Auto-hide the Launcher’.
The Theme: You can customize the theme that you are using in Ubuntu by following these steps:
- Click on the Control Gear and then head to System Settings.
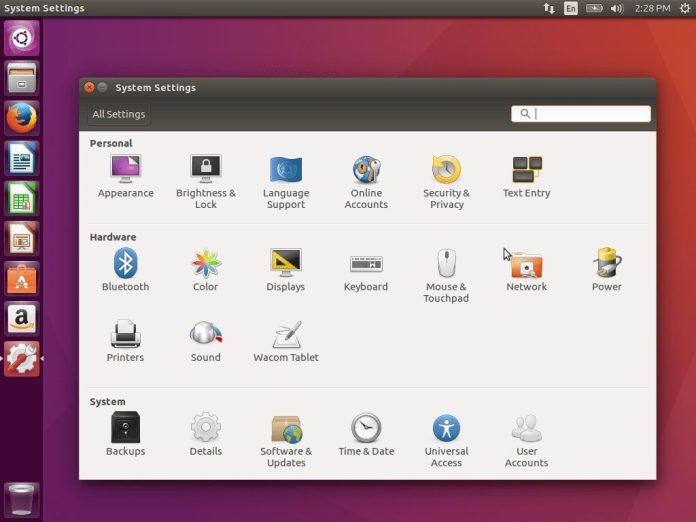
- Click on Appearance under Personal and then under the Look tab you will find the option to customize the theme.
- Choose the theme you like from the drop-down menu in theme.
Connect to Ubuntu One: Ubuntu One is a cloud storage service where you can sync all your files and store it in the cloud. With Ubuntu One you will be able to easily access your files from anywhere.
- Click on the envelope icon on the top right of the screen.
- From the drop-down menu, click on Ubuntu One.
- Click on the radio button which says ‘I am a new Ubuntu One user’
- Then type in the required details and you will get a message confirming that you have been signed up for Ubuntu One.
- You can download the desktop client from the following link: https://one.ubuntu.com/downloads/
- Use the account details that you used to sign up and you should be able to use Ubuntu One and avail 5GB free cloud storage too.

Ubuntu is a very easy and user-friendly OS which makes a number of software programs available for you free of cost. You can use the Ubuntu Software Center to search for new software or the Ubuntu Apps Directory. If you see something you like, then you can easily install download and install it. This free Linux OS has a lot more to it. If you happen to get stuck somewhere, then you can access free tutorials on https://tutorials.ubuntu.com/. Another helpful place for support is the Ubuntu community support page https://www.ubuntu.com/support/community-support.
“And that’s all for now, thanks for sticking with the article, and you know it will always good to let me know about the tutorial, in the comments down below.” 🙂


 Error in Middle of Computer Startup")


