


 & HDD (Hard Disk Drive)?")


You know when you’re browsing the web, and you see that little padlock icon assuring you everything’s secure? That’s thanks to encryption protocols doing their magic to keep your data safe during transmission between websites and your device.
But hey, even with all these security measures, sometimes things don’t go as planned. One particularly annoying hiccup is the infamous “ERR_SSL_VERSION_OR_CIPHER_MISMATCH” error. It’s like the ghost in the machine that pops up when your browser tries to establish a secure connection with a website, but they just can’t agree on how to do it.
Here’s the lowdown: SSL (Secure Sockets Layer) and its successor, TLS (Transport Layer Security), are like the bodyguards of internet communication, ensuring your data stays hidden from prying eyes. When you see that error message, it means there’s a mismatch between the encryption protocols or cipher suites supported by your browser and the website’s server.
This mismatch can happen for a bunch of reasons—maybe your browser’s outdated, the server’s settings are wonky, or they’re just speaking different encryption languages. Figuring out what’s causing the hiccup is key for website admins and tech pros. Once you know the why, you can roll up your sleeves and fix it, getting things back on track for smooth, secure browsing.
In the wild world of cybersecurity, knowledge is power. Dealing with errors like “ERR_SSL_VERSION_OR_CIPHER_MISMATCH” means understanding the nitty-gritty of encryption protocols and network setups. With a bit of know-how and a dollop of diligence, we can keep our digital spaces safe and sound for everyone surfing the web. So, let’s see how to fix it.
Quick Tip
When you come across an SSL network error on a particular website, it’s crucial to understand that fixing such issues typically falls under the responsibility of the website’s administrator or webmaster. As a user, your options are pretty limited—you can report the error and then sit back, crossing your fingers while waiting for the responsible party to address and resolve it.
To make the reporting process smoother and to gain some insights into the SSL setup of the troublesome website, you can turn to online tools like “https://www.ssllabs.com/ssltest/“. This nifty tool offers a thorough SSL test that evaluates the security setup of the targeted website’s SSL certificate. Simply plug in the URL of the site that’s giving you SSL headaches into the SSL Labs SSL Test tool, and voila! You’ll get a wealth of information about the SSL certificate, including its validity, encryption protocols, and any potential vulnerabilities it might have.
Solution #1: Clear Old SSL Certificates
When you surf the web using any web browser on your computer, it automatically saves Secure Sockets Layer (SSL) security certificates from websites that use SSL encryption. This handy process, called caching SSL certificates, speeds up your future visits to those websites by keeping these certificates stored locally on your device. But, every now and then, your browser might save a wonky certificate, causing errors to pop up during your browsing sessions.
Encountering SSL errors or similar snags often boils down to these cached certificates acting up. To fix these issues and get your browsing back to normal, you’ve got a few options. You can tweak your browser settings or clear out those stored certificates from your computer.
Here’s a step-by-step guide on how to clear the SSL certificate cache on Windows using this method:
- Open Control Panel: Start by opening the Control Panel on your Windows computer. You can do this by searching for “Control Panel” in the Windows search bar or finding it in the Start menu.
- Access Internet Options: In the Control Panel, look for and click on the “Internet Options” icon. This will bring up a new window with various internet settings and options.
- Go to the Content tab: Within the Internet Options window, switch to the “Content” tab. You’ll usually find it at the top of the window, clearly labeled.
- Clear SSL state: Under the Content tab, locate the “Certificates” section and click on the “Clear SSL state” button. This will delete all SSL certificates stored in the cache on your Windows computer.

- Confirm the action: If a confirmation prompt pops up, confirming the action of clearing the SSL state, go ahead and confirm it to proceed.
- Close and Apply Changes: Once you’ve cleared the SSL state, close the Internet Options window and any other open Control Panel windows. Your changes will be applied automatically.
By giving your SSL state a good scrub-a-dub, you’re basically hitting the reset button on those certificates. This little trick can sort out any woes related to outdated or wonky certificates, making your online adventures smoother and safer than ever before. Cheers to that!
Solution #2: Turn Off “Experimental QUIC Protocol”
QUIC, the new kid on the block in the realm of internet protocols. Standing for Quick UDP Internet Connections, it’s Google’s brainchild, promising faster speeds and beefed-up security compared to the traditional TCP connections we’re used to. How does it work its magic? By blending the best of TCP and TLS (Transport Layer Security) into a single protocol, running over UDP (User Datagram Protocol).
Sounds pretty sweet, right? Well, hold onto your hats, because there’s a catch. Despite its perks, QUIC is still in the experimental phase, meaning it might not play nicely with all networks and web servers out there. Sometimes, enabling QUIC in your browser or network settings can lead to a world of trouble, like the dreaded “ERR SSL VERSION OR CIPHER MISMATCH” error.
But fear not! There’s a lifeline: disabling QUIC and reverting to good old TCP. Here’s how you can do it in Google Chrome:
- Fire up Google Chrome on your trusty device.
- In the address bar, type “chrome://flags” and hit Enter. This will take you to Chrome’s treasure trove of experimental features.
- Now, in the search bar, type “Experimental QUIC protocol” to locate the setting you’re after.
- Once you’ve found it, switch the option labeled “Experimental QUIC protocol” to “Disabled” using the dropdown menu.

- Last but not least, give Chrome a quick restart to make sure the changes take effect.
Solution #3: Turn On “TLS 1.3 Support”
In the fast-paced world of internet security, staying up-to-date with the latest encryption protocols is key to keeping your online experience safe and smooth. Transport Layer Security (TLS) plays a vital role in ensuring that your data exchanges with websites remain encrypted, protecting you from potential threats.
Enter TLS 1.3 – a game-changer in encryption technology, offering improved security and performance compared to its predecessors. While newer versions of popular web browsers typically come equipped with TLS 1.3 support out of the box, users of older browser editions may need to roll up their sleeves and enable this protocol manually.
Here’s a step-by-step guide to get TLS 1.3 up and running in older versions of Google Chrome:
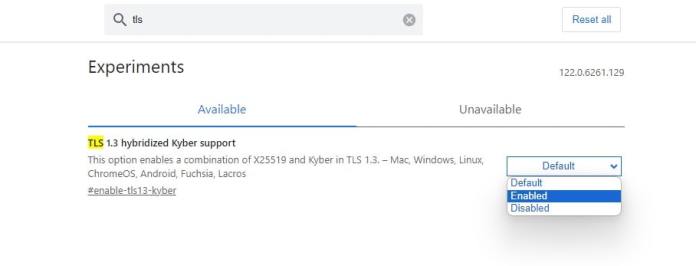
- Access Chrome Flags: Launch Google Chrome on your computer and head to the address bar. Type “chrome://flags” (without quotes) and hit Enter. This will whisk you away to the Chrome Flags page, where you can tweak experimental features and settings.
- Search for TLS: Once on the Chrome Flags page, spot the search bar at the top. Type “TLS” (again, no quotes) into the search bar and hit Enter. This will filter the options to display those related to TLS protocols.
- Enable TLS 1.3 Support: Now, it’s time to hunt down the option labeled “TLS 1.3 support”. You might need to scroll a bit to find it. Once you’ve located it, click on the dropdown menu next to it and select “Enabled” from the list of choices.
- Restart Chrome: With TLS 1.3 support enabled, Chrome will kindly ask for a restart to apply the changes. Click on the “Relaunch” button that pops up at the bottom of the screen to give Chrome a fresh start with the new settings.
- Revisit the Website: Once Chrome boots back up, pay a visit to the website that previously gave you SSL-related grief. With TLS 1.3 now in the mix, your browser should establish a secure connection with the site, bid adieu to any SSL version or cipher mismatches.
Solution #4: Disable Firewall

Firewalls are like the stalwart guardians of your computer or network, diligently monitoring the flow of incoming and outgoing traffic to keep out the bad guys. But sometimes, their overzealous nature can accidentally block legitimate connections, causing headaches like SSL network errors. In moments like these, turning off the firewall temporarily can help figure out if it’s the culprit.
Here’s a handy guide to disabling the firewall on a Windows system:
- Access Control Panel: Kick things off by clicking the Start button or tapping the Windows key on your keyboard to summon the Start menu. Then, type “Control Panel” into the search bar and hit Enter to dive into the Control Panel.
- Navigate to System and Security: Within the Control Panel, hunt down the section called “System and Security” and give it a click to reveal its secrets.
- Open Windows Defender Firewall: In the realm of “System and Security”, keep an eye out for the holy grail – “Windows Defender Firewall”. Click on it to access the firewall’s inner sanctum.
- Turn Windows Defender Firewall Off or On: Inside the Windows Defender Firewall window, you’ll spot a bunch of options on the left side. Look for the one labeled “Turn Windows Defender Firewall on or off”.

- Disable the Firewall: Now, you’re faced with a decision. In the “Customize settings for each type of network” section, you’ll find toggles for both private and public networks. Click on the radio button next to “Turn off Windows Defender Firewall (not recommended)” for both.

- Save Changes: Once you’ve made your bold move to deactivate the firewall, seal the deal by clicking the “OK” button. Windows might ask for confirmation, so if it does, just nod along and click “Yes” or “OK”.
- Revisit the Website: With the firewall now taking a nap, fire up your web browser and head back to the website that was giving you grief with SSL errors. See if you can establish a secure connection without any hiccups now that the firewall is out of the picture.
Solution #5: Disable Antivirus
Antivirus software is like the knight in shining armor for your computer, warding off malware, viruses, and all sorts of digital nasties. But sometimes, even the noblest of guardians can get a little too protective and mess with your secure connections, causing those dreaded SSL errors and connectivity woes. When that happens, it might be time to put your antivirus on temporary standby to see if it’s the culprit.

Solution #6: Reset or Reinstall Chrome Browser
Resetting your Chrome browser can work wonders, tackling a host of problems like those pesky SSL errors, simply by returning the browser to its default settings. This nifty little trick can nip misconfigurations and conflicts in the bud. Here’s your step-by-step guide to Chrome restoration:
- Open Chrome and click on the menu at the top right.
- Select “Settings”.
- Scroll down and click on “Show advanced settings”.
- Find “Reset settings” and click it.
- Confirm the reset.
- Wait for Chrome to finish resetting.
- Restart Chrome.
If resetting your browser’s settings doesn’t do the trick, a clean slate might be in order. Here’s how to uninstall and reinstall Google Chrome for a fresh start:
Uninstall Chrome:
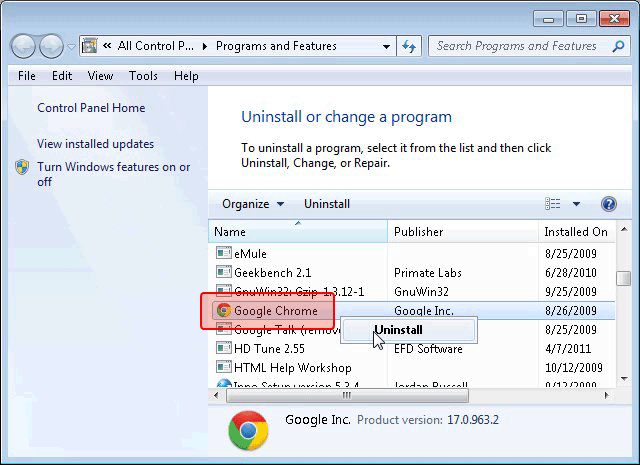
- Open Run Command: Press the “Windows key + R key” at the same time to summon the Run dialog box.
- Type Command: In the Run dialog box, type “appwiz.cpl” and hit Enter. This command opens the Programs and Features window.
- Select Chrome: In the Programs and Features window, locate Google Chrome in the list of installed programs. Click on it to highlight.
- Uninstall Chrome: With Google Chrome selected, hit the “Uninstall” button at the top of the window. Follow the on-screen prompts to finish uninstalling Chrome.
Reinstall Chrome: Now head over to the official Google Chrome website. and look for the download link for Chrome and give it a click to start the download. Once the download is done, find the downloaded file and double-click to kick off the installation. Follow the prompts to install Chrome on your system.
If you’ve tried everything and the SSL error still persists, it might be time to loop in your Internet Service Provider (ISP). They can dive deeper into any network issues causing the problem.
Alternatively, if the SSL error only pops up on a specific website, it could be due to updates or maintenance on their end. Give it some time, then try accessing the site again – sometimes, patience is the best solution.
When you've been waiting for the webpage to load for hours, but your Wi-Fi is just like, 'Nah, I'm on a break!' 🤷♂️📶🤯💻
WIFI is Connected but No Internet Access – What to Do?https://t.co/UGUk1gCkcK#LoadingHell #InternetWoes #WifiFails #ConnectionConundrum #NetworkNonsense pic.twitter.com/zFCbG6gnlA— deskdecode (@deskdecode) March 6, 2024


The Chrome setting for minimum SSL/TLS seems to be gone in version 53.
Latest chrome don’t have that option, you can try to “Disable QUIC”, maybe that will works for you.
Execuse me . Now I just want to enable https visting avaiable . By settting server.xml of tomcat . But still
the tips occur . Having tried many methods to solve the issue . Still not work . How to deal with that .
having this problem on your website?
Nnno. None of these work at all.
I am still running Chrome on Windows XP. Will your suggested fixes still work for me?
Yes 🙂
Not true. I am running Chrome on XP and I have tried every method I could find on the web…even reinstalling the OS. The problem still exists for me. Selecting “disable SSLv3” in Chrome is not even an option in Chrome 49…which is the latest version you can get for XP.
Thank Sir,
I got my solution by your article.
Gaurav
@Reinstall Chrome Bowser (browser?
If I uninstall chrome how do I download a new version please?
by using some other preinstalled browser.
If you are going through a firewall you want to have your firewall team check the enycrption settings. This problem had me troubled for a while.
Nothing is working. May be it’s because It’s 11:00 am in India. On the other hand they shut down there machine in middle of night.
Cho minh hoi la sua chua duoc loi tren he dieu hanh IOS app chorme and series ???
It’s common to having this problem on your website and mainly this error only occurs on those websites who using SSL security certificates to encrypt their connection between a user and the website.
Thanks for sharing this valuable content with us this work is appreciable and I have bookmarked your website.
If you see this error on your website, then it means that the secure connection can’t be able to establish on a browser because of some outdated security code on your website. Chrome is just protecting the user’s privacy by preventing the page to open.