


 & HDD (Hard Disk Drive)?")


In the fast-paced world of portable computing, stumbling upon a cracked or broken laptop screen can make you feel like you’ve hit a major tech crossroads. Imagine this: you’re deep into your work, smoothly navigating virtual landscapes, and then out of nowhere, a dead or burned pixel throws off the whole visual vibe. But fear not, because the solution lies in the artful finesse of fixing or swapping out that glitchy screen.
Now, getting into this requires a delicate dance with technology, where every component has to harmonize with precision. It’s a process that involves taking apart your laptop, revealing the circuits and connectors underneath. Think of it like a symphony of careful maneuvers, a ballet of digital surgery.
And for those wrestling with the idea that their display has kicked the bucket just because it stays in the shadows during the system’s startup, fret not! We’ve got a bunch of handy articles ready to clear up any doubts.
- Testing Laptop For Broken & Faulty Screen (Display Troubleshooting)
- Laptop Turns ON But No Display On Monitor! – Every Possible Solution
So, Let’s See How To Change A Broken Or Faulty Laptop’s Display
Embarking on the quest to revive your laptop’s visual glory starts with a crucial step – getting yourself a shiny new display screen. Whether you fancy an original replacement or a compatible one, the vast realm of online stores awaits, offering a myriad of options tailor-made for your laptop model. And, as you stroll through the virtual aisles, why not consider tossing a screwdriver kit into your cart? It may be modest, but it’s an indispensable companion for the tech journey that lies ahead.
Laptop’s Display Starts From: @Amazon US ($50.99), @Amazon UK (£49.99), @Amazon IND (₹2,499.00), @Walmart US ($74.99), @Newegg ($54.99).
Screwdriver Kit Starts From: @Amazon US ($9.99), @Amazon UK (£9.99), @Amazon IND (₹149.00), @Walmart US ($9.99), @Newegg ($10.99).
No matter if your laptop rocks LCD or LED display tech, the revival process follows a standardized path, ensuring a smooth approach for screens of all kinds. Think of this tutorial as your digital guide, leading you through the intricacies with precision.
Let’s move on to the procedure:
- Power Down Gracefully To start, gracefully power down your laptop. Disconnect both the power adaptor cable and the battery, severing the lifelines that sustain its electronic heartbeat.

- Peel Off the Rubber Protector Next, enter the delicate domain of dismantling by peeling away the rubber protector cover. Use the nimble dexterity of your nails to reveal the hidden facets beneath, shielding the front panel screws.

- Unveil the Inner Sanctum Reveal the inner sanctum with a trusty screwdriver. Extract the screws binding the display panel. If some elusive screws escape your scrutiny, proceed gracefully to the next act in this technological ballet.

- Crack Open the Casing With finesse, crack open the display case, delicately prying it apart with your fingernails or the gentle persuasion of a flat (-) screwdriver. Let the base cover part ways, unveiling the internal tapestry of your laptop.

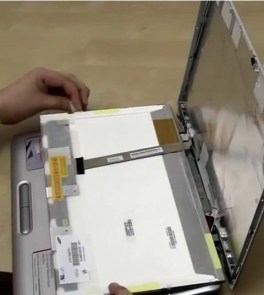
- Unscrew the Hinge Navigate the labyrinth of screws, focusing on those entwined with the laptop’s hinge. Unscrew the ties that bind, liberating the display from its casings. Caution guides your hands to ensure the sanctity of the webcam cable remains undisturbed or safely disconnected.

- Extract the Video Connector Gently lay the screen on the keyboard, extracting the video connector. A transparent tape may cloak this vital connection, revealing it as you peel away the layers.

- Untether the CCFL Power Connector Venture into the depths of the LCD screen, untethering the CCFL power connector. For LED enthusiasts, basking in the glow of their technology, no power connector lurks beneath, as LED requires no such tethering.

- Introduce the New LCD/LED The grand moment arrives—introduce the new LCD or LED to its rightful place. Reunite the video cable and, if applicable, the CCFL power connector. Each connection fosters the resurrection of your laptop’s visual symphony.
- Assemble the Laptop Assemble the fragments with reverence, reinstalling the screws to the hinge and frame. Reattach the front casing, a puzzle of components coming together in a cohesive reunion.
- Test the Grand Performance With the grand performance nearly complete, rekindle the electronic vitality. Reconnect the battery, breathe life into your laptop, and witness the luminous resurrection. No intricate software or compatibility drivers are required; your display, reborn, awaits your important endeavors. Plug in, power on, and seamlessly resume the tasks that awaited this triumphant return to visual brilliance.

What are the common mistakes to avoid when replacing a laptop screen?
When replacing a laptop screen, it’s crucial to steer clear of common mistakes that could result in damage or injury. Here are some pitfalls to avoid:
- Impatience: Rushing the process and trying to force open or remove the screen while the adhesive is still cool can lead to broken glass, bent parts, or critical failures. Exercise patience and use appropriate tools to gently separate the screen.
- Screws Mismanagement: Losing track of screw sizes and locations during removal can complicate proper reassembly. Take pictures or refer to the manufacturer’s diagrams to ensure screws are replaced in their correct positions.
- Display Damage: Careless handling of the screen during replacement may cause scratches or other damage. Safeguard the laptop with a soft cloth or towel and handle the screen with care.
- Incorrect Cable Disconnection: Disconnecting the display cable improperly, such as pulling too hard, can damage the cable. Slowly and carefully disconnect the cable to avoid any harm.
- Inappropriate Tools Usage: Using the wrong tools, such as a dull knife or improper pry tool, can harm the laptop or screen. Utilize appropriate tools, such as a plastic pry tool or thin metal spatula, to gently separate the screen.
- Ignoring Safety Precautions: Always power off and unplug the laptop before attempting a screen replacement. If the laptop has a power board, avoid replacing the screen with a powered board, as it can pose risks.
By steering clear of these common mistakes, you can ensure a successful laptop screen replacement without causing further damage to your device.
Suggested Articles:
- Fix For – Screen Flickers When Playing Games
- PC Turns ON But No Display On Monitor! – Every Possible Solution


")
Basically i did not try to change my laptop screen if something wrong on it, i generally go to service center to sort it out, but i love your guidance for solution.
It help me a lot, Thanks