


 & HDD (Hard Disk Drive)?")


ReadyBoost—a nifty Disk Cache Service feature Microsoft rolled out with Windows Vista back in 2007.
Imagine this: your old computer is feeling a bit sluggish, but instead of splurging on a fancy new SSD or RAM upgrade, you pop in a USB flash drive or SD card and let ReadyBoost work its magic.
ReadyBoost acts like a turbocharger for your system, using these external storage devices to give your hard drive a helping hand. Its main gig? Speeding up your PC’s responsiveness, especially if you’re rocking older hardware or limited RAM.
So, what’s the secret sauce? Flash memory, my friends. Unlike our trusty old sluggish hard disk drives (HDDs), flash memory—think USB drives and SD cards—offers blazing-fast read and write speeds. ReadyBoost taps into this speed demon to cache frequently used data, slashing the time it takes to fire up apps, open files, and tackle other disk-heavy tasks.
Now, let’s rewind a bit. Before ReadyBoost strutted onto the scene, upgrading your hardware was often the go-to fix for a sluggish system. But let’s be real, not everyone’s keen on dropping big bucks for a hardware makeover, especially if you’re on a tight budget or clinging to an older computer like it’s a vintage relic.
Enter ReadyBoost, Microsoft’s budget-friendly knight in shining armor. With Windows Vista, they gave us a way to supercharge our PCs without breaking the bank. Just plug in a cheap external storage device, enable ReadyBoost, and voila! Your old-timer suddenly feels a lot snappier and more responsive.
And the saga continues! ReadyBoost has been hanging around since Vista, making appearances in Windows 7, 8, 10, and 11, with tweaks and optimizations along the way. Sure, its mileage may vary depending on your system setup and how you use your PC. But for those rocking limited resources, ReadyBoost is still a solid go-to for squeezing out some extra performance juice.
Benefits of ReadyBoost for Windows PCs:
- Faster Load Times: One of the standout perks of ReadyBoost is its ability to turbocharge the loading times of your favorite applications and frequently accessed files. By storing these in the faster cache of your external storage, you’ll be zipping through tasks like never before.
- Reduced Disk Activity and Noise: ReadyBoost acts like a helpful assistant, reducing the workload on your hard drive. This means less spinning and churning, resulting in reduced disk activity and a quieter computing experience. Say goodbye to those noisy disk operations!
- Extended Battery Life: For laptop users, ReadyBoost can be a lifesaver on the go. By offloading some memory operations to the cache instead of constantly accessing the power-hungry hard disk, ReadyBoost can help conserve battery life. It’s like giving your laptop a little energy-saving boost!
- Improved Responsiveness: Whether you’re juggling multiple tasks, hopping between windows, or waking your PC from sleep or hibernation, ReadyBoost is there to make sure your system stays snappy and responsive. It’s like having a performance enhancer for your multitasking adventures!
Exactly, How Does ReadyBoost Work?
ReadyBoost and SuperFetch—the dynamic duo from the Windows Vista era! Think of SuperFetch as your computer’s personal assistant. It pre-loads crucial files like Process File Libraries and Application Components into your memory, cutting down on loading times. It’s always one step ahead, predicting what your programs will need next by analyzing their activities and patterns. It’s like a digital detective, tracking program actions and creating a cache of these records to speed things up.
Now, ReadyBoost kicks in with a neat trick: it duplicates all this cached data and stores it on an external USB drive. This means your system can read cache records from this duplicate location, keeping your USB drive busy and your system running smoothly.
Plus, when it’s time to write new data, ReadyBoost acts like a buffer, speeding up those write operations before sending them off to the hard drive. It uses a nifty algorithm to figure out which data deserves prime real estate in the cache. This way, it’s always optimizing performance by focusing on what matters most to your system.
Here’s the cool part: since all cache files on the USB are duplicates, removing the drive suddenly won’t throw a wrench in the works. Your system just switches back to the original cache, no sweat! Not only that, ReadyBoost lets Windows tweak the cache size on-the-fly based on your system’s needs. It’s like a self-adjusting belt that ensures you’re getting the best performance without hogging all your storage space.
ReadyBoost mainly creates a disk cache file named “ReadyBoost.sfcache” on your external device for reading and writing cache data. Enable it on a Pendrive, and after a few minutes, depending on your PC’s performance, you’ll have a full-size Cache Database file. And remember, the file’s size? It varies based on your USB storage capacity.
ReadyBoost Limitations
ReadyBoost is a lifesaver for those of us who either can’t afford or aren’t too keen on cracking open our PCs to add more RAM. But, like any superhero, ReadyBoost has its kryptonite—let’s break down its limitations.
The Catch(es):
- Compatibility Woes: ReadyBoost isn’t besties with your mobile phones, cameras, or devices with emulated storage. Also, if you’re rocking Windows Server 2008 or the latest Windows 11 version 22H2, sorry, ReadyBoost won’t be joining your party.
- Performance Quirks: While ReadyBoost can be a game-changer for memory-strapped systems, its impact diminishes as RAM prices drop and more RAM is added. USB 2.0 drives, while handy, can’t quite match the speed of modern desktop hard drives.
- Size Matters: Your removable storage needs to pack at least 256 MB (that’s 250 MB after formatting). Windows 7 lets you use up to eight devices, totaling 256 GB of extra memory, with a max of 32 GB on a single device. Plus, it needs to be snappy with access times under 1 ms and read speeds of 2.5 MB/s for those quick 4 kB reads and write speeds of 1.75 MB/s for 512 kB writes.
- Wear and Tear: Flash drives have a lifespan, and ReadyBoost can speed up that countdown with its frequent write operations.
- Need for Speed: ReadyBoost is no match for the lightning-fast speeds of RAM, especially on beefier systems.
- File System Follies: If you’re on a 32-bit OS, you’re capped at a 4GB file size due to OS limitations. Got a 64-bit OS but using FAT32? You’ll need to reformat to NTFS to unlock your flash drive’s full potential with ReadyBoost.
- SSD Snub: If you’ve already splurged on an SSD for your OS, ReadyBoost takes a backseat. SSDs are already speedy, making ReadyBoost redundant.
At This Moment, Is ReadyBoost Still Useful?
Now, a quick RAM refresher: RAM (Random Access Memory) is where your computer juggles all its active tasks. It’s super-fast, operating about 100 times quicker than your old-school hard disk drive. Surprisingly, even a snazzy USB drive (Pendrive) is only about 10 times slower than a hard disk.
When your computer runs out of RAM, it starts storing extra data on the hard disk. Sounds harmless, right? Wrong! This switch to the slower hard disk can drag down your system’s performance.
That’s where ReadyBoost steps in. It lets your computer tap into a USB drive’s storage as an extra RAM cache, reducing the workload on your hard disk and potentially revving up your system. It’s a game-changer for those with limited RAM, like the 512 MB to 1 GB crew, offering a noticeable performance boost.
But, here’s the catch: ReadyBoost’s magic fades as your RAM stash grows. If you’re rocking more than 3 GB of RAM, don’t expect ReadyBoost to work miracles; the improvement might be subtle or even non-existent.
Plus, if you have a snazzy Solid-State Drive (SSD) in your computer? Well, Windows plays it smart and automatically hits the brakes on ReadyBoost. Why? Because SSDs are the speed demons of storage, leaving SD cards and USB drives in the dust when it comes to data access and retrieval. Instead of relying on ReadyBoost, Windows taps into the SSD’s blazing-fast speeds by using it for a page file (or swap file). Think of this page file as your computer’s safety net—it’s virtual memory that kicks in when your RAM is maxed out.
ReadyBoost shines in these scenarios:
- Computers with skimpy RAM and sluggish hard disks can see a massive performance boost with ReadyBoost.
- ReadyBoost teams up best with speedy USB drives that play nice with USB 3.0.
- Got a computer with 1 or 2 GB of RAM but still need a memory boost for new tasks? ReadyBoost can offer a decent performance kick.
To put it all in perspective, imagine two identical computers in a face-off. One has a measly 512 MB of RAM but packs a 4 GB ReadyBoost Pendrive. The other relies solely on its 512 MB RAM. The results? Let’s just say ReadyBoost brings a lot to the table!

In today’s tech landscape, it’s pretty common to find computers packing at least 4 GB of RAM, if not more. With this beefed-up RAM in modern machines, ReadyBoost might not be the performance game-changer it once was. Think of it like trying to supercharge a sports car—if the engine’s already a powerhouse, there’s only so much more speed you can squeeze out!
Now, Let’s See How To Use ReadyBoost In Your Window
So, you’ve heard of ReadyBoost and you’re wondering how to jump on this speed-boosting bandwagon? Don’t worry, it’s not rocket science. Whether you’re a fan of Autoplay or prefer to get your hands dirty with some manual tweaking, we’ve got you covered. Buckle up, and let’s dive in!
1. The Autoplay Route: Speeding Up with a Single Click
- Plug and Pray: Stick that nifty USB flash drive into your PC, and wait for the Autoplay window to make its grand entrance.
- Speed Me Up, Scotty!: Spot the “Speed up my system” option? Give it a cheeky click, and voila! ReadyBoost is now setting up shop on your USB drive.
2. The Manual Gearhead: Rolling Up Your Sleeves
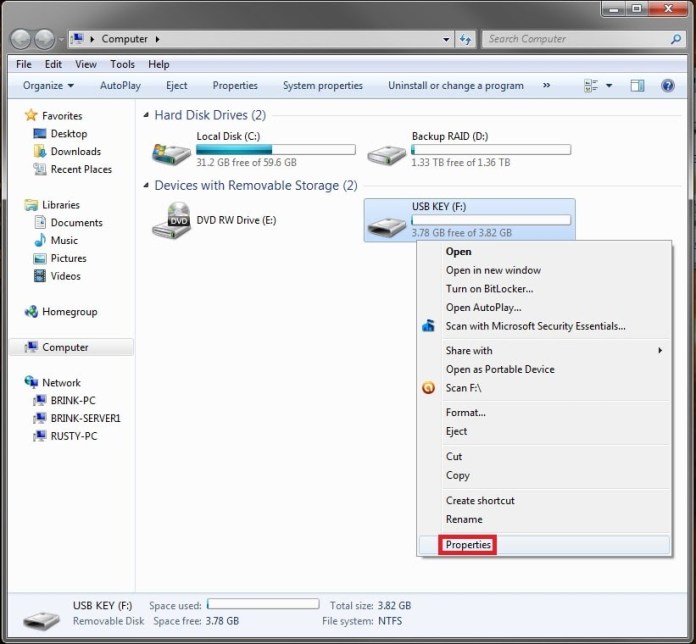
- USB Insertion: Pop your USB into the slot like you’re inserting a key into a sports car.
- Right-Click Magic: Fire up File Explorer, locate your USB drive, right-click, and summon the “Properties” genie.
- ReadyBoost Tab: Head over to the “ReadyBoost” tab – your playground for tweaking ReadyBoost to your heart’s content.
ReadyBoost Playbook: Your Options Unveiled
- Do not use this device:
- Default setting: this baby’s ready for action but on standby.
- Why Choose It? If you’re feeling fickle and want to revert to regular USB duties post-ReadyBoost, this is your safe bet.
- Dedicate this device to ReadyBoost:
- Dedicate this device to ReadyBoost: Give your USB the VIP treatment by dedicating all its storage to ReadyBoost.
- Why Go Exclusive? Got a USB you’re willing to commit to the cause? Make it the sole provider of cache goodness for your system.
- Use this device:
- Use this device: Play USB landlord by deciding how much space you want to allocate to ReadyBoost.
- Why Be a Shareholder? Want the best of both worlds? Reserve some space for ReadyBoost while keeping room for your files.

Suggested Articles:
- How To Test And Monitor ReadyBoost Performance?
- “ReadyBoost Not Working” – Listed All Working Solution


 Error in Middle of Computer Startup")


thanks