


 & HDD (Hard Disk Drive)?")


Ah, the wild world of the internet, where data zips around at lightning speed and connections are made faster than you can blink. But then, out of nowhere, BAM! You’re hit with the dreaded “ERR_INTERNET_DISCONNECTED” error. It’s like hitting a pothole on the information superhighway – frustrating and confusing.
So, what’s the deal with this cryptic error message? Well, it basically means your device is having a brain freeze trying to translate a human-friendly website address into the language of machines—IP addresses. You know, those strings of numbers that tell your browser where to find the website you’re looking for.
But when your browser can’t find the right IP address for the website you want, it throws up its hands in defeat and flashes you the ERR_INTERNET_DISCONNECTED message. This could happen for all sorts of reasons, like wonky DNS settings, internet hiccups, or problems on the Internet Service Provider’s end.
For folks dealing with this error, it’s like hitting a roadblock in the middle of a smooth journey through cyberspace. Whether you’re trying to access something important, kill time online, or just satisfy your curiosity, this network error is a major buzzkill.
And let’s not forget the frustration of not knowing why it’s happening or how to fix it. It’s like trying to navigate a maze blindfolded, with only trial and error as your guide.
So Let’s See How To Fix The “ERR INTERNET DISCONNECTED” Network Error
Let’s start by acknowledging that about 90% of the time, when you run into this error, it’s due to minor hiccups in your network setup. To tackle this hiccup effectively, the first step is to check your internet connection beyond just your current device. You want to see if other gadgets hooked up to your network are also hitting the same snag.
If you’re using a WiFi setup to spread your internet love around, try connecting another gadget like a smartphone or tablet to your network. This little experiment will help you figure out if the issue’s spreading across all your devices or if it’s just one gadget acting up.
Now, if you’re hooked up via a LAN cable, unplug it from your current computer or laptop and plug it into another device for some good old testing. This switcheroo lets you see if the glitch is specific to your machine or if it’s messing with the whole network.
Why bother with all this? Well, it’s like detective work for your internet. Sometimes, we blame our poor computers when the real troublemaker could be our Internet Service Provider (ISP) or some finicky network gadget like a modem or router. Running these tests helps us nail down the culprit and get to the bottom of things faster.
Solution #1: Power Cycle
When I talk about power cycling, I mean rebooting your router or modem along with every device between your Internet Service Provider (ISP) and your personal gadget. This trick comes in handy when our system is struggling to hook you up online, when certain devices are having trouble accessing the internet, or when your router or gateway just can’t seem to make the connection.
To power cycle or reboot your network device—like your modem or router—follow these steps:
- Turn off the power button of your router (if it has one) and unplug the power cable from your modem or router.
- Leave the device unplugged for about a minute.
- Plug the power cable back into your modem or router.
- Check if your device has successfully reconnected to the internet.

If you’re still having trouble getting online on any device after this, it’s time to ring up your ISP for some extra help. But if your internet works fine on all your other gadgets and the error sticks around only on your main device’s Chrome browser, then follow the steps laid out in this tutorial.
Solution #2: Refreshing Connections
Here’s how to re-establish your network connection with a few simple steps:
If Your Laptop Or Desktop Is Connected By LAN Cable (Wired Connection): If you’re hooked up via a LAN cable, kick things off by changing the connection port on your modem or router. Just unplug the cable from the current socket and plug it into the next available one. If all sockets are taken, swap your connection with another device by switching LAN cables.
If Your Laptop, Desktop, or Android Phone Is Connected by WiFi (Wireless Connection): For devices connected via WiFi, it’s all about refreshing the connection. Start by forgetting the current network from your WiFi settings. Here’s how to do it depending on your operating system:
For Windows 7 & Vista:
- Go to Start.
- Click on Control Panel.
- Select “Network and Internet”.
- Choose “Network and Sharing Center”.
- Click on Manage Wireless Networks from the left panel.
- Right-click on the current network from the list and choose Remove.

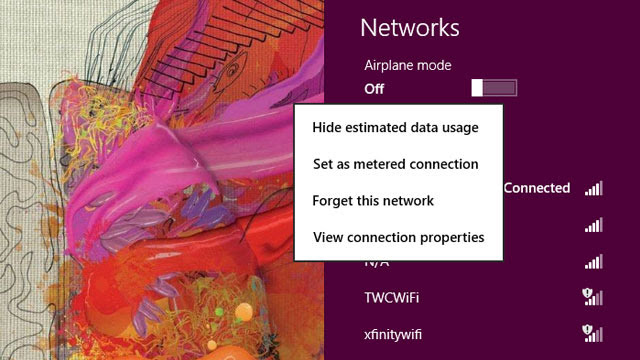
For Windows 8:
- Click on the WiFi icon in the Taskbar.
- Right-click on your current network and select “Forget this network”.
For Windows 10:
- Press Windows key + I key to open Windows settings.
- Select Network & Internet settings.
- Click on Wi-Fi from the left panel.
- Click on Manage Wi-Fi Settings.
- Under Manage known networks, select your network, then click on Forgot.

For Mac:
- Go to System Preferences.
- Click on Network.
- Select WiFi from the left panel.
- Click on Disconnect next to the WiFi network.
- Click on the Advanced button.
- Select your WiFi network and click on the (-) button to remove it.
- Click OK and then Apply.
For Android:
- Go to Menu > Settings > Wi-Fi Settings.
- Tap and hold the network you’re connected to.
- Tap on Forgot network.

After forgetting the network, reconnect to it. This might just solve your problem. If not, you can move on to further troubleshooting steps.
Solution #3: Changing Internet Setting
Sometimes, our computer’s internet settings can get tampered with without our consent, often due to sneaky viruses or suspicious software installations. Among these settings, the “Proxy” setting is especially vulnerable to meddling. A proxy server acts as a middleman between your computer and external servers, handling requests for resources.
Reasons for Changes in Proxy Settings:
- Changed by Malware: Sneaky software can mess with proxy settings to reroute internet traffic or compromise your privacy.
- Changed by Viruses: Virus infections might mess with proxy settings, messing up your normal internet connection.
- Changed by Users, Manually: Sometimes, users might unknowingly or intentionally mess with proxy settings, causing unintended consequences.
- Changed by Installed Software: Some software installations may include components that tweak proxy settings for different reasons, potentially disrupting your internet access.
Regardless of the cause, a single tweak to these settings can often get your internet back on track.
To Change Internet Settings in Windows:
- Go to the “Control Panel” on your Windows PC.
- Find and double-click on “Internet Options” to reveal your computer’s internet settings.
- Go to the Connection Tab and click on the LAN settings button.
- Uncheck all the settings in the checkboxes and click OK to confirm.

- Restart your computer to apply the changes. If the problem persists, further troubleshooting may be needed.
To Change Internet Proxy Setting In Mac OS:
- Click the Apple icon in the top-left corner of the menu bar.
- Select “System Preferences” and then click on “Network”.
- Choose your current network connection and click on the Advanced button.
- Go to the Proxies tab and uncheck all checkboxes under “Select a protocol to configure”.

- Click OK, then Apply Now to save the changes.
To Change Internet Setting In Android: While Android usually doesn’t have built-in proxy browsing features, if you’ve installed third-party apps or recently added ones that use proxy settings, consider removing them from your device. Test your internet connection after uninstalling these apps to see if the problem goes away.
Solution #4: Disable Firewall
Sometimes your computer’s firewall can be a bit overprotective, blocking your access to the internet and all its wonders. But fear not, I’ve got your back. Let’s walk through how to disable that pesky firewall, specifically for all you Windows users out there who are feeling the brunt of this issue.

Here’s how to disable the Firewall in Windows:
- Head over to your Windows Control Panel. You can do this by either typing “Control Panel” in the search bar or finding it in the Start menu.
- Once you’re in the Control Panel, look for the “Windows Firewall” option. If you’re having trouble finding it, just type ‘Firewall’ into the search bar within the Control Panel.
- In the Windows Firewall settings window, you’ll spot an option labeled “Turn Windows Firewall on or off” in the left panel. Give that a click.

- If it asks for administrator permission, go ahead and provide the necessary credentials or confirmation.
- Now, you’ll see options to turn off the firewall for different network locations like Home, Work, and Public networks. Under each location, select the “Turn off Windows Firewall (not recommended)” option.

- Once you’ve done that for each location, hit “OK” to save the changes.
Keep in mind, disabling the firewall means you’re temporarily sacrificing some protection for internet connectivity. So, while it might help you get online, remember that your computer becomes more vulnerable to security threats. It’s like taking off your armor temporarily – useful in a pinch, but you’ll want to suit up again once you’ve sorted out your connection issues.
Solution #5: Reset Chrome Browser
If despite trying out all the steps I mentioned earlier, your computer’s internet is behaving just fine everywhere except in Chrome, then it’s probably a Chrome-specific glitch. When that happens, a good old reset of Chrome’s settings usually does the trick by taking it back to its default setup.
Here’s how you can reset your Chrome browser:
- Open up Google Chrome and spot the menu button at the top-right corner (looks like three dots stacked vertically).
- Give that button a click, and then click on “Settings” from the menu that pops up.
- Scroll all the way down till you see “Advanced” – click on that to reveal more settings.
- Under the “Reset settings” section, hit the “Reset settings” button.
- Chrome will ask for your confirmation – just click “Reset” to confirm and let Chrome do its thing.
By doing this, you’re basically giving Chrome a fresh start, which might just fix whatever’s been bugging it.
Solution #6: At Last, Update Network Drivers
When your computer’s drivers go haywire, it can really mess with the performance of your hardware. This can mean anything from glitchy behavior to devices straight-up refusing to work. But fear not, updating those drivers to the latest versions can often swoop in and save the day, getting everything back on track.
Now, let’s zoom in on network card or WiFi drivers. Keeping these bad boys up-to-date can be a lifesaver when you’re dealing with pesky connectivity issues or just want to ensure your network-related hardware runs smoothly.
Here’s how to track down and grab those drivers online:
- Identify Your Hardware: First things first, figure out what network card or WiFi adapter you’ve got. You can usually find this info in the device manager or by checking out the manufacturer’s documentation.
- Hit Up the Manufacturer’s Website: Once you know what you’re dealing with, head over to the official website of the manufacturer. They usually have a support section where you can find drivers for their products.
- Find Those Drivers: Navigate to the support or downloads section of the website. You should be able to spot the drivers you need for your specific hardware. Just make sure they’re compatible with your operating system version.
- Get Downloading: Once you’ve located the right drivers, download them to your computer. Double-check that you’re snagging the correct ones for your operating system (like Windows 10 or macOS).
- Install Away: Once the drivers are safely on your machine, follow the manufacturer’s instructions to get them installed. This usually means running an installation file and following the on-screen prompts.
- Give It a Reboot: After the installation dance is done, do yourself a favor and restart your computer. This makes sure the changes kick in properly and your shiny new drivers get cozy with the rest of your system.
By giving your network card or WiFi drivers a little update love, you can squash those pesky driver issues and keep your network hardware running like a well-oiled machine.
Suggested Articles:
- What Is a Network Driver, And How To Install It?
- WiFi Driver – What It Is & Why We Need It, And Mainly How To Install It?
When you've been waiting for the webpage to load for hours, but your Wi-Fi is just like, 'Nah, I'm on a break!' 🤷♂️📶🤯💻
WIFI is Connected but No Internet Access – What to Do?https://t.co/UGUk1gCkcK#LoadingHell #InternetWoes #WifiFails #ConnectionConundrum #NetworkNonsense pic.twitter.com/zFCbG6gnlA— deskdecode (@deskdecode) March 6, 2024


