


 & HDD (Hard Disk Drive)?")


Ah, the laptop screen—a crucial piece in the tech puzzle. Its proper functioning is key for a smooth ride through the digital world. You wouldn’t want pesky issues mucking up your productivity, would you? Dead pixels, cracks, flickering—quite the party crashers, those! And let’s not forget the backlight issues that sneak in uninvited, disrupting your workflow like a loud neighbor.
Being the savvy user you are, detecting these culprits early on is the secret sauce. Prevention is better than a costly cure, after all. Now, in this article, let’s get Sherlock-esque and delve into methods to spot these rascals. From software tests to eyeing the screen like a hawk, we’ll equip you with the skills to size up your laptop screen like a pro.
But wait, there’s more! External device connection tests—a fancy term, but a necessary one. Think of it as the Sherlock and Watson duo, making sure no stone goes unturned in your screen evaluation adventure. So, gear up, folks! We’re about to navigate the maze of laptop screen issues like seasoned detectives.
Method 1: Using Monitor Testing App
The EIZO Online Monitor Test? Oh, it’s like the Swiss Army knife for checking image quality in a jiffy! Picture this: 13 cool tests to size up stuff like image uniformity, text sharpness, and those sneaky pixel defects. Plus, it gives the lowdown on how well your monitor handles different angles.
But, hold up! Each monitor plays these tests in its unique style based on its model and what it’s built for—like gaming or graphic design. So, it’s crucial to know your monitor’s specs, especially for that pixel detective work.
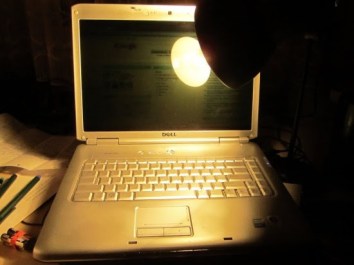
Pro tip: dim the lights for the ultimate exam conditions, especially when grading the darker parts of the images.
Website: EIZO Online Monitor Test

Method 2: Visual Lookup
If you’re facing screen flickering on your laptop, try this simple diagnostic step: tweak the display hinge and see if the flickering continues. If adjusting the hinge affects the flickering, it might not be the display causing the trouble.
In this case, the flickering tied to hinge movement hints at a possible problem with the cable linking the screen to the laptop’s motherboard. That cable’s a crucial bridge between the screen and the laptop’s insides. Any trouble or harm to this connection might cause display issues, like annoying flickering.
If shining a flashlight onto the screen shows a faint image or some visuals despite the lack of backlight, it means the screen itself is working but the backlight is having problems. In this case, you might have to replace the whole screen to fix the backlight issue.
However, if you’re lucky, a skilled technician with the right tools might be able to just replace the backlight of the LCD screen without swapping the entire screen setup. This could be a more budget-friendly option, if it’s doable. But remember, this fix needs expertise and specific parts, so it’s important to talk to a qualified technician for a proper diagnosis and repair.
Or otherwise, If your screen looks like the image provided, it’s a clear sign of serious damage. That means your screen is definitely broken and needs replacing pronto.


Method 3: Using An External Display
No matter what’s up—dead pixels, flickering, lines, or a black screen when starting up—using an external display is your best bet to figure out if your laptop’s display or its parts are acting wonky.
# Let’s See How To Test It;
- Power off both your laptop and the external monitor.

- Connect one end of the video cable to your laptop’s video output, typically located on its side or back. Plug the other end into the video input slot of your external monitor, also situated on its side or back.

- Switch on the external monitor.
- Power on your laptop and allow it to boot. Pay attention to the typical boot-up sounds; once these sounds cease, proceed to the next step.
- To display your laptop’s content on the external monitor, locate the “Fn” key on your laptop’s keyboard along with the “CRT/LCD” button. The “CRT/LCD” button might be labeled on the “F3,” “F5,” “F8,” or “F9” keys and usually features a small Display/LCD icon. Continuously press these buttons until your laptop’s content appears on the external monitor.

If you don’t have another monitor handy, you can try using your TV for the laptop’s display test. Just make sure your TV has a VGA or HDMI Port for this to work.
To test using your TV, do it like you would with a monitor. Connect one end of the right cable (VGA or HDMI) from your laptop’s video output to the matching port on your TV. Turn on the TV and follow the steps I mentioned earlier to show your laptop’s stuff on the TV screen.
Need a VGA or HDMI Cable?
VGA to HDMI Cable Starts From: @Amazon US ($8.99), @Amazon UK (£7.99), @Amazon IND (₹499.00), @Walmart US ($9.99), @Newegg ($9.99).
HDMI to VGA Cable Starts From: @Amazon US ($8.99), @Amazon UK (£5.99), @Amazon IND (₹189.00), @Walmart US ($9.99), @Newegg ($9.99).
HDMI to HDMI Cable Starts From: @Amazon US ($8.99), @Amazon UK (£7.40), @Amazon IND (₹159.00), @Walmart US ($9.99), @Newegg ($9.99).
Suggested Articles:
- Replacing Broken/Faulty Laptop’s Display Screen: Step-By-Step Guide
- PC Turns ON But No Display On Monitor! – Every Possible Solution
- Laptop Turns ON But No Display On Monitor! – Every Possible Solution
- Fix For – Screen Flickers When Playing Games
- Fixing Laptop’s Display Problem by Reflowing its GPU (Graphics Chip)
- How To Reflow GPU Or Chipset Chip Of Desktop’s Motherboard?


Thank you! You just made my day.