


 & HDD (Hard Disk Drive)?")


Ah, the saga of Windows Safe Mode dates back to the grand arrival of Windows 95.
Picture this: a troubleshooting superhero that swoops in when your Windows is acting up, starting with only the bare essentials of drivers and system services. It’s like sending your computer to boot camp to whip it into shape!
In Safe Mode, it’s all about stripping down to the basics, loading only the stuff Windows absolutely needs to function. This helps pinpoint pesky problems caused by rogue software or wonky drivers. Getting into Safe Mode is like a secret handshake—just hit specific keys during boot-up or use some other sneaky method depending on your Windows version.
Why To Boot Into Safe Mode?
Boot into Safe Mode is like entering a superhero mode for your Windows system, helping you tackle all sorts of pesky problems that might be plaguing it. Whether you’re dealing with software conflicts, driver dramas, or startup snags, ‘Safe Mode’ has your back. It’s like a clean slate where third-party apps and unnecessary system doodads take a back seat, letting you focus on the real issues.
And hey, if you’ve got some sneaky malware or viruses causing trouble, Safe Mode is your trusty sidekick. It creates a pristine environment where those nasty critters stick out like sore thumbs, making them easier to squash. It helps you figure out if the culprit is a wonky driver, a clash of software egos, or something more sinister lurking in the hardware shadows.
And here’s a pro tip: before you go all in with new drivers or software, why not give them a test run in Safe Mode? It’s like a trial period without the commitment, letting you see if they play nice with your system before you fully integrate them. Safe Mode isn’t just for troubleshooting. You can also use it to turn back time with System Restore, make critical tweaks, or even perform some hardware CPR when things go haywire.
Here’s a rundown on what you’ll have access to in Safe Mode:
- Basic Display Driver: Think of it as the default setting for your screen—nothing fancy, but it gets the job done.
- Keyboard and Mouse Drivers: Because without these, you’re stuck staring at your desktop.
- Disk Drivers: They’re the backstage crew, making sure your Hard Disk Drive and other storage devices are accessible.
- System Services: These are the behind-the-scenes heroes, like the Windows Installer, Event Log, and Plug and Play services, keeping everything ticking along.
- Networking Services (Optional): Depending on what flavor of Safe Mode you pick, you might be able to hop online for troubleshooting.
- Windows System Files: The bare essentials like registries to keep Windows chugging along.

By slimming down the startup process, Safe Mode makes it easier to spot problems like pesky third-party software, wonky drivers, or system settings gone haywire. It’s like giving your computer a tune-up so it can start fresh
Types of Safe Mode Options Available
Alright, let’s dive into the different flavors of Safe Mode for Windows, each tailored to tackle specific troubleshooting tasks. Think of them as different tools in your IT utility belt:

- Safe Mode (Minimal): This is your classic, no-frills Safe Mode. It boots up with just the essential drivers and services, perfect for sorting out those pesky software clashes, driver dramas, or startup snafus that are throwing a wrench in your Windows experience.
- Safe Mode with Networking (Network): Consider this the Safe Mode 2.0. Alongside the standard Safe Mode features, it throws in basic networking capabilities. That means you can still hop online to do some digital sleuthing, kick malware to the curb, or grab those much-needed software updates, all while enjoying the Safe Mode safety net.
- Safe Mode with Command Prompt (Alternate shell): Here’s your Safe Mode with a side of tech-savvy. It’s like the standard Safe Mode but swaps out the usual Windows interface for a Command Prompt window. This mode is your go-to for running specific commands, tinkering with files, or deploying advanced troubleshooting tools to pinpoint and fix system issues.
- Directory Services Restore Mode (Active Directory repair): Last but certainly not least, we’ve got the specialist—tailored for the IT pros managing Active Directory on domain controllers. This mode boots up with just what’s needed to focus on Active Directory tasks, making it a powerhouse for maintenance, backups, or recovery operations.
So, whether you’re a tech whiz or just getting your hands dirty with troubleshooting, Windows Safe Mode has got a flavor to suit your needs!
How To Access Safe Mode?
So, let’s dive into the different ways you can hop into Safe Mode on a Windows system. Think of these methods as different secret handshakes to unlock your system’s troubleshooting mode:
Method #1: Using System Configuration (Works On All Versions Of Windows)
Using System Configuration (msconfig) is like the Swiss Army knife of boot configurations—easy to wield yet powerful. It’s a great tool for Windows users of all stripes to dip their toes into Safe Mode’s troubleshooting waters.
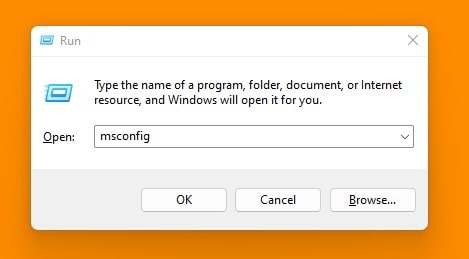
- Pop Open the Run Dialog: Smash that Windows key and tap the R key—boom! You’ve got the Run dialog box right in front of you. This nifty keyboard shortcut is your express ticket to all sorts of Windows utilities, including our star today, System Configuration.
- Fire Up System Configuration: In that Run dialog box, type ‘msconfig’—no need for the quotes here—and hit Enter or give that OK button a click. Voila! The System Configuration utility unfolds before you, brimming with options to tweak your system’s startup antics and service shenanigans.
- Dive into the Boot Tab: Inside the System Configuration window, your eyes should naturally gravitate towards the Boot tab at the summit. This tab spills the beans on all the boot options and settings that dictate how Windows struts its stuff during startup.
- Toggle Safe Boot: Scroll down to the ‘Boot options’ or ‘Boot parameters’ section under the Boot tab. You’ll spot an option labeled ‘Safe boot’—go ahead, tick that box like you’re marking off a to-do list item.
- Pick Your Safe Mode Flavor: Now that ‘Safe boot’ is on your side, you’ll need to pick a Safe Mode persona. Your choices usually include ‘Minimal’, ‘Networking’, or the mysteriously named ‘Alternate shell’. Make your pick and feel the power!
- Seal the Deal and Reboot: With your Safe Mode type chosen, hit that OK button to seal the deal. Windows will nag you for a restart, so go ahead and indulge it. Whether you click ‘Restart’ or opt for a manual reboot, Windows will boot up in Safe Mode, ready for your troubleshooting prowess.
Method #2: Using Shift + Restart (Works Only On Windows 11, 10, 8.1 & 8)
The Shift + Restart method is like the VIP backstage pass to Windows’ advanced startup options, including Safe Mode. It’s a nifty shortcut that sidesteps the usual startup procedures, making it a godsend for quick and effective troubleshooting.
- Summon the Power Options: Kick things off by hitting that Start button—yeah, that little flag icon at the bottom-left corner of your screen. From the Start menu, give ‘Power’ a click to reveal a menu chock-full of power moves like ‘Shut down’, ‘Restart’, and ‘Sleep’.
- Kickstart the Restart with Shift: Here’s where the magic happens. Hold down the Shift key like you’re holding onto the last slice of pizza, and then click ‘Restart’ from the Power menu. This combo acts like a secret handshake, unlocking a special boot mode with all the advanced startup goodies.

- The ‘Choose an Option’ Crossroads: After your computer does its restart shimmy, you’ll land on the ‘Choose an option’ screen—a hub of troubleshooting and recovery options. This is your launchpad for tackling system gremlins.
- Sleuthing Through Startup Settings: First up, click ‘Troubleshoot’ on the ‘Choose an option’ screen. This opens the Troubleshoot menu, where the advanced tools hang out. From there, hit ‘Advanced options’ to dive deeper into startup and recovery settings. Finally, click ‘Startup Settings’ to reveal a menu of startup tweaks at your disposal.

- Encore Restart: At the bottom-right corner of the Startup Settings screen, you’ll find the ‘Restart’ button. Click it to give your computer another reboot, setting the stage for your chosen startup settings to shine.

- Choosing Your Safe Mode Adventure: After that reboot encore, you’ll be back at the Startup Settings menu, now with numbered options galore. Hit the ‘4’ key or F4 to venture into plain ol’ Safe Mode. Feeling adventurous? Press ‘5’ or F5 for Safe Mode with Networking. Choose wisely!

Method #3: Using F8 or Shift + F8 (Works Only On Windows 7 & Earlier)
The F8 or Shift + F8 method is like the classic vinyl record of Safe Mode access—reliable, timeless, and a bit nostalgic. While it’s a throwback that sings best on Windows 7 and its older siblings, it’s still a handy trick to have up your sleeve.
- Initiating the Great Reboot: First things first—let’s kickstart that computer of yours. Head over to the Start button like it owes you money. From there, hover over the Shutdown or Power icon and pick the ‘Restart’ option. Feeling like a keyboard maestro? Try the Ctrl + Alt + Delete dance and choose ‘Restart’ from the menu that pops up.
- The F8 or Shift + F8 Boot Ballet: Brace yourself; this step is a bit of a keyboard workout. As your computer gears up for its restart waltz, start frantically tapping the F8 key like you’re playing the world’s smallest piano recital. Do this before the Windows logo struts onto the screen. If F8 gives you the cold shoulder, give Shift + F8 a whirl instead. Keep hammering those keys until the screen transforms into the illustrious Advanced Boot Options menu.
- Diving into the Advanced Boot Options Playground: Score! If you managed to summon the Advanced Boot Options menu, give yourself a pat on the back—you’ve earned it. This menu is your treasure trove of startup secrets, letting you tweak Windows’ startup behavior to your heart’s content.
- Selecting Your Safe Mode Adventure: Now, channel your inner gamer and use those arrow keys to navigate through the options. Find ‘Safe Mode’ lurking in the list and give it the spotlight it deserves. Hit that Enter key like you’re sealing a pact with the tech gods, and voila—you’re booting up in Safe Mode, with only the bare essentials hitching a ride.

Steps To Enable Windows 10 Safe Mode By F8 Key
Typically, savvy users would hit F8 during the initial boot to access the Advanced Boot Options. However, when Windows 8 strutted onto the scene, Microsoft decided to give the boot to this feature. Why? To turbocharge the booting process and leave the snail-paced boots of yesteryears in the dust… Read More

Method #4: Using Settings (Works Only On Windows 11 & 10)
The Settings method is like the sleek sports car of Safe Mode access—modern, user-friendly, and packed with features. It’s perfect for those who prefer a graphical interface over the traditional keyboard shortcut jungle.
- Step into the Settings Spotlight: First up, let’s get you acquainted with the star of the show—the Settings app. Click that Start button like you’re launching a rocket and zero in on the gear-shaped icon, signaling the Settings app’s grand entrance. Feeling like a keyboard wizard? Skip the mouse-click marathon and summon Settings with the Windows + I shortcut—talk about VIP access!
- Embark on the Update & Security Odyssey: Within the Settings app, scroll down like you’re navigating the menu of a five-star restaurant and click on ‘Update & Security’ in Windows 10 or ‘Windows Update’ in Windows 11. This treasure trove houses all things related to Windows updates, security protocols, and recovery options—a veritable Swiss Army knife for system maintenance.
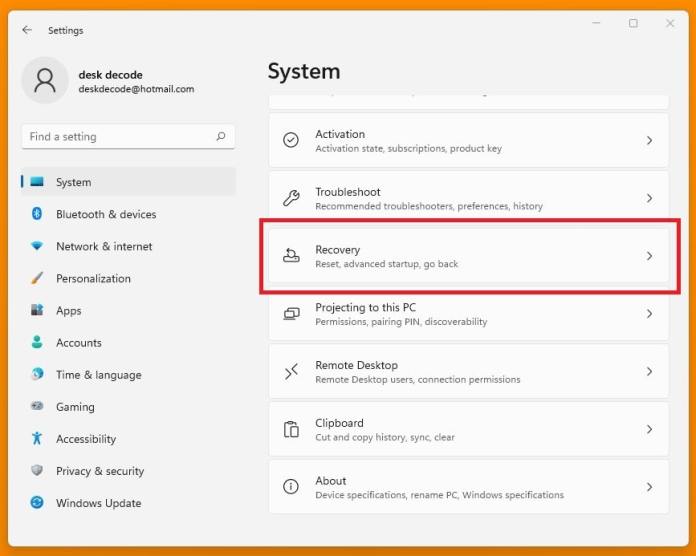
- Dive into the Advanced Startup Rabbit Hole: Now, cruise over to the ‘Recovery’ tab nestled in the left-hand sidebar of the Update & Security menu in Windows 10 & ‘System’ in Windows 11 to see the ‘Recovery’ options in which you can find the option to restart your computer in ‘Advanced startup’ mode. Spot the enticing ‘Restart now’ button under the ‘Advanced startup’ banner? Go ahead, give it a click—it’s the gateway to a world of advanced startup shenanigans.

- The ‘Choose an Option’ Crossroads Redux: After your computer performs its magical reboot dance, you’ll land on the ‘Choose an option’ screen—a hub brimming with troubleshooting and recovery options. It’s like the backstage pass to your computer’s inner workings.
- Navigating the Startup Settings Maze: Choose the ‘Troubleshoot’ option from the ‘Choose an option’ menu to unlock the Troubleshoot menu—a treasure trove of advanced tools. From there, click ‘Advanced options’ to reveal even more startup and recovery secrets. Finally, click ‘Startup Settings’ to unveil a smorgasbord of startup tweaks.
- The Grand Finale – Another Restart: At the bottom-right corner of the Startup Settings screen, you’ll find the ‘Restart’ button. Give it a click to cue another round of computer acrobatics, setting the stage for your chosen startup settings to shine.
- Choosing Your Safe Mode Symphony: After that encore reboot, you’ll be back at the Startup Settings menu, now with numbered options galore. Feeling minimalist? Hit the ‘4’ key or F4 for classic Safe Mode. Need networking? Press ‘5’ or F5 for Safe Mode with a side of Wi-Fi. Pick your poison!
Method #5: Using CMD (Works On All Versions Of Windows)
Using Command Prompt to set Safe Mode as your default boot option is like the secret handshake of tech troubleshooting—direct, efficient, and a bit wizardly. It’s your go-to method for tackling startup conundrums and performing maintenance tasks that demand the Safe Mode touch.
>> 20 Different Ways To Open CMD On Your Computer
- Elevate Your Command Prompt Game: First things first, let’s crank up the Command Prompt to superhero status—Admin mode, to be precise. Hit that Start button like you’re launching a rocket and type ‘cmd’ into the search bar. When Command Prompt shows its face in the search results, give it a right-click and select ‘Run as administrator’ from the menu. Voila! You’re now wielding the power of Command Prompt with all the administrative might.
- Unleash the Bcdedit Command: With great power comes…well, great command-line scripting! In your freshly minted Command Prompt window, type the following incantation: “bcdedit /set {default} safeboot minimal“. Hit Enter like you’re sending a digital carrier pigeon to tweak your boot configuration data (BCD). This command rolls out the red carpet for Safe Mode, ensuring it boots with only the bare essentials.

- The Grand Reboot Spectacle: After your command-line wizardry is complete, bid farewell to the Command Prompt window—it’s served its purpose for now. Now, give your computer the old restart shuffle. Click that Start button, hover over the Power icon, and pick ‘Restart’ from the lineup.
- The Safe Mode Victory Lap: Post-reboot, your computer should waltz right into Safe Mode, donning only the essential drivers and services like a minimalist art exhibit. It’s the ideal playground for troubleshooting and playing tech detective.
- The Manual Safe Mode Marathon: If, for some reason, your computer decides to play hard-to-get and doesn’t boot into Safe Mode automatically, fear not! During the boot process, channel your inner keyboard drummer and tap the F8 or Shift + F8 key like you’re playing a rhythm game, depending on your Windows flavor. This should summon the Advanced Boot Options menu, where you can manually select Safe Mode.
Method #6: Using Windows Disc Or USB (Works Only On Windows 11, 10, 8.1 & 8)
Using a Recovery Drive or Installation Media to boot into Safe Mode is like calling in the cavalry for your computer. It’s your go-to strategy when faced with stubborn startup issues or pesky system errors. With the powerful tools at your disposal in WinRE, you’re equipped to tackle software skirmishes, driver dilemmas, and other techy tangles that might be throwing your computer off balance.
- Insert Your Superhero Cape—Ahem, Installation Media: Got a Windows installation media gathering dust? Time to let it shine! Whether it’s a USB drive or a DVD, plug it into your computer’s USB port or slide it into the optical drive. Now, gear up for a reboot, but not just any reboot—a boot that prioritizes your trusty installation media. Dive into the BIOS/UEFI settings to make sure the USB or DVD drive steals the show.
- Pick Your Language and Time Zone—No Passport Required: Once your computer boots from the installation media, you’ll be greeted with language, time, and keyboard input choices. Pick the ones that speak your language (literally) and click “Next” to keep the ball rolling.
- The Repair Toolkit Unveiled: Now, onto the good stuff! Spot the “Repair your computer” option hiding in the bottom-left corner of the initial Windows Setup screen? Click it, and voila—you’ve unlocked the Windows Recovery Environment (WinRE), your Swiss Army knife for system troubleshooting.

- Journey to the Startup Settings Oasis: Within WinRE, click “Troubleshoot” to dive deeper into the troubleshooting labyrinth. Next stop? “Advanced options”, your gateway to a treasure trove of recovery and repair tools. Click “Startup Settings”, and you’re almost there—just one more reboot to go!
- The Final Reboot Showdown: Hit the “Restart” button at the bottom-right corner of the Startup Settings screen, signaling your computer to do its reboot dance one last time. This sets the stage for your chosen startup settings to take the spotlight.
- Choose Your Safe Mode Adventure: Post-reboot encore, you’ll be back at the Startup Settings menu, now adorned with a smorgasbord of numbered options. Feeling minimalist? Hit the ‘4’ key or F4 for classic Safe Mode. Need networking? Go for ‘5’ or F5 for Safe Mode with a dash of internet connectivity. Choose wisely!
How To Get Out Of Safe Mode?
Exiting Safe Mode and returning your computer to its normal operating state is a straightforward process. Here’s how you can get out of Safe Mode:
- Restart Your Computer:
- The simplest way to exit Safe Mode is to restart your computer. Click on the Start button, select the Power icon, and choose “Restart” from the menu. Alternatively, you can use the Ctrl + Alt + Delete keyboard shortcut and select “Restart” from the options menu.
- Manually Disable Safe Mode via System Configuration:
- Press the Windows + R keys simultaneously to open the Run dialog box.
- Type “msconfig” and press Enter to open the System Configuration utility.
- In the System Configuration window, go to the “Boot” tab.
- Under the “Boot options” section, uncheck the box next to “Safe boot”.
- Click “OK” and restart your computer to apply the changes and exit Safe Mode.
- Using Command Prompt:
- Open Command Prompt as an administrator by searching for “cmd” in the Start menu, right-clicking on “Command Prompt”, and selecting “Run as administrator”.
- Type the following command and press Enter:
bcdedit /deletevalue {default} safeboot
- Restart your computer to apply the changes and boot into normal mode.
- Exit via Settings (Windows 10 and Windows 11):
- Click on the Start button and select “Settings”.
- Go to “Update & Security” > “Recovery”.
- Under “Advanced startup”, click on “Restart now”.
- After restarting, select “Troubleshoot” > “Advanced options” > “Startup Settings” > “Restart”.
- Press the number 1 key or the F1 key to boot into normal mode.
By following these exit strategies, you’re not just escaping Safe Mode—you’re reclaiming your computer’s full functionality. Safe Mode is your tech troubleshooting sidekick, but it’s no place to stay forever. With these methods, you can bid adieu to Safe Mode and get back to enjoying all your favorite programs, files, and settings in their full glory.


 Error in Middle of Computer Startup")
Very informative , it should help me repair BSOD on my desktop, also upgrade to 3.0 USB