


 & HDD (Hard Disk Drive)?")


RAM, aka Random Access Memory. This bad boy is a key player in your computer’s hardware setup, and it’s nothing like your run-of-the-mill Hard Disk Drives or SSDs. RAM is the quick-change artist of memory, storing data temporarily while your computer struts its stuff.
Why does RAM deserve the spotlight? Well, it’s the ultimate connector between your computer’s storage and its brainy CPU. When you fire up an app or launch a program, the relevant data takes a shortcut from the storage drive to the RAM for a lightning-fast pit stop. This lets the CPU grab and play with the necessary information at warp speed, giving your system a turbo boost in performance.
But here’s the twist: for your computer to be the superhero it is, RAM needs to be at its A-game. If your RAM is acting up—blame it on power hiccups, sudden shutdowns, or just plain overuse—it can throw a wrench into the whole operation.
Picture this: your computer freezing mid-task, doing unexpected gymnastics with restarts, struggling to boot up Windows, flashing the notorious Blue Screen of Death (BSOD), or worst-case scenario—not even showing anything on the screen during startup. These are the nightmares that a RAM gone rogue can bring to your tech life, causing mayhem and threatening your precious data.
So, what’s the plan when your computer starts acting like it has one too many cups of coffee? Test that RAM, my friend! Diagnose and kick out those faulty RAM modules. It’s like sending the troublemakers out of the party—restoring order, preventing chaos, and keeping your data safe.
So Let’s See How to Properly Test Your Computer’s Memory (RAM)
Before you start pointing fingers at a rogue RAM module, let’s go Sherlock Holmes on your computer issues and check if it’s really a memory crunch. By playing detective with Task Manager, you’ll figure out if it’s a RAM hiccup or just a memory shortage. Follow these steps to crack the case:
- Open Task Manager:
- Right-click on the bottom taskbar.
- Choose “Task Manager” from the menu.
- Navigate to the “Performance” Tab:
- In Task Manager, hit up the “Performance” tab.
- Check RAM Usage:
- Under “Performance,” click on “Memory” on the left.
- Behold the real-time graph of your computer’s memory hustle.

High RAM usage can throw a wrench into your computer’s performance, causing it to freeze or crash programs. If your RAM is working overtime, consider shutting down unnecessary apps to free up memory or otherwise upgrading one.
- How Much RAM Do I Need?
- How To Buy A Perfect RAM Stick For Laptop & Desktop Computers?
- Ram Upgrade – Why, How, and How Much?
- RAM Compatibility With Motherboard: Identifying Supported/Installed Types
- >> Top & Best RAM Sticks Available For Laptop & Desktop – Recently Updated
If your PC is playing a high-stakes RAM game even with no apps in the spotlight, it’s time for a performance intervention. This high idle RAM usage can throw your system into turtle mode—slow responses, overall sluggishness, and the whole nine yards. When your computer decides to take a nap during its shift, it’s a sign that some tech TLC is in order.
To kickstart your rescue mission, I recommend checking out a gem of an article titled “Why Is My Computer Or Laptop So Slow? – 8 Easy Ways To Fix It“. This piece is your go-to guide for diagnosing and ironing out those performance wrinkles. It spills the beans on common culprits behind a slowpoke computer and hands you practical solutions to jazz up its speed and responsiveness.
Method #1: Using the Windows Memory Diagnostics Tool
The Windows Memory Diagnostics Tool is a built-in feature in Microsoft Windows operating systems designed to help users identify and diagnose issues related to system memory (RAM). It is a handy utility for detecting potential problems with RAM that may be causing system instability, crashes, or other memory-related errors.
Here’s a step-by-step guide on how to use the Windows Memory Diagnostics Tool:
- Open Run Dialog: Press the Windows key + R to open the Run dialog.
- Run Windows Memory Diagnostic: Type “mdsched.exe” in the Run dialog and press Enter.

- Choose Detection Method: Now, two options will be presented.
- “Restart now, and check for problems (recommended)”: This option immediately restarts your computer and runs the memory tests.
- “Check for problems the next time I start my computer”: This option schedules the tool to run on the next system restart.

4. System Restart: If you choose the recommended option, your computer will restart automatically.
- Memory Testing: Before Windows starts, the Memory Diagnostics Tool will begin testing your computer’s RAM.
- Progress Bar: A blue screen will appear with a progress bar, indicating that the tool is performing a series of memory tests.

- Test Completion: Once the tests are complete, your computer will automatically restart, and Windows will load as usual.
8. Checking Results in Event Viewer: After the restart, you can view the results in the Windows Event Viewer.
-
- Press the Windows key + X and select “Event Viewer” from the menu.
- In the Event Viewer, navigate to “Windows Logs” > “System”.
- Look for an event source named “MemoryDiagnostics-Results” to find the results of the memory test.
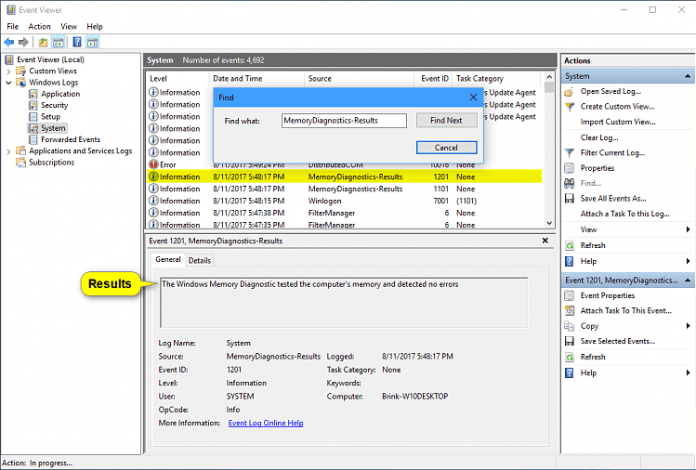
Interpreting Results:
- No Errors: If no errors are found, your RAM is likely functioning correctly, and the issues you’re experiencing may be unrelated to memory problems.
- Errors Detected: If errors are detected, the Memory Diagnostics Tool will provide information about the nature of the problem, such as the affected memory module.
Tips:
- Repeat the Test: For intermittent issues, consider running the test multiple times to increase the likelihood of detecting any potential problems.
- Thorough Testing: The tool typically runs a standard set of tests, but for more in-depth analysis, consider using third-party tools like Memtest86.
Method #2: Using the Memtest86 Tool
MemTest86, born in 1994, is a nifty piece of free memory testing software designed for both x86 and ARM computers. This software takes a stroll down memory lane, booting up from a USB flash drive and employing sophisticated algorithms to thoroughly examine your RAM for any faults or hiccups.
As time rolled on, this project underwent some evolution. A notable split occurred, resulting in MemTest86+ surfacing on the scene between 2002 and 2004. Then in 2013, PassMark Software stepped up to the plate, taking over maintenance duties. They gave the code a makeover to suit the 64-bit era and the UEFI platform.
Now, here’s an interesting tidbit: MemTest86 version 4 continues to embrace its open-source roots, allowing users to tinker under the hood. However, from version 5 onwards, the software adopted a proprietary license, locking down some of its secrets. On the other hand, it seems that development for MemTest86+ hit a roadblock back in 2013, leaving it in a state of suspended animation.
Here’s a step-by-step guide on how to use MemTest86:
- Download MemTest86: Visit the official MemTest86 website and download the appropriate version for your system (x86 or ARM).
- Create Bootable Media: Choose the USB or CD/DVD version depending on how you plan to boot the software. If you choose USB, then use a tool like Rufus or Yumi to create a bootable USB flash drive. Make USB Flash Drive Bootable by “Rufus”
- Insert Bootable Media: Insert the bootable USB flash drive or CD/DVD into the computer you want to run the software from.
- Boot from MemTest86:
- Restart your computer.
- Access the boot menu or BIOS/UEFI settings during startup (this is usually done by pressing a specific key, like F2 or Del).
- Choose the bootable USB or CD/DVD drive to start MemTest86.
- Quick Boot USB or CD/DVD Directly From Boot Menu: Step-By-Step Guide
- Run MemTest86:
- MemTest86 will automatically start running and testing your computer’s RAM.
- The testing process involves various algorithms and patterns to identify potential memory issues.
- Allow MemTest86 to complete multiple passes for a thorough examination.

- Review Test Results:
- After the testing is complete, MemTest86 will display the results on the screen.
- Look for any error messages or indications of memory issues.
- If errors are found, consider replacing or troubleshooting the faulty RAM module.
- Repeat if Necessary:
- For a more comprehensive check, it’s recommended to run MemTest86 for several passes.
- This can help identify intermittent issues that may not be apparent with a single pass.

- Exit and Reboot:
- Once you are satisfied with the testing, exit MemTest86.
- Remove the bootable media from your computer.
If MemTest86 uncovers errors during the memory testing process, it’s crucial to proceed with a detailed troubleshooting procedure to identify and address the specific issue. The following steps involve isolating and pinpointing the faulty RAM module responsible for the detected errors, allowing for a precise course of action.

First things first, figure out how many RAM modules are partying inside your computer.
If your system is rocking multiple RAM modules, it’s time to test them one by one.
Politely escort all but one RAM module off the motherboard, giving only the main module the spotlight.
Reboot your system and let MemTest86 do its thing with the solo RAM module.
This helps you zero in on the problematic module and see if errors are still gate-crashing the party. If MemTest86 gives you grief with the first module, rinse and repeat with the others. This step-by-step groove helps figure out if one or more RAM modules are playing the villain.
Keep a log of the results for each RAM module. Note if errors are throwing a wild party with a specific module or if they’re just crashing sporadically. Once you’ve unmasked the villainous RAM module, kick it to the curb. Grab a replacement module that matches the specs and pop it in.
- How Much RAM Do I Need?
- How To Buy A Perfect RAM Stick For Laptop & Desktop Computers?
- Ram Upgrade – Why, How, and How Much?
- RAM Compatibility With Motherboard: Identifying Supported/Installed Types
- >> Top & Best RAM Sticks Available For Laptop & Desktop – Recently Updated
Boot up your system and run MemTest86 again with the new RAM module.
Make sure the replacement player is error-free and ready for action. After the RAM module swap, keep an eye on your computer’s overall vibe. Watch out for any crashes, errors, or weird shenanigans linked to the previous troublesome memory.
If the DIY troubleshooting dance doesn’t cut it or errors still refuse to take a hike, it might be time to call in the pros. A computer technician can dig deeper than MemTest86 and work some magic.
How To Fix A Bad RAM Stick?
When your RAM stick starts throwing a fit with system instability or sluggish performance, there’s a nifty trick up your sleeve – RAM cleaning. This fancy dance involves physically yanking out the RAM module and giving its electrical contacts a good scrub. Why, you ask? Well, it turns out that over time, gunk-like dust and oxidation can crash the party on those metal contacts, causing a ruckus in the connection between your RAM and motherboard.
So, here’s the lowdown on why you might want to give your RAM a spa day:
- Boosting Electrical Conductivity: The main game here is to amp up the electrical conductivity, tackling issues tied to lousy contact. This becomes especially crucial in places where humidity is high and oxidation decides to play the villain.
- Tackling Intermittent Gremlins: Ever had those random glitches making your system do the cha-cha? RAM cleaning might just be the hero you need. It’s like a superhero cleanse for your RAM, potentially leading to a more chill and stable system.
But, and there’s always a but, let’s be real about RAM cleaning’s limits. While it’s great for those electrical contact issues, it’s not a one-size-fits-all solution. If your RAM problems involve physical damage, manufacturing blunders, or issues that go beyond electrical contacts, you might need to break up with that faulty RAM module and find a new love.
So, next time your system’s acting up, give RAM cleaning a whirl. It might just be the spa day your RAM needs to get back to its zippy self. And remember, if all else fails, there’s always a new RAM module waiting to steal your computer’s heart.
- RAM Cleaning – One Solution To Fix Memory Related Problems
- How To Repair A Faulty Dead RAM Stick? – Fixing Damaged Memory Stick

#Some Other RAM Testing Tools
let’s dive more into the world of RAM testing tools – the unsung heroes keeping our systems in check. Here’s a rundown of the cool cats in the game:
- MemTest86+ (MemTest86 Plus): The open-source sibling born from MemTest86. Packs a similar punch and is often the go-to alternative for memory testing fun.
- HCI Memtest (memtest.org): The friendly face with a graphical interface. Perfect for a user-friendly RAM test and sniffing out those pesky memory issues.
- GoldMemory: The commercial maestro in the memory testing world. Offers a range of tests to pinpoint memory problems, supporting various types and architectures.
- RAMTest (PassMark): A hotshot part of the PassMark Software family. This one’s all about putting your system memory through the wringer to check reliability and stability.
- DocMemory: The doctor in the house, brought to you by CST Inc. Ideal for a deep dive into RAM module testing. Trust the Doc!

- Prime95: Known as a CPU stress-tester, Prime95’s got a secret weapon – a memory testing component. Unleash it to spot any stability hiccups in your system.
- MemScope: The brainchild of Micro2000, MemScope is your detective for testing and diagnosing memory-related issues. Sleuth away!
So, whether you’re rocking Windows, dancing with open-source vibes, or prefer a commercial partner, there’s a RAM testing tool for everyone. Keep those memory lanes clean and your system will thank you with smooth sailing! 🚀💾


Great Article. Windows 10. my Samsung brand Laptop taking for ever to boot. no error found in chkdsk and RAm test. what next now. thx
Repair your windows by using the startup repair tool.
Thank you for the info on testing RAM. 🙂
My desktop keeps restarting. Gives me the blue screen. It says physical memory dump or memory dump. It starts fine in safe mode. Did the ram test several times didn’t find anything. So rebooted to crash again.
try this
http://www.deskdecode.com/startup-repair/
My laptop got freeze, so i use power button to shutdown it and then restart it. It shows blank screen (RAM load light is not blinking), so i pluggedout and insert both RAMs (2GB and 1 GB) several times. It got start.
After 2 days again it same problem happened, now it’s not starting. Plz suggest me…..
Try to use some different RAM.
by mistake I remove my ram while the CPU was on and it shorted. I had 2 of them and neither one is working can you please help me repair those??
The profile pic is disgusting and creepy.
😀
@nnootthhiinngg that’s not what your mother said last night
hi,
i have 6gb ram actually but it is showing installed ram is 2 gb . Please help me and this is my email id ramutule007@gmail.com. Please send the solution to this link
and my lapy is lenovo g500
Use 64-Bit OS
iam using 64 bit os only.. just ram slot connection problem. I just fixed it and working fine. Thanks 🙂
My laptop is Acer Core i5 8th gen with 8GB RAM, when I am trying to install Crysis 3,Assasin Creed India and revallation , it shows ISDONE.DLL Error. I checked it on google, and could find some reasons for it including RAM Issues. I checked all reasons and all are ok. I think problem is about RAM cards, But cannot find in steps above. Does it means no issues on my RAM cards ? #Sorry_for_my_bad_English
I don’t think the hardware the faulty if only two or three games aren’t working. Check for the software compatibility, or maybe you can try to use some different setup file.
Whether your RAM is running well or not, that can be tested by some of the error indications that the computer sometimes shows. Like the Blue Screen is the most common issue that is occurred by the RAM issue of the system, or if your computer gets problem with the reboot process then also it is for the problems with the RAM.
i have lenovo z560 4gb ram two slot i means 2 gb + 2 gb . i upgrade one 4gb ram + my old one 2 gb ram i installed but after how ever worked i don’t know .oneday all worked but after now not support Now showing launch reprair or starting normaly both of i do after also not working stuck . how i can solved this problem please help me
my problem is that my hp 3115m laptop takes 5 attempts to start. It will power up, hard disk will run but only a black NOT blue screen> Finally after pressing power button it will load on the 5th or 6th attempt
Looks like a BIOS problem to me (which need to be flashed, in order to fix the problem).
My computer freezes for short periods.
I did a full ram test (mulitple) and it came back with 0 errors.
Sometimes games will freeze and crash.
help.
Try to clean the RAM and RAM’s slot.
thanks for the reply.
My issue was, I believe, I “cleaned” my pc with fancy software, ie cc cleaner. Seems it was too thorough and deleted imported registries.
I reinstalled windows and my pc runs amazingly.
Thanks again.
Nice post it really helped to me.
Question.
I have a 6 month old custom pc. It began restarting in the middle of the night about a month ago, had no idea why just assumed there was a power/sleep setting I missed. Few days ago the PC began randomly restarting at increased intervals, event viewer and cpu/gpu temps showed no abnormalities. I checked all setting and realized this is why pc was reset in morning. I ran memtest86 and got 5000+ errors that also seemed to typically be related to particular sectors. When I went to test the sticks individually and in different slots, still received memtest errors.
That just seems strange? I have never experienced this before. PSU is also 6mo old and i have redundant UPSs connected to all equipment including this desktop in the server room.
Have you experienced dual channel ram failing together simultaneously this quickly? I am covid19 poor right now and use my pc for work so i don’t want to RMA my ram and wait if the issue is the mobos memory module?
Any advice?
I’m not very tech-savvy, but this made it so easy for me to test my computer.
I never knew how simple it was to test the RAM on my computer until I read this.
I had been experiencing some issues with my PC’s performance, and this article helped me understand how to check if my RAM is causing the problem. Great information!
I want reading through and I conceive this website got some really utilitarian stuff on it! .