


 & HDD (Hard Disk Drive)?")


Fixing the annoying “Windows Explorer Has Stopped Working” issue in Windows can feel like trying to untangle a mess of wires – frustrating and time-consuming. This pesky error has a knack for popping up out of nowhere, disrupting your workflow and leaving you scratching your head in confusion. But fear not, fellow Windows users, for most of the time, it’s not as dire as it seems.
Picture this: you’re cruising along in the digital world, managing files, organizing folders, and suddenly, bam! Windows Explorer decides to take an unscheduled coffee break. It’s like hitting a pothole on the information highway—jarring and unexpected.
Now, let’s get to the bottom of this conundrum. Is it a glitch in the matrix, viruses or perhaps a case of incompatible software throwing a tantrum? Sorting through the maze of possibilities requires patience and a Sherlock Holmes-esque attention to detail.
In our quest for a solution, we’ll explore tried-and-true troubleshooting methods, from basic fixes to ninja-level techniques. By the end of this guide, you’ll be armed with the knowledge to conquer the “Windows Explorer Has Stopped Working” beast, saving you from the dreaded last resort of reinstalling your entire operating system. So buckle up, intrepid tech adventurer, and let’s dive into the fray!
So, Let’s See How To Fix This Issue
When Windows Explorer decides to take an unexpected vacation, your first line of defense is to give it a gentle nudge using the Task Manager. To summon this digital Swiss Army knife, simply press Ctrl + Alt + Del. Once the Task Manager window pops up, head over to the “Processes” tab. Here, you’ll see a laundry list of all the digital denizens currently milling about in your system.

Now, scroll down until you spot our elusive friend, “Windows Explorer”. Right-click on it, and voilà! A menu will appear, offering you two options: “Restart” and “End Task”.
For those on Windows 8 or newer, the “Restart” option is your best bet. It’s like hitting the reset button on a misbehaving gadget—quick and painless. Sadly, our older pals on Windows 7 and below don’t have this luxury. Instead, opt for the “End Task” button for explorer.exe and then cozy up to the “Run new task” option.
Or just use the “Run new task” option if you can’t find “Windows Explorer” running.

Clicking on the “File” button from the top menu and then selecting “Run new task” opens up a little chat box where you can type in a command. Here’s where you work your magic – type “explorer.exe” and hit Enter. This incantation tells your operating system to conjure up a fresh new instance of Windows Explorer. It’s a bit more hands-on, but hey, sometimes you’ve got to roll up your sleeves to get things done.

Whichever route you choose, rest assured that Windows Explorer will soon be back on its feet, ready to tackle your digital chores with renewed vigor. Peace and tranquility shall once again reign in your pixelated kingdom.
Solution #1: Deep Virus Scan
To tackle the pesky issue head-on, one of the top strategies is to kick off a thorough virus scan. Since a good chunk of these problems stem from sneaky viruses wreaking havoc behind the scenes, having a solid antivirus program in your corner is non-negotiable. Aim for top-tier antivirus software that packs a punch with its detection abilities and real-time protection perks.
Once you’ve got your antivirus software all set up, it’s time to dig into its bag of tricks. One key move to make is to prioritize a boot-time scan. This method goes above and beyond your standard scan by checking your system for malware and other nasties before your operating system fully boots up. Why? Because 99% of the time, the “Windows Explorer Has Stopped Working” hiccup is caused by unwanted viral guests crashing the party. By tackling them head-on with a boot-time scan, you’re essentially nipping the issue in the bud, beefing up your system’s defenses against these digital troublemakers.

Sure, the process might take a bit of time, but trust me, the payoff is worth it. Not only does a deep virus scan squash any existing threats, but it also acts as a proactive shield against future attacks. So, take charge of your digital realm by giving your system a thorough once-over, paving the way for smooth sailing sans those pesky error messages.
Solution #2: Updating Video & Chipset Drivers
Outdated or incompatible Hardware Drivers often lurk behind system hiccups like the one we’re facing. To embark on this journey toward smoother operation, caution and precision are paramount.
First things first, make sure to uninstall any existing drivers related to your video and chipset components. This proactive move prevents potential clashes between old and new drivers, making the transition to updated versions a breeze. Once you’ve cleared the deck, it’s time to hunt down the latest drivers from reliable sources.

If you’re rocking a branded desktop or laptop, head straight to the manufacturer’s official website. There, you’ll find a handy support section chock-full of drivers tailored to your specific model. Grab the newest versions of both video and chipset drivers, double-checking compatibility with your operating system along the way.

Now, for those navigating the wilds of a custom-built desktop, the driver update journey takes a slightly different turn. Start by pinpointing the model number of your motherboard, the nerve center housing those crucial chipset drivers. Armed with this info, venture forth to the manufacturer’s website, where a treasure trove of recommended drivers awaits. Punching in the motherboard model number unlocks a selection of drivers fine-tuned for your hardware setup.

By sticking to this meticulous process of driver updates, you’re not just ironing out compatibility wrinkles – you’re also unlocking the full potential of your hardware. As the digital landscape evolves, keeping your drivers up-to-date ensures peak performance and resilience against those pesky errors.
Solution #3: Fixing Windows Internal System Files
Often, it’s corrupted or missing system files that lurk behind these vexing issues. To set things right and restore order to your digital realm, you’ll need to call upon the mighty System File Checker (SFC) and Deployment Imaging Servicing and Management (DISM) tools, masterfully wielded through the command-line interface (CMD).
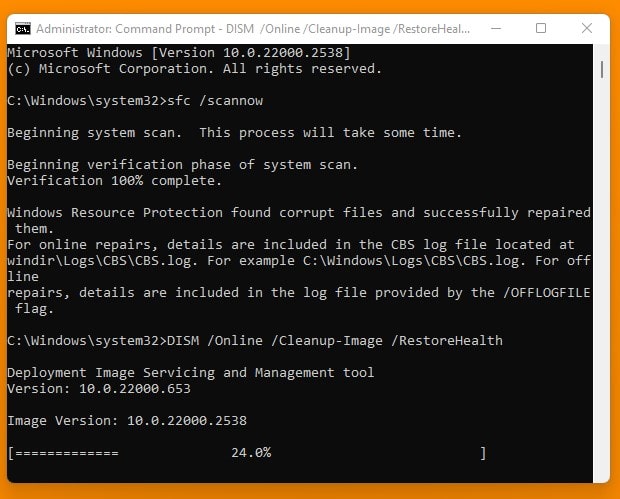
Begin your journey of system file restoration by opening up CMD with administrative privileges. Once you’re in, kick off the System File Checker (SFC) utility with the command “sfc /scannow”. This clever tool meticulously examines the integrity of your system files, fixing any problems it encounters along the way. Be patient as SFC does its thing, as each scanned file brings you one step closer to a resolution.

If, by chance, SFC uncovers issues it can’t fix or doesn’t quite do the trick, fear not – the Deployment Imaging Servicing and Management (DISM) tool is here to save the day. Issue the command “DISM /Online /Cleanup-Image /RestoreHealth” to unleash DISM’s restorative powers upon your beleaguered system. This versatile tool digs deeper, tapping into Windows Update to replace corrupted files with fresh ones, giving your operating system a new lease on life.
As the CMD interface buzzes with activity, each command you enter becomes a beacon of hope, guiding your system towards redemption and resilience. With the strategic use of the SFC and DISM tools, you embark on a journey of transformation, transcending the confines of system errors to emerge victorious in the realm of digital harmony. So, wield your command-line skills with confidence and conviction, for within its depths lies the key to unlocking the full potential of your Windows operating system.
Solution #4: Manually Fix The Windows Registry
When standard fixes fall short, especially when viruses have deeply embedded themselves in the Windows Registry Database, manual intervention becomes necessary. The Windows Registry is the heart of the operating system, housing vital configurations and settings. Unfortunately, it’s also a prime target for malicious entities aiming to disrupt your system’s stability.
To start the manual registry repair process, open the Windows Registry Editor by pressing the Windows key + R on your keyboard to bring up the Run Command. Then, type “Regedit” into the provided field and hit Enter to access the intricate maze of the Windows Registry.
Navigate through the registry folders until you reach the specified path within the Windows Registry Editor: “HKEY_CURRENT_USER\Software\Microsoft\Windows NT\CurrentVersion\Windows”. Here, you’ll encounter a list of registry entries, each holding a piece of the puzzle to system functionality.
Check out the “Load” registry within the Windows folder. If it looks normal without any irregularities, resembling a standard configuration, the issue likely lies elsewhere, calling for further investigation. However, if the “Load” registry shows signs of compromise, such as an unusual path leading to a virus file, it’s time to take decisive action.
Double-click on the compromised “Load” registry entry and carefully remove the malicious path ensnaring your system. Exercise caution during this process, making sure to delete only the malicious elements, leaving the registry configuration clean and intact.

By embarking on this meticulous journey through the Windows Registry armed with determination and precision, you regain control over your system’s fate. Through strategic intervention, you thwart the advances of malicious entities, reinforcing the structural integrity of your operating system and safeguarding the sanctity of your digital domain.
Solution #5: Use System Restore
In the tireless effort to fix the persistent “Windows Explorer Has Stopped Working” error, System Restore emerges as a powerful tool at your disposal. Engineered to roll back your system to a previous state, System Restore effectively undoes recent changes that might have triggered this troublesome issue. With this intuitive feature, you can rewind time, bringing back peace to your digital realm with relative ease.
To kick off System Restore, head to the Control Panel and access the “Recovery” or “System” settings, depending on your version of Windows. Within this menu, find and click on the option for System Restore, prompting your system to embark on a journey through its collection of restore points. These checkpoints, meticulously saved over time, provide glimpses into the past, each representing a snapshot of system stability.
Select a restore point that predates the appearance of the “Windows Explorer Has Stopped Working” error, then follow the on-screen instructions to start the restoration process. Be patient as your system diligently rolls back to the chosen state, gradually undoing the events that led to the error.

However, in rare cases where System Restore falls short and doesn’t deliver the desired outcome, requiring a more drastic measure, resetting or reinstalling your operating system becomes the last resort. While disruptive, this step offers a clean slate to rebuild your digital realm, wiping out any lingering issues and restoring system integrity.
- How To Install Windows 10? – Complete Guide
- How To Install Windows 8/8.1? – Complete Guide
- How to Install Windows 7? – Complete Guide


 Error in Middle of Computer Startup")


I was searching far and wide online – no dice. Everything worked in Safe mode, so I tried to go to msconfig (type: “msconfig” in Start>Search or Ctrl+Alt+Del>Start Task Manager>File>New Task>type “msconfig”) then under tab “Services” eliminate groups and restart to find it by trial and error, which sometimes works – still no dice. At least for me it turned out tho, the problem came when I connected to the internet. So I used program NetStalker, (its free, and there are a few similar ones) to see the programs using the internet. There I found Explorer.exe, looked the location (which is C:\Windows\explorer) and then went to Control Panel>System and Security>Windows Firewall>Advanced Settings (or if you are blocked from doing anything do the following: Ctrl+Alt+Del>Start Task Manager>File>New Task>type in: “wf.msc”). There under Inbound rules” on the left menu, click “New Rule”. Then go: Program>Next>This Program Path>Browse>Locate “C:\Windows\Explorer”>Next>Block the connection>Next>Next>Finish. Repeat the process for the “Outbound rulles” and your done. 🙂 Hope it helps, I spent a few hours on this one.
Thanks for your help Dimitri,
I think it’s really going to helpful for others.
you have shared the nice post thanks for sharing.