


 & HDD (Hard Disk Drive)?")


I get the panic when your computer just won’t power up, leaving it all dead. It’s like, seriously distressing. But hold up! If you’re thinking about losing precious data? Then, Don’t Worry! Chances are super slim, like a mere 0.2%. That’s like worrying ’bout rain in the desert, you know?

When your computer acts all dead and doesn’t respond, it’s usually because something’s up with the power. Either it’s not getting juice or something’s wonky in the computer’s power system. That’s why it’s not waking up—there’s definitely a hiccup in how electricity moves around in there.
So, let me walk you through troubleshooting step by step. Don’t worry if you’re not a hardware whiz – my instructions are super easy to follow, even a kid could get it! But hey, a word of caution: even though I’ve made things simple, it’s best not to try fixing stuff if you’re underage or don’t have the right supervision or know-how for these tech things.
Moreover, if your computer successfully powers on but fails to display anything on the screen, this particular tutorial may not address your issue. Instead, I recommend exploring our related tutorials on “PC Turns ON But No Display On Monitor! – Every Possible Solution” & “Laptop Turns ON But No Display On Monitor! – Every Possible Solution“ which is specifically designed to assist in troubleshooting scenarios where the screen remains blank despite the computer being powered on.
Solution #1: Check Power Socket
What is the primary move in this tech troubleshooting game? Investigating the power source. It all starts with a thorough check of the wall socket or outlet where your computer is plugged in. Sometimes, the hiccup might be as trivial as a loose connection or a misbehaving outlet. Ensure the outlet’s in good shape by plugging in another device or employing a trusty circuit tester, aka a multimeter.

Solution #2: Check Power Cable & Its Output Voltage
If the power outlet seems to be functioning correctly, inspect the power cable and its connection to the computer. Examine the cable for any visible damage, such as fraying or cuts. Try using a different power cable if available, as a faulty cable could be the reason behind the computer’s failure to power on.
Another important step is to inspect the main power cord using a multimeter tester. This helps check if the power supply is working properly and giving out a steady amount of power, enough to kick-start the computer’s PSU (Power Supply Unit). Usually, the PSU needs at least 100-110 volts or 200-220 volts to power up.
Remember, voltage needs can differ depending on where you are. Like in India, they use around 220 volts, but in the US and UK, it’s about 110 volts. Not only that, but different countries have different electricity standards, and computer PSUs can also have different requirements. So, it’s super important to check if your PSU matches the voltage from your power cord.
This means checking if the power cord gives the right voltage that your computer’s PSU needs. Always refer to the computer’s manual or specs to make sure it’s compatible with the power supply.
Simply adjust the dial of the multi-meter tester to the AC Current Mode labeled as “A~”. Then, insert the red and black probes into the power cord to measure the live output voltage accurately.

Screwdriver Kit Starts From: @Amazon US ($9.99), @Amazon UK (£9.99), @Amazon IND (₹149.00), @Walmart US ($9.99), @Newegg ($10.99).
Multimeter Starts From: @Amazon US ($12.99), @Amazon UK (£7.99), @Amazon IND (₹229.00), @Walmart US ($12.99), @Newegg ($14.99).
Solution #3: Check For Faulty Power Button
The Power SW (Power Switch) Pins on the F-Panel Connector are spots on the Motherboard where you connect the power button from your computer case. They’re like a link between the button on the case and the motherboard. When you press the button, these pins help start or shut down the computer.
Instead of using the physical power button, there’s another way to turn on the computer. You can directly short the Power SW (Power Switch) pins on the motherboard for this. It’s like a shortcut to start the computer without pressing the button. You do this by briefly joining or touching these Power SW pins with something that conducts electricity, like a screwdriver or a jumper cap. It’s like giving a nudge to the computer to turn on.
Finding these Power SW pins is important, especially when you’re dealing with power issues. They’re usually in a group of pins called the F-Panel connector on the motherboard. The motherboard’s manual shows you where these pins are, making it easier to find them.
To find the Power SW (Power Switch) pins on the motherboard for shorting, follow these steps:
- Use the Manual: Look at the manual that came with your motherboard. It’s got details and pictures showing where everything is, including the front panel connectors.
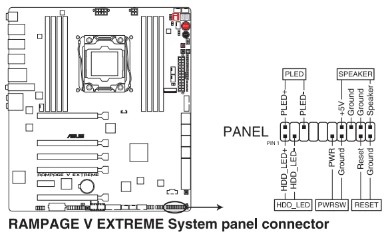
- Spot the F-Panel Connector: Find the F-Panel connector on the motherboard. It’s a group of pins where the power button, reset button, and LEDs connect.

- Look at the Pins: Check the manual for a picture or chart of the F-Panel connector’s pins. Look for labels like ‘PWR_SW’ or ‘PWR_BTN’ to find the Power SW pins. Or just Check where the Power SW Connector is connected on the motherboard.

- Find the Power SW Pins: Identify the two pins meant for the Power SW function in the F-Panel connector. They’re usually close together. Use the manual to be sure you’ve got the right ones for the power button.

- Short the Pins: Once you’ve found the Power SW pins, briefly connect them using something small and conductive like a screwdriver or jumper cap just for a single second. This pretends like you’re pressing the power button, but just for a moment.

Doing this trick can really help figure out what’s up with the power button. If you short the Power SW pins and the computer turns on, it means the power button might have a problem. It could be broken, stuck, or not connected right.
But if even after shorting the pins the computer still won’t turn on, it tells us the problem might be somewhere else. It could be with the motherboard, the power supply (PSU), or maybe something else inside the cabinet.
Solution #4: Check PC’s Power Supply Unit (PSU)
The third big step is checking the computer’s PSU with a special tool called a Power Supply tester. This tool is designed specifically to find problems in the PSU quickly and efficiently.
The power supply tester is made with features that help check how well the PSU is working. It has connectors and lights that let you check the PSU without needing the rest of the computer. This way, you can figure out if the PSU itself is causing the computer not to turn on.
You connect the power supply tester to the PSU and switch it on using the tester’s controls. Lights or a screen on the tester will show you the voltage levels in different parts of the PSU, like +3.3V, +5V, and +12V.
The tool’s made to be super accurate, showing you if the voltage levels match what they’re supposed to be according to the PSU’s manual. If the readings are off or keep changing a lot, it might mean there’s something wrong with the PSU.
To know more about using this tool or a multimeter for testing the PSU, don’t forget to check out: Test Computer’s PSU: Checking Power Supply Without Motherboard
PSU Tester Starts From: @Amazon US ($10.99), @Amazon UK (£12.99), @Amazon IND (₹299.00), @Walmart US ($12.99), @Newegg ($13.99).
- How To Buy Perfect Power Supply Unit (PSU) For Desktop Computer?
- Top & Best PSU (Power Supply Unit) Available In The Market: 15+ Articles
There is one more thing;
Before we dive into testing that PSU, let’s talk about a neat little troubleshooting trick. What you can try doing is unplugging both the 20-pin ATX Motherboard Power Connector (24-Pin in newer motherboard) and the 4-Pin CPU Power Connector (6 or 8-Pin in newer motherboard) from their slots on the motherboard and then popping them back in a few times.
This action might help tackle potential issues related to poor connectivity caused by gunk or dirt buildup on those conductive contacts within the power connectors and the slots on the motherboard. When you unplug and replug these connectors a bunch of times, it sort of scrapes off any nasty stuff that might be messing with the electrical contact.

Solution #5: Checking The Motherboard & Components
To find out whether the problem is with the motherboard or another internal part, you’ll need to take the motherboard out of your computer’s case and test it on its own. This means physically removing the motherboard from its place inside the computer.
To do this properly, you should follow some specific steps and be careful:
- Watch How-to Videos: You can learn a lot from videos on assembling computers, especially on platforms like YouTube. These videos show you, step by step, how to take apart a computer, including removing the motherboard. They’ll help you understand which cables and parts you need to disconnect to safely take the motherboard out of the case.
- Identify Cables to Remove: It’s important to know which cables and parts are connected to the motherboard. Usually, you’ll need to disconnect things like power supply cables (like ATX and CPU Connectors), front panel connections (power button, LEDs), data cables (SATA, USB), and any cards (like Graphics Cards or Network Card) attached to the motherboard.

- Be Cautious: Make sure the computer is turned off and completely unplugged before you start taking it apart. Use the right tools and handle everything carefully to avoid causing any damage.
- Remove the Motherboard: Follow the instructions you’ve learned from those assembly videos. Gently unscrew and detach the motherboard from the case. Take note of any standoffs or screws that hold the motherboard in place and remove them too. Also make sure not to remove the CPU, CPU Fan & RAM from the main board.
- Connect the Power Supply: Once the motherboard is out, place it on a surface that doesn’t conduct electricity, like a wooden table. Then, connect the both the 20-pin ATX Motherboard Power Connector (24-Pin in newer motherboard) and the 4-pin CPU Power Connector (6 or 8-Pin in newer motherboard) to the motherboard.

- Test the Motherboard: Now, short the POWER SW pins on the motherboard using the screwdriver, just like I demonstrated in solution number 2 and it will start the motherboard (you’ll be able to see the CPU fan running).
# What to Do if Motherboard Turns ON
If the motherboard turns on without any issues during the separate test, switch it off. Next, connect a monitor to check if there’s any display output. Without an HDD or SSD), you won’t reach the operating system. But with the CPU and RAM attached, the motherboard can show the POST (Power-On Self-Test) BIOS Screen when starting up. This screen tells you that the essential parts are working and shows the initial boot-up process.
After confirming that the motherboard works fine on its own, put it back into the computer case. Then, start reconnecting each component one by one and test the computer after plugging in each part before connecting the next.
This step-by-step process helps find out if any specific part or connection is causing the trouble. By methodically reconnecting and testing each component separately, you can figure out and pinpoint any hardware issues within the system. This method ensures a systematic check of every part’s function before moving on to the next, making it easier to diagnose potential problems accurately.
# What to Do if Motherboard Doesn’t Turn ON
If the motherboard doesn’t start initially, try troubleshooting by removing the RAM modules. Sometimes, taking out the RAM and attempting to start the computer can make the motherboard activate, as seen by the CPU fan running. If the CPU fan works after removing the RAM, it might mean there’s a problem with the RAM modules.
If your system has two RAM modules installed, perform a diagnostic test by using each RAM module separately. Take out one RAM module and try starting the computer. If the system turns on fine with only one RAM module in place, it might suggest that the other RAM module could be the issue.
If the motherboard still doesn’t turn on even after removing the RAM, try starting the computer without the CPU as well, but keep the CPU fan connected. If the CPU fans run without the CPU and RAM, it’s possible that the issue is between the CPU and the motherboard. You can try using a different compatible CPU to find the actual problem.

Suggested Articles:
- 4 Different Ways to Find Your Motherboard’s Model Number
- Fixing Computer That Won’t Turn ON At All & Remains Dead
- How To Reflow GPU Or Chipset Chip Of Desktop’s Motherboard?


 Version Compatibility on Any Motherboard?")

I need to to thank you for ones time for this wonderful help.
I have been browsing online more than 3 hours today, yet I
never found any interesting article like yours.
It’s pretty worth enough for me.
A lot of people will be benefited from your writing.
Cheers!
It’s difficult to find well-informed people about this subject,
however, you seem like you know what you’re talking about!
Thanks
I’ve been surfing online more than 4 hours today, yet
I never found any interesting article like yours.
Marvelous, whatt a web site it is! This wsbsite presents helpful facts tto us, keep it up.
That’s a well detailed guide. Thanks
this is nice keep it up dude very helpful website thanks
thank you so much this is power helpful step by step keep it up dude :-))
hi please this cool thanks.
please i need a step to step on a laptop no power please can someone help me out
I will make that when i get free.
your tutorials are complete. I like your article. 🙂
THANXXXXXXX
Fantastic guide. Thank you!
Desperate Need
Please I need help. I have an all-in-one computer that was working fine but now it’s dead. Don’t know where to start , it has been suggested that it might be a hardware problem. It is totally dead no power at all. Would like any suggestions ? The powercord is not the problem.
Try to use some different, but same Wattage PSU.
Well I really appreciate your hard work for writing this article,but I really needed a step to step guide to test and trouble shoot power dead problem. Can anyone help with that
It takes time, just to explain what you say “step by step guide”. But I’ll definitely heads you up when I updated this article or create a new one about the same topic.
hi I need help .. so I have an intel dx58so with 6 core i7 980 x and got a new graphic card a zotac 1660 6gb gtx nvidia. now I fitted it following all instructions and ive reset the cmos jumpers and pulled battery but all I get is a 5A error when trying to boot and it only gets to the screen where u can press f2 to enter bios but all it does is beep when u press f2 all lights and fans are working ..ive also had it where ive only had power on off button graphics and monitor ram fitted but no boot also took ram out so it should beep but doesn’t .. please some advice would be greatfully received…
Well done…..
Also your website is amazing
A round of applause for your post.Really thank you! Will read on…
Appreciate this post. Will try it out. donate for ukraine
Really informative article.
I cannot thank you enough for the blog. Thanks Again. Really Great.