


 & HDD (Hard Disk Drive)?")


Encountering the dreaded “Unmountable Boot Volume” error, also known as Stop Error Code: 0x000000ED, can be a real headache for Windows users. Imagine your computer throwing a tantrum in the form of a Blue Screen of Death (BSOD) – not a pleasant sight! This error signals a serious hiccup that stops your computer from reaching the boot device, essentially rendering it useless temporarily.
Now, what triggers this annoyance? Well, it could be a variety of things. Picture this: wonky storage-related filter drivers going missing, getting corrupted, or just acting up. Or, blame it on file system corruption or some tinkering with storage controller settings in the BIOS—they can all play a part in this drama. Oh, and here’s a plot twist: even change your storage controller post-Windows installation or transfer your hard disk to a new computer with a different controller, and voila, you might be staring at this error.
But that’s not all—hardware issues can also be pulling the strings behind the scenes. A rebellious motherboard, a troublesome storage controller, or faulty hardware components could be the culprits causing this error. And here’s a wild card entry – even problems with the TrustedInstaller service failing to install updates correctly due to store-related issues can throw you into the “Unmountable Boot Volume” abyss.
Now, how do you tackle this technical maze? Take a breather, grab a cup of coffee, and let’s break it down systematically. It’s time to identify and squash the specific gremlin causing the blue screen error.
# 3 Possible Conditions For The Error To Appear
Encountering this pesky error can throw a wrench into your computing experience, and it has a knack for showing up in three distinct scenarios:
- During Startup: You press the power button, eager to start your computer, and just as the system begins its ballet, bam! The blue screen featuring the “Unmountable_Boot_Volume” code rudely interrupts the show.
- While Performing Tasks: It’s the middle of you doing your thing on the computer—be it working on software, diving into a gaming session, or multitasking like a pro—and suddenly, the error crashes your party.
- During Windows Installation or Upgrade: As you embark on the noble quest of installing or upgrading your Windows operating system, the error decides to gatecrash the process, bringing everything to a screeching halt.
Now, let’s talk solutions. Before you dive into troubleshooting, take a moment to reflect on any recent changes to your computer. Did you install new software, add devices, or tweak motherboard settings (BIOS)? If any of these changes coincided with the error’s grand entrance, consider reverting or undoing them. Sometimes, a quick backtrack can be the magic fix for this blue screen conundrum.
Condition 1: Error Occurring In Middle Of Windows Startup
Imagine your Windows startup getting interrupted by this notorious error. Fret not, as there’s a handy tool akin to a computer doctor called Startup Repair, designed to come to your rescue. This tool operates within the Windows Recovery Environment (WinRE), which typically pops up after a few unsuccessful attempts to kickstart your computer.
Startup Repair acts as a digital medic, aiming to diagnose and mend the root causes of boot problems. It sets out to tackle issues like corrupted files, wonky settings, or any other factors playing a role in the error, with the ultimate goal of restoring your computer to its normal, glitch-free self.
To get into the Startup Repair tool via the WinRE menu, follow these simple steps:
- Click on “Troubleshoot”.
- Select “Advanced options”.
- Choose either “Automatic Repair” or “Startup Repair”, depending on what options are available.

If, for some reason, the Startup Repair doesn’t work its magic, fear not – there are more steps you can take. This might involve dealing with removing pending Windows updates, fixing the master boot volume setup, and sorting out any issues lingering in the Windows registries. For a deep dive into these more intricate solutions, check out the guide titled “Blue Screen Error in Middle of Computer Startup“. It’s your go-to resource for a step-by-step walkthrough on resolving the error during the startup phase.

Condition 2: Error Occurring While Working On Windows
So, you’re cruising through Windows, and suddenly, bam! You’re face-to-face with the “Unmountable Boot Volume” error. Odds are, those pesky malware or virus troublemakers might have had a field day with your Windows files. Fear not, though; we’ve got some solutions up our sleeves to get things back on track:
Solution No. 1 – Clean OS Drive Storage If Its Full
If your computer’s main drive is starting to resemble an overstuffed suitcase after a vacation – you know, bursting at the seams – it’s high time to tackle that clutter. A jam-packed drive not only eats up precious space but also becomes a breeding ground for annoying performance slowdowns and pesky error hiccups.
Let’s restore some order to this digital chaos, shall we? Start by bidding adieu to unnecessary baggage – get rid of what you no longer need, toss out those temporary files, and wave goodbye to those apps gathering virtual dust.
For a more effective cleanup job, turn to the “Disk Cleanup” tool hanging out in your OS Drive’s (C:\ ) properties under the “General” tab. This nifty tool efficiently rids your system of non-essential items, including outdated updates and temporary data-hogging space on your computer. As it does its thing, the Disk Cleanup process assesses everything and hands you the power to choose what to chuck – like temporary internet files, system-generated caches, and extra app data.
And hey, don’t forget to hit up the “Clean up system files” button within the Disk Cleanup tool if you spot that option. It broadens the cleanup scope to include more system-related files, giving you a beefier list to declutter.

Solution No. 2 – Scan OS Drive For File System Errors
Now, again head back to the properties of your OS Drive (C:). Move over to the “Tools” tab and keep an eye out for an option called ‘File System Error Checking’. This handy feature takes a close look at the file system structure of your drive, spotting and fixing any potential problems it might come across.
Solution No. 3 – Fix Corrupted System Files
So, when your Windows starts acting all wonky, it’s time to call in the troubleshooters. We’re talking about the System File Checker (SFC) and Deployment Image Servicing and Management (DISM). Think of SFC as the superhero swooping in to fix those corrupted Windows files, and DISM as the guardian angel making sure all the crucial files for a smooth system setup are safe and sound.
But here’s the thing: you’ve got to summon these mystical tools using some specific commands in either Command Prompt or PowerShell. Once you’ve got them on the case, they go on a little adventure, scanning and fixing any troublesome files that might be causing chaos in your system. And there you have it! Your Windows domain should be back to its error-free glory.
First Command: sfc /scannowSecond Command: DISM /Online /Cleanup-Image /RestoreHealth

Solution No. 4 – Update Storage Controller Drivers
Alright, let’s talk about Storage Controller Drivers – the unsung heroes making sure your computer and storage devices speak the same language. Think of them as translators, ensuring your computer understands and optimizes the use of your storage gadgets.
Now, here’s where the plot thickens: Windows updates can be like sly magicians, swapping your advanced storage controller drivers for basic or outdated ones. To outsmart this digital trickery, it’s time to go on a little adventure to find the freshest drivers online. Head over to your device manufacturer’s official website or, if you’re feeling lazy, rely on a trusty automatic driver updater like “EaseUS DriverHandy”. Hunt down the latest Storage Controller Driver that matches your computer and Windows version.
- What Is Computer Hardware Drivers & Why We Need It?
- How to Update Drivers Directly From the Device Manager?
Ready for the action? Here’s your step-by-step guide:
- Launch the Device Manager – just right-click on the Start menu and hit “Device Manager”.
- Find “Storage controllers” or “IDE ATA/ATAPI Controller” in the Device Manager and give it a little expansion.
- Right-click on your current driver (maybe it’s the Standard SATA AHCI Controller) and choose “Update driver”
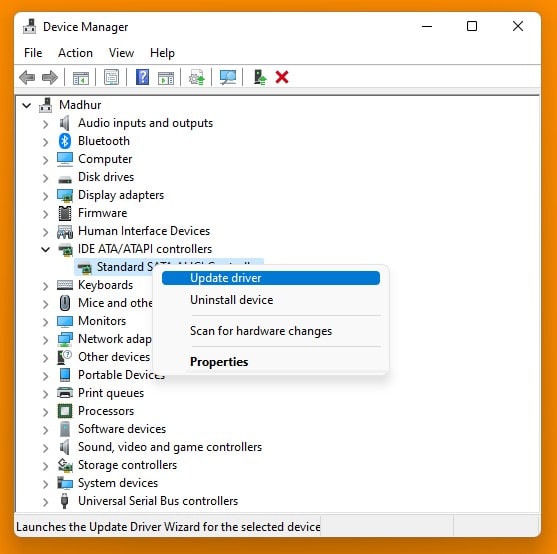
- Opt for “Browse my computer for driver software” and pick the driver you downloaded.
- Follow the on-screen instructions to do the installation dance.
- If the computer insists, take a break – restart it.
By following these steps, you’ll be the hero of your system, installing the latest driver and potentially fixing any issues while giving your computer a performance boost.
Solution No. 5 – Update SSD Firmware
Have you ever thought about sprucing up your Solid State Drive (SSD) with a little software makeover? Let me break it down for you: the SSD firmware is like the conductor inside, calling the shots on how it dances with your computer.
To kick off this update adventure, head over to the official website of your SSD’s manufacturer. Go to the support or downloads section and snag the firmware made just for your SSD model. Then, follow their step-by-step instructions, usually involving downloading a file, firing up a software tool, and carefully following the on-screen cues to smoothly integrate that shiny new firmware into your SSD.
Solution No. 6 – Uninstall Recently Installed Windows Update
Ever found yourself in a situation where a Windows update seems more like a troublemaker than a helper? It happens! Picture updates as the valiant knights sworn to protect your computer’s integrity and boost its performance. But, like any gathering, sometimes these updates can disrupt the festivities. They might play off-key, clash with certain elements of your system like previously installed drivers or services, and give rise to pesky errors—cue the infamous ‘Unmountable Boot Volume’ error you might be wrestling with right now.
But fear not! If the Windows update is behaving like an unruly guest at your tech party, there’s a solution – roll it back. While updates are crucial for keeping your system secure and efficient, sometimes a particular update can be the source of discord. In such cases, bidding farewell to the problematic update can bring harmony back to your digital symphony.
To execute this fix, follow these steps:
- Go to Settings.
- Click on Update & Security.
- Choose Windows Update.
- Select View update history.
- Click on Uninstall updates.

If all else fails, consider exploring our comprehensive article on “Fixing Blue Screen Error (BSOD) – Every Possible Solution”. This piece covers a variety of approaches to troubleshoot the Blue Screen error. Packed with numerous tips and solutions, it provides ample guidance to help you resolve the issue you’re currently facing.
Condition 3: Error Occurring While Installing Windows
Setting up Windows 11 or 10 can be a bit of a headache, especially when you run into that notorious blue screen error. It usually pops up when your computer struggles to figure out what’s going on with the hard drive. The culprit behind this annoying glitch might be a lazy Hard Disk Drive (HDD) or a solid-state drive (SSD) that forgot to get an active partition. It could also be due to some mix-ups in the SATA Controller Setting hiding out in your computer’s BIOS. Oh, and don’t rule out the possibility of a rebellious cable connecting your HDD/SSD or some drama with the HDD/SSD itself.
All these hurdles mess with your computer’s mojo, making it unable to spot or make use of the storage drive properly. And that’s when the infamous Blue Screen of Death (BSOD) crashes your Windows installation or upgrade party. But fear not! When you find yourself stuck in this digital conundrum, there are a bunch of potential fixes you can give a shot.
Solution No. 1 – Change the SATA Controller Setting
While no fix can promise a perfect outcome, this workaround has proven to be quite effective for about 9 out of 10 users. With a bit of luck, it might just do the trick for your issue too.
To kick off this process, power up your computer and start pressing the Del, Esc, or F2 key on your keyboard right after it boots up. This key combo will open the door to your BIOS Setup Menu. Sometimes, the startup screen drops a hint about which key to hit, or you can refer to your computer’s manual to find out the specific key for accessing the BIOS.
Once you’ve successfully infiltrated the BIOS Menu, scout around for a setting that goes by “SATA mode”, “SATA Controller”, or “SATA configuration”. Once you’ve located it, switch it to “AHCI” mode. Before you bid adieu to the BIOS realm, make sure to save the changes you’ve made and exit gracefully. After that, restart your computer to let the tweaks take effect.
Now, onto the main event—reinstalling Windows. With this tweak in place, let’s hope for a smoother installation process, free from any unexpected run-ins with the notorious Blue Screen of Death (BSOD).

Solution No. 2 – Make Partition Active
Alright, so imagine your computer’s operating system gearing up for action, and it all starts with this one special place known as the ‘C:’ drive. This active partition is the VIP suite for startup files, managing drive letters and making sure everything kicks off smoothly. Now, picture this: sometimes, that partition decides to take a nap and goes inactive, causing chaos like the infamous Blue Screen of Death (BSOD) during a Windows setup.
Fear not! We’ve got the fix – and it involves a little command-line magic. Let’s walk through the steps to wake that partition up:
Here’s a step-by-step guide to activate the partition:
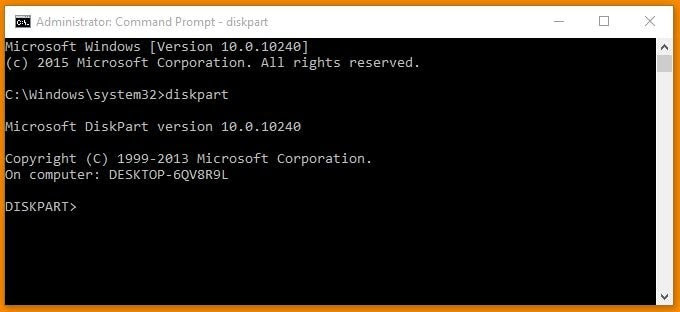
- Open Command Prompt on the Windows Setup Page by pressing Shift + F10 Key.

- Launch Diskpart:
- In the Command Prompt window, type “diskpart” and press Enter.
- In the Command Prompt window, type “diskpart” and press Enter.
- List Disks and Select the Disk:
- Type “list disk” and press Enter to display a list of available disks.
- Identify your target disk and note its number.
- Type “select disk [disk number]” and press Enter to choose the disk where the partition exists.

- List Partitions and Select the Partition:
- Type “list partition” and press Enter to show all partitions on the selected disk.
- Identify the partition you want to make active (check the drive size, typically associated with C:/) and note its number.
- Type “select partition [partition number]” and press Enter to choose the desired partition.
- Make the Partition Active:
- Finally, type “active” and press Enter to mark the selected partition as active.
Just a heads up: replace “[disk number]” and “[partition number]” with the actual numbers for your disk and partition. Once you do this dance, your chosen partition should be wide awake, ready to tackle any boot-up or installation challenges.
Example:
- diskpart
- list disk
- select disk 0
- list partition
- select partition 1
- active
Solution No.3 – Fix HDD/SSD or Its Cable
If the pesky ‘Unmountable Boot Volume’ Blue Screen of Death (BSOD) issue is still giving you a headache despite your earlier troubleshooting efforts, it’s time to turn our attention to the health of your HDD or SSD and their trusty connecting cables. Here’s the lowdown:
- Give Another HDD or SSD a Spin: If the issue persists, throw a different HDD or SSD into the mix and see if that does the trick. Go ahead and install Windows on the new storage drive to figure out if the problem tags along. Sometimes, a wonky hard drive that doesn’t quite jive with your computer can be the culprit.
- Switch Up the SATA Cable: SATA cables, like the rest of us, can wear out over time, potentially causing a communication breakdown between your storage drive and the computer. Swap out the current SATA cable for a shiny new one and see if that puts an end to the saga. A tired or damaged cable might be the root of the issue, and a switch to a fresh cable could do wonders for the connection.
Need a SATA Cable or Screwdriver Kit?
SATA Cable Starts From: @Amazon US ($4.99), @Amazon UK (£3.99), @Amazon IND (₹99.00), @Walmart US ($6.99), @Newegg ($5.99).
Screwdriver Kit Starts From: @Amazon US ($9.99), @Amazon UK (£9.99), @Amazon IND (₹149.00), @Walmart US ($9.99), @Newegg ($10.99).

Dealing with a glitchy HDD/SSD? Consider taking a deep dive into troubleshooting by opting for a comprehensive data wipe. This approach entails wiping the slate clean on your HDD/SSD, bidding farewell to all stored data, with the goal of bidding adieu to any pesky bad sectors causing a ruckus.
Suggested Articles:
- How To Completely Erase And Wipe A Hard Disk Drive?
- Recover Data From Corrupted Windows Or Linux – Explained
- How to Buy A Perfect HDD (Hard Disk Drive)?
- How to Buy A Perfect SSD (Solid State Drive) For Laptop & Desktop Computer?

 Error in Middle of Computer Startup")


Good Job
THANKS JASE! JASIE! JASIE! JASE! JASON! JASON!!
I have a partition,how do I know where is windows installed??
Windows OS partition is the one who has Windows named folder in it.
Hi
I have problem with bootup it’s old pc 2gb ram 250 hard disk Intel bord D945Gcnl it has 4 partion in all separate os installed windows 8.1 partition 4 and windows 7 partition 2 windows 10 on partition 2 again windows 10 on partition 2 unequal amount of ram installed slot 1 1gb slot 2 2gb it’s capacity support only 2gb I truly unaware of this.. now it won’t get started even now install new hard disk 500gb segate it shows insert boot disk and press any key ..in old Hard Drive very rarely bootup and display Recovery press F8 star up option F9 different os i choose F8 and press Esc enter to windows boot manager there four OS shows here if I select Windows 10 and press F10 it’s displays Edit windows boot option for Windows 10
Path \windows\system 32\winload.exe. exe
Partition :2
Hard disk :cbb433e1
[NOEXECUTE=OPTIN
]
so here can I entered any thing like always off and enter it will continue to work even at 1 hour
All these are tried and in windows 8.1 debug is enabled it’s parameter is
[NOEXECUTE =OPTIN /DEBUG/DEBUGPORT =COM1/BUDRATE =115200]
is there any way to disable all and start windows 8.1 to bootup