


 & HDD (Hard Disk Drive)?")


Ah, the notorious Blue Screen of Death (BSOD) Error – the Windows operating system’s way of saying, “Surprise! I can’t handle this”. Picture it: your computer facing a critical error, throwing its digital hands up in defeat, and boom – total system crash. Enter the drama, marked by a sea of blue on your screen, earning it the dramatic title “Blue Screen of Death”. It’s like the computer version of a soap opera cliffhanger.
Now, here’s the twist – this blue spectacle isn’t just for show; it’s like the emergency flare of the tech world. It’s saying, “Hey, stop everything! We’ve got a situation here”. But it’s not all doom and gloom; it’s also dropping some serious tech clues for the detectives among us.
When that blue screen steals the spotlight, it reveals a techy treasure trove: a Stop Code (like the secret handshake of errors), file names, memory addresses—the CSI report of computer malfunctions. It’s basically the computer’s way of saying, “Here’s what went wrong—good luck fixing it”.

Now, let’s unravel the mysteries behind this tech drama for some effective troubleshooting:
- Hardware Gremlins: First up, hardware glitches—the sneakiest culprits causing BSOD havoc. Faulty components like RAM, HDD/SSD, or Graphics Card can throw a system into chaos.
- Drivers Drama: Next on the BSOD suspect list – incompatible or outdated drivers. These guys play the middleman between hardware and software, and when they start bickering, your system pays the price.
- Software Shenanigans: BSOD can also be triggered by clashes within the operating system or third-party software. Bugs, glitches, or incompatible apps can wreak havoc.
- Corrupted System Files: Oh, the horror of damaged system files! Whether it’s malware, sudden power outages, or software tantrums, corrupted files can send your system into a blue screen frenzy.
- Heatwave Alert: Things can get steamy inside your system, and I’m not talking about the latest drama series. Excessive heat can lead to hardware meltdowns and, you guessed it, the dreaded BSOD.
Now, armed with this knowledge, you can take charge and kick BSOD to the curb.
So, Let’s See How To Fix BSOD From Windows PC
Navigating the maze of computer problems can feel overwhelming, and pointing fingers at one culprit won’t cut it when dealing with the complexity of these blue-screen issues. To effectively tackle and resolve the various problems your computer might encounter, it’s essential to take a systematic, step-by-step approach.
In this article, packed with over 5,000 words, I’ve meticulously outlined every possible remedy to help you overcome your computer-related challenges. It’s crucial to approach the troubleshooting process patiently, methodically working through each step until you effectively address the issue at hand.
Also, make sure that, after diligently trying each suggested solution, I recommend restarting your computer and attempting to use it normally. This step serves as a litmus test because there’s a chance that one intervention could fully repair the issue, making further steps unnecessary. The intricacies of computer systems mean that a targeted solution might be all you need to rectify the underlying problem.
However, if you ever find yourself in a scenario where your computer’s Windows fails to start correctly, resulting in a troublesome blue screen during the startup process, the solutions presented here may not directly apply. In such cases, I suggest checking out my separate article that delves into the specifics of addressing startup-related issues, titled “Fixing Blue Screen (BSOD) Error in the Middle of Computer Startup“. This dedicated resource provides tailored guidance to troubleshoot and overcome challenges associated specifically with the initiation of the operating system.
Solution #1: Compatibility Problem
If you’ve recently treated your computer to a flashy hardware upgrade, particularly within the last week, and find yourself facing persistent issues, consider this troubleshooting tip: strip it down. Yes, remove those shiny new additions and observe if the problem miraculously dissipates. If it does, congratulations; you’ve likely pinpointed the culprit.![]()
When extracting the recently added hardware resolves the issue, it’s akin to catching a glimpse of incompatible drivers causing chaos at the Windows version party. It seems they just couldn’t find common ground.
Conversely, if the error only makes an appearance when engaging with a specific software application, perhaps that particular program is the troublemaker. Give it a timeout by opting for a classic reinstall or, for a more sophisticated approach, upgrading to the latest version. Think of it as a spa day for your software, ironing out any wrinkles in its relationship with your operating system.
Also, there are instances where the operating system encounters the IRQL error during the installation or operation of external USB device drivers, leading to the unwelcome appearance of the blue screen. A straightforward troubleshooting step in such cases is to disconnect all USB devices from your desktop or laptop and initiate a restart. Simplify the setup by leaving only the essentials, like your trusty mouse and keyboard. Allow your computer to breathe without unnecessary peripherals, and observe if the BSOD persists.
When I mention “removing USB”, I am referring to unplugging and disconnecting all USB-connected devices, such as printer cables, scanner cables, webcam cables, external hard disk drive cables, etc., excluding your USB mouse and keyboard.
If the BSOD error appears to be resolved after removing certain USB devices, it suggests a potential issue with the drivers of one or more USB-connected hardware. In this scenario, reconnect one USB device at a time and test for errors. If everything remains stable, proceed to reconnect additional USB devices one by one until you identify the problematic one. Once identified, reinstall the drivers for that specific hardware to ensure a smooth and error-free operation.
Suggested Articles:
- How to Update Drivers Directly From the Device Manager?
- What Is Computer Hardware Drivers & Why We Need It?
- DriverIdentifier: A Great Way To Find & Download Drivers Online
- Install Computer Drivers Automatically For Free: DriverPack Solution
- 4 Different Ways To Find Your Desktop Or Laptop’s Model Number
- 4 Different Ways to Find Your Motherboard’s Model Number
Solution #2: Stop Overclocking
Ever tried overclocking your hardware to squeeze out some extra performance? Well, be cautious because it might lead to the dreaded blue screen error. This happens when you push your components, like the CPU or GPU, beyond their normal limits by cranking up frequencies and voltages. The increased heat and stress can spell trouble. One fix is to revert the performance configuration to the default settings. This basically undoes the overclocking magic, putting your hardware back to its stable, original state.
Solution #3: Clean Junk From OS Drive
If your main drive is starting to resemble an overstuffed suitcase after a holiday trip—bursting at the seams and overflowing—it’s high time for a good old cleanup. A jam-packed OS drive isn’t just a storage hassle; it’s a major culprit behind performance slowdowns and those annoying errors, like the BSOD hiccup.
To kick off your digital decluttering mission, say goodbye to unnecessary files and applications. Toss out what you don’t need, clear away temporary files, and bid adieu to apps gathering virtual dust. For a more effective approach, dive into the “Disk Cleanup” tool, conveniently hanging out in your OS Drive’s (C:\ ) properties under the “General” tab. This nifty tool systematically rids your computer of extraneous items like old updates and temporary data that hog precious space. Running Disk Cleanup lets you choose what to remove, from temporary internet files to system-created caches and redundant app data.
And don’t miss out on the “Clean up system files” option within the Disk Cleanup tool, if it’s there. This little gem exposes additional system-related elements that can be safely deleted, giving you a more comprehensive list to declutter and optimize your computer’s storage space.
Solution #4: Check OS Drive For Errors
The Check Disk (chkdsk) Command is like the superhero of Microsoft Windows—a built-in utility that swoops in to inspect and fix issues within the file system and hard drive.
Chkdsk is a multitasker. It first makes sure the file system structure follows the rules; it’s like the traffic cop of your storage. Then, it’s on a mission to find and fix any bad sectors on your disk. These are like the potholes of your hard drive world—areas that might have taken a beating and could mess up your data. And that’s not all—chkdsk is also the fixer-upper for errors in the file system. Any hiccups caused by sudden shutdowns, power outages, or similar events get sorted out.
Here’s a step-by-step guide on how to summon and utilize chkdsk for maintaining the health of your file system and storage devices in a Windows-based system:
- Open Command Prompt with Administrator Access:

- Press the Windows key to open the Start menu.
- In the search bar, type “cmd” to locate the Command Prompt.
- Right-click on “Command Prompt” and select “Run as administrator”.
- Alternatively, you can type “cmd” into the RUN and press Ctrl + Shift + Enter to open the Command Prompt with administrator privileges.
- Input the Chkdsk Command:
- In the Command Prompt window, type the following command, replacing “C:” with the drive letter you want to check:
chkdsk C: /f /x /r - Explanation of command parameters:
/f: Fixes errors on the disk./x: Forces the volume to dismount before checking./r: Locates bad sectors and recovers readable information.
- In the Command Prompt window, type the following command, replacing “C:” with the drive letter you want to check:
- Initiate Chkdsk: Press Enter to execute the command.
- System Restart: Depending on your settings and the nature of the issues detected, chkdsk might request a system restart to complete its scanning and repair operations. Just type Y and press Enter to run chkdsk on the next boot. Then allow the system to restart.
- Monitoring Progress: Chkdsk will run during the system startup, displaying progress updates. The scanning process may take some time, depending on the size and condition of the drive.
- Review Results: Once the process is complete, review the results displayed in the Command Prompt. Look for any identified issues or errors and check if they have been successfully resolved.
In a nutshell, chkdsk is a reliable tool for handling file system issues and ensuring your Windows-based system’s overall well-being. Regularly incorporating this process into your system maintenance routine contributes to a healthy and efficient computing experience.
Solution #5: Fixing Corrupted System Files
When your Windows system starts acting up, it’s time to bring in the troubleshooters: System File Checker (SFC) and Deployment Image Servicing and Management (DISM). Think of SFC as the superhero tasked with fixing any issues related to corrupted or problematic Windows files. It works like a digital doctor, scanning, identifying, and repairing inconsistencies to bring the system back to stability.
On the flip side, DISM plays the role of a guardian angel, ensuring the well-being of crucial files that form the backbone of a smooth system setup. Its specialty lies in maintaining the integrity of essential components and providing an extra layer of protection to keep your Windows environment running seamlessly.
Together, both SFC and DISM team up as dynamic allies in troubleshooting, safeguarding the integrity of vital files, and helping restore order when your Windows realm faces disruptions. However, there’s a catch: you’ll need to use specific commands in Command Prompt or PowerShell to unleash these powerful tools. Once summoned, they embark on a mission, diligently scanning and repairing any problematic files that might be causing disturbances in your system. Presto! Your Windows realm should return to its flawless state, free from errors.
First Command: sfc /scannowSecond Command: DISM /Online /Cleanup-Image /RestoreHealth

Solution #6: Troubleshooting Windows Updates
Let’s explore the less enjoyable aspect of computer systems: automatic updates. While they are intended to simplify our lives, they can occasionally disrupt the smooth operation of our devices. Imagine this scenario: your computer updates itself without warning, and suddenly, glitches start to appear.
If you encounter issues following an automatic update, the culprit may be a conflict with existing drivers. No one welcomes surprises, especially when they involve technical glitches. To troubleshoot, delve into your update history, identify any recently installed updates, and uninstall them to find out if they are the ones that are causing the disturbance.
To remove an update, go to Settings > Update & Security > Windows Update > View update history > Uninstall updates. This will show you the updates that have been installed recently.

On the flip side, if your computer has been operating without updates for an extended period, it’s time to take a proactive stance. Don’t let your system lag behind; check for available updates. It’s a simple yet crucial step.
Keeping your Windows operating system up to date is akin to providing your computer with a rejuvenating dose of vitamins. It ensures your system remains secure, stable, and capable of smoothly handling the latest software advancements. Consider it a tech self-care routine to maintain seamless functionality.
Solution #7: Update SSD Firmware
SSD firmware – the cool software that hangs out inside your Solid State Drive (SSD), making sure everything runs smoothly between the hardware and your operating system. Now, why does outdated firmware feel like a one-way ticket to the dreaded Blue Screen of Death? Well, when your SSD firmware isn’t up-to-date, it can throw a compatibility tantrum with the latest operating systems, software, and hardware drivers. Nobody wants that, right?
Firmware updates are like superhero makeovers for your SSD—they fix bugs, boost performance, and ensure it plays nicely with the latest tech trends. Ignore these updates, and you might be opening the door to BSOD errors. Scary stuff!
To be the hero your SSD deserves, here’s a quick guide: find your SSD model, hit up the manufacturer’s website, grab the right firmware update, back up your precious data (safety first!), follow the manufacturer’s steps to the letter, run the update tool, restart your system, and double-check the success through your SSD’s properties or diagnostic tools.

Keeping your SSD firmware in tiptop shape isn’t just for show – it’s your key to top-notch performance, security, and stability. Plus, it’s the ultimate shield against those pesky BSOD errors that nobody wants to deal with. Remember, stick to the manufacturer’s playbook when you’re on the firmware update quest.
Solution #8: Try Clean Boot
For the Windows aficionados out there, a clean boot is like a troubleshooting ninja move. Picture this: you fire up your system, but this time, you’ve got all non-essential apps, services, and drivers taking a breather during startup. Why, you ask? Well, it’s the secret weapon when you’re facing issues, especially blue screen.
See, some applications – think system utilities and antivirus programs – can be a bit too eager and end up clashing with the smooth operation of your OS. The result? The dreaded Blue Screen of Death (BSOD), sudden system freezes, performance going haywire and other bizarre happenings.
Now, let’s get down to the nitty-gritty of performing a clean boot:
- Kick-off by opening the Start menu on your Windows system.
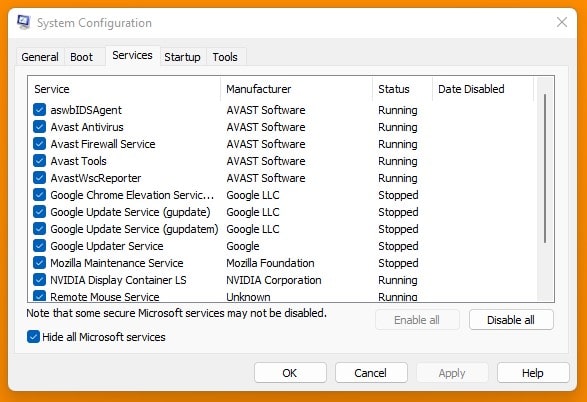
- Search for “msconfig” and give it a click to launch the System Configuration app.
- Head over to the Services tab in the System Configuration window.
- Check the “Hide all Microsoft services” option.
- Hit the “Disable all” button.
- Shift to the Startup tab.
- Click on “Open Task Manager” to dive into Task Manager.
- In Task Manager’s Startup tab, go through each item and hit “Disable”.

- Close the Task Manager.
- Restart your computer.
Now that your system is in this pristine, clean boot state, the next move is like a carefully choreographed dance: reintroduce the programs and services you temporarily benched. But here’s the crucial part: do it one by one. Yes, patience is key. After enabling each program or service, don’t forget to give your PC a restart and put it to the test.
It’s like a slow-motion replay, giving you the chance to be Sherlock Holmes and observe your system’s behavior at every step. This method is your ticket to finding the troublemaker—the specific app or service causing all the ruckus. Once you’ve unmasked the culprit, you can take action—update, reinstall, or tweak settings—to kiss those conflicts goodbye. Voila! Your system is back to its normal, stable self.
Solution #9: Virus Scan
If your computer is throwing a fit with those pesky blue-screen errors, there might be an uninvited guest in the form of a virus. Time to call in the antivirus cavalry! Opting for top-notch antivirus software is non-negotiable to ensure your system gets fortress-like protection and can swiftly detect any nasty threats.
Now, don’t get lured into the free antivirus trap – it might not cut it against the more sophisticated threats out there. Investing in a reliable antivirus tool is like putting a superhero cape on your computer, boosting its defenses against viruses, malware, and all those digital troublemakers. It’s like having a bouncer at the door, making sure only the good stuff gets in.
Once you’ve got your antivirus sidekick in place, don your detective hat and run a thorough scan of your computer. Hunt down and eliminate any lurking threats within the system. Premium antivirus solutions come with fancy features and real-time protection that play a crucial role in keeping your computer’s integrity intact. Say goodbye to those blue-screen errors caused by sneaky malicious activities; your computer is now a fortress, ready to repel any digital invaders.

Solution #10: RAM Test

Well, faulty RAM (Random Access Memory) could be the culprit behind many of those mysterious errors. To play detective and ensure your system’s memory is tip-top, it’s smart to bring in the big guns—memory diagnostic tools.
These nifty tools are like health check-ups for your RAM, meticulously examining and verifying the integrity of those memory modules. Running a memory diagnostic helps you systematically spot and tackle any issues tied to dodgy RAM. Why does this matter? Because wonky RAM can trigger a parade of errors—unexpected crashes, app meltdowns, and the infamous Blue Screen of Death.

Solution #11: Check Overheating
Let’s talk about why overheating is the troublemaker in the tech world. When your computer components, like the CPU (Central Processing Unit), GPU (Graphics Processing Unit), and other systems, start feeling the heat, it’s not just a matter of being a little warm and fuzzy. Overheating can wreak havoc and be the root cause of various issues.
Here’s the lowdown: Your computer’s components are like the engine of a car. They work hard, crunching numbers, rendering graphics, and handling all your digital tasks. Now, imagine if that engine starts getting too hot. It’s like running a marathon without water—things start going haywire.
So, how do you keep tabs on this potential heatwave? Enter HWMonitor (Voltages, temperatures, and fans speed monitoring tool), your trusty temperature detective. This tool lets you check the temperature of your CPU, GPU, and other components. It’s like giving your computer a digital thermometer. If things start getting too hot, you can take action – maybe add some cooling solutions or adjust your system settings to keep the temperature in check.

Solution #12: Check Drivers Issue
Well, guess what? About half the time this error occurs, it’s due to those pesky driver issues. The good news? You can actually play detective and figure out exactly which driver is causing all the chaos. Just take a peek at the file name linked to the driver, usually hanging out next to the error message in formats like ‘xxx.sys’ or ‘xyz.sys’. Trust me, it’s like solving a little tech mystery.


Now, if the error screen decides to be a bit mysterious and doesn’t cough up the specific driver file name with the BSOD error on your PC, no worries. There’s this nifty third-party tool called “BlueScreenView” that comes to the rescue.
It goes through all the minidump files created during those ‘blue screen of death’ moments and puts together a neat table with all the crash details. You’ll see stuff like the minidump filename, crash date/time, basic crash info (Bug Check Code and parameters), and details about the potentially troublesome driver or module (filename, product name, file description, and version).
Each crash gets its own spotlight in the upper pane of BlueScreenView, and you can dive into the nitty-gritty details of the device drivers loaded during the crash in the lower pane. Plus, BlueScreenView is kind enough to mark drivers with addresses in the crash stack, making it a breeze to spot the troublemakers.
Are you ready to give it a shot? Head over to [BlueScreenView Download].

Have trouble finding those elusive minidump files in BlueScreenView? No worries; it might just be that your Windows Mini Dump Configuration is not set up yet and needs a little tuning. Here’s a step-by-step guide to get you sorted:
- Type “sysdm.cpl” into the Windows search bar and hit Open. This will summon the System Properties Control Panel Menu window.TIP: Alternatively, you can take the scenic route by clicking on Settings → System → About → Advanced system settings.
- In the System Properties window, head over to the Advanced tab.
- Look for the Startup and Recovery section and click on Settings.
- In the Startup and Recovery window, flex your configuring muscles by enabling the following three options:
- Write an event to the system log
- Automatically restart
- Writing debugging information → Small memory dump (256 kb)

- Click OK to make those settings official.
- Now, give your computer a little siesta with a restart.
And there you have it! By following these steps, you’ve unleashed the power of the minidump file. It’ll pop up like magic whenever your system decides to throw a little crash party. This means tools like BlueScreenView can work their mojo, analyzing and dishing out insights into all that juicy crash-related info.
Once you’ve nailed down the file name causing your tech headaches, the next move is to dig deeper and uncover more about that troublesome driver. Follow this guide to navigate the ‘Online Drivers Directory’ and get the lowdown on your driver’s secrets:
- Access the Drivers Directory: Hit up the link provided; it’s your portal to a treasure trove of driver details. Drivers Directory Link: opendll.com/index.php
- Search for the .sys Driver File: Use the site’s search function to punch in the .sys driver file name you sleuthed out earlier. For example, if you’re wrestling with “rtwlane.sys”, type it into the search bar.

- Retrieve Driver Information: Once you hit that search button, the website should spill the beans with detailed info about the driver. Expect to find its full name or description, shining a light on what this driver is all about and why it’s causing a ruckus.
Let’s break it down with an example. Say your culprit is “rtwlane.sys”. A quick opendll.com search might reveal it’s a network-related driver stirring up trouble, just like the image shows.

If you can’t find the driver’s file info on opendll.com, try a different route by directly plugging in the file name into a search engine like Google. This nifty trick will hook you up with all the details on that specific driver. Go ahead and type in the file name as your search query, and you’ll likely stumble upon forums, tech support pages, or legit documentation linked to that driver. This approach widens your search net beyond just dedicated driver directories, giving you extra information sources to beef up your understanding of the driver’s features, functions, and any potential quirks.

Let’s Reinstall Those Drivers;
When you start digging into the nitty-gritty of the driver’s file name in the driver’s directory, you’ll come across two main groups: the hardware-related drivers and the Windows-related drivers.
- Hardware-Related Drivers: Now, these drivers are like the BFFs of specific hardware pieces chilling inside your computer—think graphics cards, network adapters, or sound cards. If you spot a driver with a fancy brand like Intel, Atheros, Realtek, or something, it’s dropping hints that your problem might be in the compatibility, functionality, or performance of that particular hardware piece.

- Windows-Related Drivers: On the other side of the coin, these drivers are like the unsung heroes of the Windows Operating System, making sure your OS and all the hardware components are in the loop. If your detective work shows the driver is best buds with the OS and related to Microsoft, it falls into the Windows-related category, shouting from the rooftops about its importance for the overall smooth sailing of the Windows environment. Knowing these differences is key to figuring out what’s up with your driver and coming up with a game plan for fixing it.

Now, depending on the classification of the driver, different steps need to be taken to fix the issue.
Method #1: Fixing Windows-Based Drivers
The go-to move for tackling problems tied to Windows-related drivers? Keep your Operating System (OS) in the loop by updating it. Staying on top of OS updates is a game-changer for ensuring your system runs like a well-oiled machine, maintaining peak performance, stability, and harmony with all sorts of hardware pieces. When you give your Windows OS a refresh, it rolls in patches, fixes, and updates for a bunch of drivers that are the backbone of the system.
So, hit that update button to keep things running smoothly!

Here’s another trick up your sleeve: dive into the online realm and search for the troublesome driver causing you grief. Once you pinpoint it, snatch the relevant driver file and embark on a reinstallation mission on your system.
A golden rule? Always grab your driver from trustworthy and official sources to ensure it’s the real deal. After the grand reinstall, do the classic move: restart your system. This lets the changes kick in and sets the stage for flawless chit-chat between your hardware and the operating system. This proactive move is a game-changer, often putting the kibosh on issues tied to outdated or glitchy drivers, giving your computer the stability and high-performance vibes it deserves.

Method #2: Fixing Hardware-Based Drivers
If you’ve tracked down the unruly driver file to a specific hardware piece in your system, it’s time to roll up your sleeves and dive into the reinstall game. This move is like a superhero swooping in to tackle compatibility issues, keeping your system in its A-game condition, and kicking outdated or corrupted drivers to the curb.
To kick off the reinstall party, head over to the official website of your laptop’s or desktop’s manufacturer. Find your way to the support or downloads section and locate the driver match for your problematic hardware buddy. Don’t forget to grab the latest version; it’s like getting the VIP pass to software updates and squashing potential problems before they even start.
- 4 Different Ways To Find Your Desktop Or Laptop’s Model Number
- 4 Different Ways to Find Your Motherboard’s Model Number

Here’s a neat trick for the lazy (or busy) tech enthusiasts – meet EaseUS DriverHandy, your ticket to automated updates for hardware drivers. This nifty software serves up a user-friendly solution, sparing you from the tedious manual update drill. With EaseUS DriverHandy, keeping your system’s drivers in the loop becomes a breeze, ensuring your hardware components stay on the cutting edge with the latest and most compatible versions.
Download Link: EaseUS DriverHandy
Once you’ve safely downloaded the fresh driver, it’s time to bid adieu to the old one. Open up the Device Manager on your Windows setup, spot the pesky hardware device, right-click, and hit “Uninstall”. After the uninstallation dance, give your computer a little siesta with a restart to seal the deal.
Now, it’s showtime for the new driver. Follow the manufacturer’s step-by-step guide, usually involving running an installer or setup file and being the ‘click-next’ maestro. After the installation shindig, one more restart ensures the changes stick.
Why bother with this process? Reinstalling your hardware drivers straight from the source not only puts potential conflicts to rest but also guarantees your system gets the latest and greatest features and compatibility boosts. It’s a proactive move that sets the stage for a stable and efficient system, waving goodbye to those pesky blue-screen errors.
Suggested Articles:
- How to Update Drivers Directly From the Device Manager?
- What Is Computer Hardware Drivers & Why We Need It?
- DriverIdentifier: A Great Way To Find & Download Drivers Online
- Install Computer Drivers Automatically For Free: DriverPack Solution
- What is a Sound Driver, and How to Install It?
- What is a Video Driver, and How to Install It?
- What is a Network Driver, and How to Install It?
- What is a Chipset Driver, and How to Install It?
What To Do If Nothing Works?
When all your tech wizardry falls short, it’s time to pull out the big guns—enter the System Restore feature. This superhero move involves winding back the clock on your system to a time when it was all rainbows and unicorns. System Restore can hit the rewind button on recent tweaks to system files and settings, potentially wiping out the headache-inducing root cause of that persistent Blue Screen of Death (BSOD) error.

But what if your past self didn’t plan for this chaos, and there are no restore points to save the day? Or worse, if System Restore decides to take a coffee break? That’s when you bring in the heavy artillery—the factory reset. It’s like hitting the reset button on your entire system, wiping out apps, files, and settings. It’s a drastic move, but when all else fails, it can be the silver bullet to put persistent issues to rest.
How To Properly ‘Factory Reset’ A Laptop Or Desktop Computer?

Before you go nuclear with a factory reset, though, lock and load your important data with a backup to avoid any casualties. And, for the love of tech, follow your device maker’s instructions to the letter for a smooth reset ride. This move should be your last resort, and it’s essential to weigh the potential fallout against the gravity of the issues you’re facing.

 Error in Middle of Computer Startup")


I can’t even get past the bsod it comes up and restarts, by the way I’m on XP
Try to start your computer in safe mode by pressing F8 on the system’s start up
http://www.deskdecode.com/safe-mode/
I have installed a new hard disk in my laptop (dell n5010) When I try to format my laptop using a pendrive, every time it stucks during windows logo loading and blue screen appears with message ‘A problem has been detected and windows has been shut down to prevent your computer” with a error code also i.e.0X0000000A.please help me to repair my computer.
try to use different .ISO file.
when i get the BSOD, it wont even go to the desktop and just continues in the reboot mode and i get a critical process died. how do i fix this. thank you. btw, it’s a very old dell laptop.
try this
http://www.deskdecode.com/critical-process-died/
The blue screen pops up just immediately after loading windows. Counts to 100 and restarts . Does this continously. I’ve changed the hard disc as well as try the rams 1 after d other, all to no avail. How can you help?
download and install some dump file scanner in your computer and see who is actually creating the problem.
Hey Madhur,
Ive been reading your articles and they are very nice. I have a windows server 2008 r2. And Ive been experiencing random blue screens. Some with System_Service_Exception 3B and sometimes Memory_managment 1a.
I did as instructed in your article on cleaning the ram. When I removed it I saw it was very dusty, but if that doesn’t work. What do you suggest I do?
Thanks.
Louis
You can also try to use some other different RAM in your system.
Hi and thanks for your reply. After cleaning I got the BSOD again today with this message:
Problem signature:
Problem Event Name: BlueScreen
OS Version: 6.1.7600.2.0.0.274.10
Locale ID: 1033
Additional information about the problem:
BCCode: 1a
BCP1: 0000000000041790
BCP2: FFFFFA8000C9E280
BCP3: 000000000000FFFF
BCP4: 0000000000000000
OS Version: 6_1_7600
Service Pack: 0_0
Product: 274_3
My question is if I just to the last solution and replace the RAM do you think my issue will be fixed ?
Thanks
maybe it possible but;
Did you ever tried to update all of your system’s drivers?
if not, then that’s the first thing what you should need to do.
Today i face this BSOD error i hope this post will help me.
Hi.
I’ve had this issue with my laptop’s graphics for so long now,whereby while using the laptop doing my own stuff the windows suddenly turn dark.Which makes the computer totally unusable and I have to manually restart it. I actually have a way round the problem whereby I just uninstall the graphics driver and the problem is solved. But now, me being an architecture student,I have reached a point where I really need the graphics driver( for 3D rendering and all) that is still problematic. My laptop model is Hp elite book 8440w with Nvidia quadro graphics card. Please help me out.
What about updating the drivers to the latest one.
I have tried severally. From both nvidia.com and hpsupport. Maybe you can help me out by checking it out for me The machine is HP elite book 8540w. Could you look it up and tell me the driver details please. Thanks
https://support.hp.com/in-en/product/hp-elitebook-8540w-mobile-workstation/4096175/drivers
i get also this error many time while using in windows 10 as well as 7 what should i do. i have to change ram or hard drive?
try to update all the drivers first, then test any other hardware.
Great and useful information. Thank you Madhur.
Thanks for sharing valuable content.
hey buddy i had this one happen = DRIVER_IRQL_NOT_LESS_OR_EQUAL and now my computer won’t stop blinking and won’t turn on and going through what i think is this “loop” i took it all apart and put it back together and its still blinking(both fans and the hard drive is won’t stop turning off and on) can u help me? i had a whole bunch of viruses too to be cool to your name bud thats all bud please return to me right now