


 & HDD (Hard Disk Drive)?")


Ever hit that “Start Windows Normally” button only to find yourself stuck in an endless loop of restarts? Ah, the joys of tech! Usually, this fun little loop happens when Windows 7 or Vista takes a hit from a sudden power cut. Imagine Windows doing its best balancing act and then getting tripped up by a power glitch. Not cool, right?
But sometimes, what else can cause this mess? Well, first up, viruses. These sneaky little troublemakers can worm their way into your system, wreaking havoc and making everything wonky. Then there’s the registry—think of it as the brain of Windows. When it gets corrupted, it’s like trying to think straight with a scrambled brain. Lastly, storage errors pile on, making this already messy situation feel like a digital Rubik’s Cube.
Fixing this headache requires some serious detective work. Picture yourself untangling a digital knot made up of all these weird glitches. It’s a mix of tech know-how and smart problem-solving, blending diagnostic skills with actual fixes.
In this article, we’re going to navigate the maze of Windows 7 & Vista troubleshooting together. We’ll dish out some tips and tricks to tackle this “Start Windows Normally” snafu head-on. With the right info and tools, you’ll be dodging those registry pitfalls, kicking those viruses to the curb, and sorting out those pesky storage errors. We’re aiming for a harmonious Windows experience here—one where everything runs smoothly and you’re free from the chaos of tech glitches.
And believe me, this guide will 99% fix your computer without needing to reinstall your OS.
So, Let’s See How To Fix This Problem Completely From Your Computer
Now, first things first! When you hit that frustrating wall of failed Windows boots, there’s a hero waiting in the shadows: the “Last Known Good Configuration (advanced)” option. Think of it as your tech lifeboat, pulling you out of the murky waters of system chaos.
Choosing this option is like hitting the rewind button. You’re taking Windows back to a time when everything was hunky-dory, skipping over the mess that’s causing your boot-up blues. It’s all about flushing out those corrupted settings and finicky drivers that are messing with your booting mojo. Also, don’t worry if this option isn’t available, we will figure out something else.

On the other hand, if you are greeted by that infamous blue screen error on startup, just when you’re settling in for some quality computer time. It’s like your PC decided to throw a curveball right at the start of the game!
Don’t panic if you’re lost in the maze of blue screen errors. There’s a lifeline out there—a meticulously crafted article designed to shed light on this pesky BSOD issue that loves to pop up during startup.
Enter the scene: “Blue Screen of Death (BSOD) Error in the Middle of Computer Startup“. This article isn’t just a light read; it’s your roadmap to navigating the choppy waters of BSOD errors. Think of it as your trusty co-pilot, guiding you through diagnosis and troubleshooting with ease.
Now, let’s get started;
Solution #1: Use Startup Repair
Think of Startup Repair as the knight in shining armor for your computer’s startup woes. It’s the frontline soldier, ever vigilant and ready to tackle the glitches and hiccups that mess with your boot-up sequence, disrupting the smooth launch of your beloved operating system.
At its core, Startup Repair is a powerhouse of diagnostic smarts and problem-solving skills. It’s designed to dig deep, hunting down corrupted files, sorting out wonky settings, and squashing any other gremlins that might be throwing a spanner in the works of your boot process.
But here’s the kicker: Startup Repair doesn’t just talk the talk—it walks the walk with a user-friendly interface. It’s all about making your troubleshooting journey as smooth as possible, breaking down the jargon and offering clear, step-by-step guidance. It’s like having a GPS for your startup woes, guiding you through the maze with real-time feedback and straightforward instructions.
Let Me Get Your Startup Back on Track:
Method 1 – Kickstarting Startup Repair from the Recovery Screen: When your OS hits a snag during startup, it plays its trump card—the recovery screen. Consider this your computer’s way of saying, “Hold on, we’ve got a hiccup to sort out!”
Here, you’re faced with a fork in the road. Your first port of call? The inviting “Launch Startup Repair (Recommended)” button. Give it a click, and you’re enlisting your own personal tech SWAT team to tackle the issue head-on.

Method 2 – Diving into Advanced Boot Options: But wait, there’s more! A hidden treasure trove of options awaits. Here’s your VIP access:
- F8 Key Magic: As your PC springs to life, hammer that F8 key again and again like you’re trying to win a high-speed typing contest. This unlocks the Advanced Boot Options menu—your secret handshake into the tech underworld.
- Finding “Repair Your Computer”: Among the options, you’ll spot the golden ticket labeled “Repair Your Computer”. Click on it like you’re claiming a rare Pokémon.

- System Recovery Shenanigans: Now you’ll be greeted with the system recovery options. Pick your language and keyboard layout like a pro.

- User Account Check: Select your user account—it’s like setting the stage for a performance where your PC is the star.
- Activating Startup Repair: Last but not least, spot “Startup Repair” at the top of the menu and give it the go-ahead. Watch as it works its automated magic to sort out your startup woes.

Method 3 – Using an Installation Disc or USB Drive for Startup Repair: If the first act didn’t steal the show, don’t lose hope! Here’s your backup plan, starring a Windows installation disc or USB drive:
- Craft Your Bootable Sidekick: Get your hands on a compatible Windows setup ISO file and whip up a bootable USB or disc. Make sure it’s a match for your OS—Windows 7 or Vista. If you’re rocking Windows 7, use a Windows 7 setup disc, or a Windows Vista setup disk if you’re using Windows Vista.
- Boot Up Like a Pro: Fire up your PC with the Windows Installation Disc or USB drive. Tweak the boot sequence in the BIOS or summon the boot menu to make it happen.
- The “Any Key” Moment: When prompted to ‘press any key to boot’, don’t be shy—pick a key, any key!

- Setup Menu Safari: Navigate through the setup menu like you’re on a treasure hunt. Click “Next”, then “Repair Your Computer” to dive back into the startup repair adventure.

- Hunt for Windows Installation: The system recovery options tool goes on a hunt for your Windows installation. Help it out by selecting the right one and hitting “Next”. If Windows is playing hide-and-seek, the Command Prompt might have some tricks up its sleeve to coax it out. >> Fixing Unlisted Windows 7 in System Recovery Options

- Invoke “Startup Repair”: In the menu, give “Startup Repair” the spotlight. This trusty tool is your go-to for diagnosing and fixing any startup hiccups.
- The System Restore Option: Sometimes, the tool might suggest a system restore as the ultimate fix. If it does, go with the flow and let it work its restorative mojo.

Solution #2: Open Computer In Safe Mode
If Startup Repair throws in the towel and your computer’s startup woes continue to haunt you, don’t despair! Enter Safe Mode—the unsung hero of troubleshooting. This special booting mode strips down your computer to its essentials, sidestepping potential software conflicts and glitches that might be throwing a wrench in the works.
Accessing Safe Mode via Advanced Boot Options:
- Give Your PC a Fresh Start: Kick things off with a reboot. Think of it as hitting the reset button, giving you a clean slate to work with.
- F8 Key to the Rescue: As your computer gears up for another round of booting, start tapping that F8 key again and again like you’re trying to break a world record. Do this before the Windows logo appears to unlock the secret door to the Advanced Boot Options menu.
- Choosing Safe Mode: Once you’ve cracked the code and the Advanced Boot Options menu appears, spot the “Safe Mode” option. Click it or navigate to it using the arrow keys, then hit Enter to set the wheels in motion.

Once you’ve successfully made the leap to Safe Mode, your computer undergoes a transformation. It sheds the excess baggage of unnecessary software and services, zeroing in on the core components needed for basic operation. This stripped-down environment offers a stable platform, allowing you to diagnose and tackle software conflicts, glitches, or compatibility issues that might be causing your startup headaches.
Here, you can run system scans, bid farewell to troublesome software, update drivers, or even roll back to a previous system state to get to the bottom of those pesky startup issues.
To know more about how to do that, read our article on, Windows Computer Only Starts In Safe Mode: Solutions For Every Possible Condition.
Solution #3: Fix Storage Related Issue
If both Startup Repair and Safe Mode hit a dead end in resolving your computer’s startup woes, it’s a clear sign of deeper issues lurking beneath the surface. The culprit might be nestled within the operating system or even within the very heart of your storage drive. But fear not, for a meticulous troubleshooting approach awaits, starting with addressing potential storage-related issues using the Command Prompt (CMD).
Tackling Storage Hiccups with CMD: A Step-by-Step Guide:
- Preparing for CMD Access:
- Get Your Bootable Windows Setup Disc or USB Ready: To kick off your journey into CMD-based troubleshooting, you’ll need a trusty bootable Windows Setup Disc or USB drive. Make sure it’s compatible with your computer’s OS to ensure a smooth ride.
- Boot Up with Your Setup USB or Disc: Take charge of the booting process by setting your computer to boot from the Windows Setup USB or Disc. Usually, this involves accessing the boot menu during startup and selecting your chosen bootable medium.
- Accessing CMD from the Setup Screen: Once the Windows Setup springs to life, you’ll be greeted with a setup screen. Here’s where the magic happens—trigger the Command Prompt (CMD) by pressing a strategic combo of keys, Shift + F10. Voila! You’ve unlocked the gateway to your system’s inner workings, ready for some serious troubleshooting and repair.

- Identifying the OS Drive:
- Invoke DiskPart Utility: Commence by launching the DiskPart utility to navigate and manage disk partitions effectively. Execute the command
diskpartwithin the Command Prompt to initiate this specialized utility.
- Enumerate Volumes: With the DiskPart utility activated, execute the
list volumecommand. This command orchestrates a comprehensive display of all the assigned volumes ensconced within your storage, unveiling a detailed overview of the partition structure and drive assignments.
- Concluding DiskPart Session: Once you’ve gleaned the requisite insights from the
list volumecommand, gracefully exit the DiskPart utility by executing theexitcommand, returning you to the familiar confines of the Command Prompt. - Accessing Drive: Proceed by accessing the potential OS drive where Windows is nestled. This can be achieved by executing the corresponding drive letter command, for instance,
d:. This command facilitates navigation to the specified drive, paving the way for further exploration.
- Verifying Windows Directory: To corroborate that you’ve successfully navigated to the Windows-infused OS drive, execute the
dircommand. This command unfurls a comprehensive list of files ensconced within the designated directory. A telltale sign of an OS drive is the presence of a Windows folder, signifying the kernel of the Windows operating system.
- Invoke DiskPart Utility: Commence by launching the DiskPart utility to navigate and manage disk partitions effectively. Execute the command
- Executing Chkdsk for Storage Drive Rectification:
- Initiating Chkdsk Command: With the OS drive confirmed and identified, proceed to deploy the chkdsk command tailored to storage drive rectification. Execute the command
chkdsk /f /r /xwithin the Command Prompt to activate this comprehensive storage drive scanning and repair tool.-
- /f: This switch facilitates automatic fixing of detected file system errors.
- /r: This switch orchestrates an in-depth scan, identifying and repairing bad sectors on the storage drive.
- /x: This switch facilitates volume dismounting, enabling chkdsk to initiate a comprehensive scan and repair process on drives that are currently in use.
-
- Initiating Chkdsk Command: With the OS drive confirmed and identified, proceed to deploy the chkdsk command tailored to storage drive rectification. Execute the command
Now you can restart your computer to test it!

Solution #4: Fix Bootloader
So, you’ve fixed your storage drive, but now you’re wrestling with pesky startup issues? Don’t sweat it; let’s get you sorted out and back to smooth sailing in no time. Fixing your bootloader is like giving your OS a well-deserved spa day—it perks up, runs smoother, and thanks you with better performance. Let’s dive into a snazzy guide on using CMD commands to whip that bootloader back into shape.
- Accessing Command Prompt: Fire up the Command Prompt (CMD) using the tried-and-true method we talked about earlier. This gives you the backstage pass to all the system-level tools you’ll need for bootloader repair.
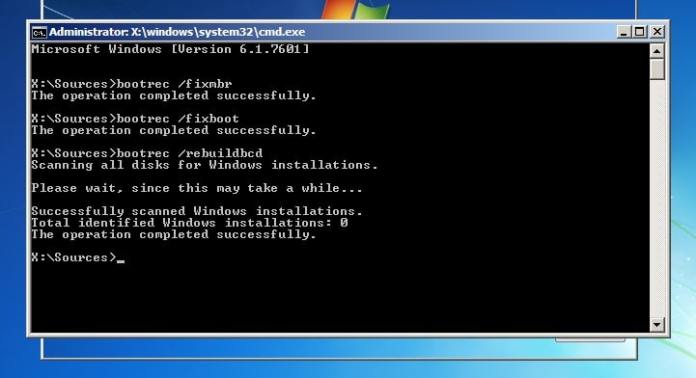
- Executing Bootrec Commands: Once you’re in the Command Prompt, it’s time to flex those bootrec muscles. These commands are tailor-made to iron out those bootloader wrinkles and get your system humming along nicely.
bootrec /fixmbr: Think of this as the boot record’s spa day—it smooths out any rough spots or damage that might be slowing down your boot-up.bootrec /fixboot: This one’s the boot sector’s personal trainer, making sure it’s in tip-top shape and ready for action, no conflicts allowed. If an “access is denied” error occurs, type: “bootsect /nt60 sys” and then re-enter the “bootrec /fixboot” command.bootrec /rebuildbcd: This is the master architect—it rebuilds your Boot Configuration Data (BCD) for a fresh start, setting the stage for a flawless boot-up and stable system.
Solution #5: Fix Corrupted Registry
So, you’ve stumbled upon some corrupted Windows registry issues, huh? Don’t panic! A well-executed registry repair using its backup is like hitting the ‘undo’ button on a cosmic scale—it can restore order to your system and get things running smoothly again. Let’s roll up our sleeves and dive into this nifty guide on using CMD commands to bring your Windows registry back from the brink.
Windows Registry Repair Using Backup: The Ultimate Guide
- Accessing Command Prompt Using OS Disc or USB: Whip out that OS disc or USB drive like a tech-savvy magician pulling a rabbit out of a hat. This is your ticket to the Command Prompt (CMD) and all the system-level tools you need to fix that wonky registry.
- Identifying Windows Partition: Remember that method we talked about earlier in Solution #3 to find your Windows partition? Yeah, use that to suss out the drive letter. Once you’ve got it, strut on over to the Windows system32 directory with this command – “cd d:\windows\system32“. Just swap out ‘D’ with your actual drive letter – we’re flexible like that.
- Creating Temporary Backup of Config Folder: Now, let’s play it safe and create a backup of the config folder. Trust me; your future self will thank you. Now first use this command – “mkdir configBak” and then this one “copy config configBak”. This step is like putting your precious registry settings in a protective bubble wrap before the repair.

- Accessing RegBack Directory: Time to visit the RegBack directory, where your registry backup is chilling like a fine wine. First use this command – “cd config\RegBack” and then this one “dir”.
- Quick tip: After running the ‘dir’ command, check those file sizes (SYSTEM, SOFTWARE, SAM, SECURITY, DEFAULT). If they don’t match the ones in our screenshot or, heaven forbid, some are showing zero size, halt the repair mission ASAP to avoid any more boot-up catastrophe.

- Restoring Registry from Backup: Assuming everything’s in order, let’s hit the jackpot and restore that Windows registry. At last, use this command “copy * ..\*”. You’ll get some prompts asking if you’re cool with overwriting stuff. Channel your inner nodding dog and hit ‘Y’ to confirm each time. Voila! Your registry is back from its backup, feeling refreshed and ready to roll.

- Concluding Registry Repair: Once you’ve successfully executed those restoration commands, exit the Command Prompt with a flourish by clicking the Close (X) button in the top-right corner.
What To Do If Nothing Works?
Sometimes, despite our best efforts and the wizardry of tools like Startup Repair or CMD, the stubborn system issues just won’t budge. When you’ve reached the end of your troubleshooting rope, reinstalling the operating system (OS) can be the Hail Mary pass you need. It’s the ultimate reset button, wiping the slate clean and giving your system a fresh start by banishing those deep-seated anomalies and corruptions.
- How to Install Windows 7? – Complete Guide
- How To Install Windows 8/8.1? – Complete Guide
- How To Install Windows 10? – Complete Guide


 Error in Middle of Computer Startup")


Reinstall Windows
If all the components are in good condition, “Windows 10 blue screen loop,” could be caused by your Windows, which is unfixable. Reinstalling Windows may fix the error.
still getting random BSOD loop check for other soltuions here on this website.