Navigating the maze of Windows troubleshooting, stumbling upon the infamous message, “Startup Repair Cannot Repair This Computer Automatically in Windows 7”, or “Automatic Repair Couldn’t Repair Your PC in Windows 11, 10 & 8”, can throw even the most seasoned techies for a loop. It’s like trying to find your way through a maze with a map that’s missing a few crucial pieces—frustrating, confusing, and often leaves you feeling stranded.
Imagine this: You fire up your PC, expecting to seamlessly dive into your digital tasks, only to be greeted by an error message instead. Your heart sinks as you realize something’s blocking your path to productivity. And so begins the adventure—the hunt to figure out what’s causing the hiccup and plot a course to fix it.
But fear not! Amidst the chaos, there’s a glimmer of hope—a roadmap to fix things up and revive your ailing system. With a mix of tech smarts and strategic moves, we’re setting off on a quest to unravel the mysteries behind this confounding conundrum.
So Let’s See How To Fix This Problem
Navigating the maze of tech glitches can sometimes feel like being a detective in a digital thriller. You’ve got everything from crafty malware and viruses to the fallout from power outages and rogue shutdowns. It’s like your PC’s own little spy novel!
Sometimes, the heart of the problem is hidden deep within your system files—the blueprints that make your digital world go around. Other times, it’s those updates that just can’t seem to get their act together, causing a chain reaction of chaos. And let’s not forget about those pesky outdated or incompatible hardware drivers—they’re the undercover agents, throwing your system’s balance off-kilter.
But wait, there’s more drama! Software conflicts can turn your peaceful digital playground into a virtual war zone. The corrupted Boot Configuration Data (BCD) is like the gatekeeper gone rogue, throwing a wrench into your startup plans. And just when you think you’ve cracked the case, along comes faulty RAMor Hard Drive issues, sending your PC on a wild goose chase of erratic behavior.
So, how do you crack this tech mystery? It’s all about channeling your inner Sherlock and mastering the art of strategic troubleshooting. You need to piece together the clues to uncover the root cause, just like solving a gripping digital whodunit. Armed with a systematic approach and the right tools, tackling the “Automatic or Startup Repair Couldn’t Repair Your PC” conundrum isn’t just possible—it’s a thrilling journey to tech mastery.
Now let’s get started;
Quick Tip
Mainly, this tech challenge doesn’t require a massive toolkit—precision and choosing the right tool for the job are your best allies. Enter the Windows Recovery Environment (WinRE)—your digital safe haven packed with diagnostic and repair tools. Think of it as your PC’s emergency room, ready to tackle those pesky system issues head-on. Making sure you can easily access WinRE is like having a lifeboat ready for when your digital ship hits stormy waters.
Usually, Windows is pretty resilient. If your PC’s boot attempts hit a wall, it often gracefully bows out and points you toward the comforting arms of the WinRE Menu. Not only that, you can also click on the “advanced option” when your compter is showing the error message “Startup Repair Couldn’t Repair Your PC”. This user-friendly menu is your gateway to a range of fixes, guiding you through the maze of potential solutions with relative ease.
But let’s face it—the digital world loves throwing curveballs. If you find yourself stranded without the usual WinRE invite, don’t panic. The troubleshooting spirit is strong with this one! Your backup plan? The Windows setup disc or USB drive. These handy tools come with a “repair your computer” option that lets you manually summon the WinRE Menu. Sure, it’s a bit more hands-on, but it’s a tried-and-true route to the essential diagnostic and repair tools tucked away in WinRE.
Open Windows Recovery Environment (WinRE) via Windows Setup Installation Media
Solution#1: Disable Early Launch Anti-Malware Protection (ELAM)
Think of Early Launch Anti-Malware Protection (ELAM) as your system’s bouncer during startup. Its job? To give every driver a once-over before letting them join the boot party. This pre-check helps ELAM spot and block any sketchy drivers or rootkits trying to sneak into your system, acting like a digital bodyguard for your precious files and settings.
But here’s the twist: Sometimes, ELAM’s overprotective nature can mistakenly flag legit drivers or interfere with troubleshooting steps, leading to the very errors you’re scratching your head over. When that happens, a tactical move might be to give ELAM a temporary break.
So, how do you get to ELAM’s hideout in the WinRE menus? It goes a little something like this: Navigate to “Troubleshoot” > “Advanced Options” > “Startup Settings”. You’ll find yourself in a menu overflowing with boot options and settings galore. To disable ELAM, go ahead and restart your system from this menu. When your PC boots up again, you’ll see a list of startup settings, each linked to a number key.
To give ELAM a breather, hit the ‘8’ key. This tells your system to skip ELAM’s usual startup checks the next time you boot up, giving you a break from its watchful eye. This can often be a game-changer when you’re dealing with driver conflicts or compatibility hiccups, clearing the path for more troubleshooting magic with WinRE’s robust toolkit.
Solution#2: Disable Automatic Restart After Failure
Let’s dive into the “Disable Automatic Restart After Failure” feature, a standout gem tucked away in the WinRE. True to its name, this setting lets you take back the wheel from those sneaky automatic reboots, keeping error messages in plain sight and letting you steer the ship during troubleshooting.
Finding this handy feature in WinRE is like following a tech roadmap. Start by clicking on “Troubleshoot” from the main menu, then meander over to “Advanced Options”, and finally, land on “Startup Settings”. This journey brings you to a critical crossroads, offering up a smorgasbord of boot options and specialized settings to explore.
Ready to kick automatic restart to the curb? Go ahead and hit that restart button from this menu. As your PC gears up for another round, you’ll see a list of startup settings pop up, each paired with a handy number key on your keyboard.
To wave goodbye to automatic restart, tap the ‘9’ key. This sends a clear message to your system: “Hold the reboot, please!” Instead, it’ll keep things as they are after the glitch, giving you VIP access to those all-important error messages. This sets the stage for a more savvy and effective troubleshooting session right there in the embrace of WinRE.
Solution#3: Open Computer In Safe Mode
When the usual troubleshooting tricks just aren’t cutting it and your digital world is still a maze of glitches and gremlins, Safe Mode steps in like a tech superhero—a no-frills, bare-bones setting designed to give you a stable platform for deeper diagnostics.
Think of Safe Mode as a peaceful retreat from the usual startup chaos of programs, drivers, and processes. By stripping things back to the essentials, Safe Mode helps you zero in on the troublemakers causing your system to go haywire—whether it’s unruly drivers, lingering malware, or software that just can’t play nice with others.
Navigating the peaceful waters of Safe Mode is a journey that follows the same clear-cut path we’ve already mapped out for accessing startup options in the WinRE. This step-by-step guide acts like a trusty compass, leading you through the twists and turns of menus straight to the serene Safe Mode sanctuary.
Kick off this calming adventure with a deliberate reboot of your system, setting the stage for the familiar dance of digital boot-up. Among this lineup, the call of Safe Mode rings loud and clear, promising stability and laser-focused diagnostics. To answer this siren call, simply tap the ‘4’ key—a numeric key that acts like a VIP pass to the peaceful Safe Mode zone.
Now, congratulations on successfully navigating the maze to Safe Mode! You’ve taken a big step toward regaining control over your computer’s quirks and kinks. While this achievement deserves a round of applause, the road to mastering system quirks is a never-ending adventure, filled with subtle challenges and intriguing problems waiting to be solved.
If your thirst for knowledge is still unquenched, I wholeheartedly recommend diving deeper into troubleshooting with my comprehensive article, “Windows Computer Only Starts In Safe Mode – Solutions For Every Possible Condition“. This well-crafted guide is like a treasure trove of tailored fixes, meticulously selected to tackle a wide range of scenarios that might trap your computer in the Safe Mode limbo.
Inside, you’ll uncover a goldmine of insights, complete with detailed, step-by-step instructions designed to unravel complex issues and light the way to solutions. From hidden details that escape casual observation to expert troubleshooting tips refined through years of collective know-how, this article acts as a guiding light through the intricate maze of system diagnostics.
If Safe Mode isn’t cutting it for solving your computer’s startup woes, you’re likely dealing with deeper, trickier issues that need a closer look. These issues could be lurking in the operating system or buried deep within your storage drive’s core. But don’t worry—there’s a methodical troubleshooting strategy that’s ready to guide you through, starting with a focus on potential storage-related hiccups using the Command Prompt (CMD).
To kick off this detective work, your first step is to access the Command Prompt, which you can do through the Windows Recovery Environment (WinRE).
Once you’re in the CMD interface, follow these commands to get the ball rolling:
Launch DiskPart Utility: Start your troubleshooting journey by firing up DiskPart, a tool that’s great at managing disk partitions with surgical precision. Type diskpart into the Command Prompt and hit Enter to open this specialized utility.
List Volumes: With DiskPart up and running, type list volume and hit Enter. This command will give you a bird’s-eye view of all the volumes on your storage setup, showing you the layout of your partitions and drive assignments.
Conclude DiskPart Session: After you’ve gathered the info you need from the list volume command, type exit and hit Enter to gracefully bow out of the DiskPart utility and return to the Command Prompt.
Access Drive: Next, navigate to the drive where your Windows operating system lives. To do this, type the appropriate drive letter command, like d:, and hit Enter. This sets the stage for deeper investigation.
Verify Windows Directory: To confirm you’ve landed on the right OS drive, type dir and hit Enter. This will show you a detailed list of files in the directory you’re in. A surefire sign that you’re on the OS drive is the presence of a “Windows” folder, which is the heart and soul of your Windows operating system.
Initiate Chkdsk Command: Now that you know which drive you’re dealing with, it’s time to run chkdsk, a tool designed to fix storage drive issues. Type chkdsk /f /r /x into the Command Prompt and hit Enter to unleash this all-in-one diagnostic and repair powerhouse.
/f: This switch automatically fixes any file system errors it finds.
/r: This switch conducts a thorough scan, identifying and repairing bad sectors on the drive.
/x: This switch allows Chkdsk to unmount the volume, so it can perform a comprehensive scan and repair on drives that are currently in use.
As you kickstart the Chkdsk utility, let this specialized tool do what it does best—dig deep into your storage drive’s file system with laser-focused precision.Chkdsk is designed to give your files, folders, and sectors a thorough once-over, keeping an eagle eye out for any glitches or irregularities.
Whether it’s moving data to healthier sectors, patching up corrupted file entries, or clearing out leftover bits of fragmented data, Chkdsk works methodically to make sure every part of your file system gets the once-over, fixing what needs fixing and getting things back on track.
The maze of startup hiccups after mastering storage? Don’t sweat it! We’ve got your back with a remedy that’ll have your system purring like a kitten in no time. Now, think of fixing your Bootloaderas sending your Operating System on a spa day—it’ll come back refreshed, snappy, and ready to rock. So grab your CMD and let’s dive into this boot-tastic journey to revitalize your system.
Firing Up Command Prompt: First things first, fire up that Command Prompt (CMD) using the trusty method we’ve already chatted about. This is your golden ticket to a treasure trove of system-level tools that are your BFFs when it comes to bootloader TLC.
Unleashing the Bootrec Beast: Once you’re in the Command Prompt, it’s showtime! Time to unleash the bootrec commands—these babies are designed with surgical precision to iron out any kinks in your bootloader and get your system humming in harmony.
bootrec /fixmbr: Think of this as a day at the boot spa for your boot record. It’s like a magic eraser for any bumps or bruises that might be slowing down your boot-up game.
bootrec /fixboot: This is your boot sector’s personal trainer. It keeps things fit and ready, nipping conflicts in the bud. If you hit an “access denied” snag, no worries! Just punch in “bootsect /nt60 sys” and give “bootrec /fixboot” another whirl.
bootrec /rebuildbcd: Picture this command as the maestro of the bootloader symphony, meticulously rebuilding your Boot Configuration Data (BCD). It’s like laying down the red carpet for a flawless boot-up and a rock-solid system vibe.
Solution#5: Uninstall Recently Installed Updates
Windows has gotten a bit cheeky with its autonomous Windows Updates, sneaking them in like a ninja while you’re not looking. Sure, it’s all in the name of boosting security and adding new bells and whistles, but sometimes these surprise updates can throw a wrench in the works, especially when they butt heads with your existing drivers or apps.
So, what’s a savvy tech user to do? Well, one smart move is to hit the brakes on any ongoing updates or roll back the latest ones. It’s like hitting the undo button to dodge potential clashes and get your system back to its zen state.
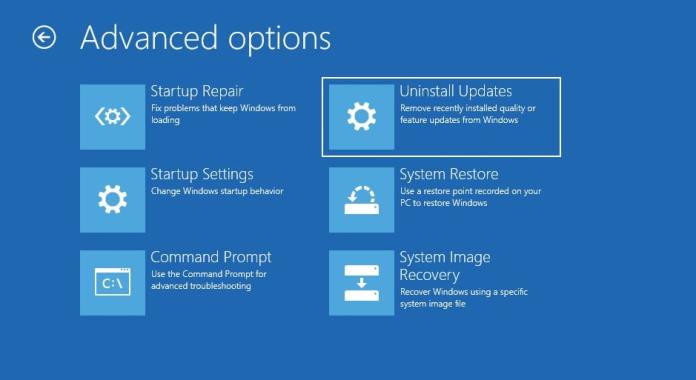
Luckily, Windows Recovery Environment (WinRE) has got your back with a nifty feature tucked away in its Advanced Options menu: “Uninstall Updates”. This gem lets you ditch both the freshest quality and feature updates, offering a bespoke fix for your update woes.
Here’s the game plan:
Step One: The Quality Rollback—Kick things off by clicking on “Uninstall latest quality update”. This takes aim at the most recent quality update, trying to undo any mischief it might have caused. If that doesn’t do the trick, don’t sweat it; we’ve got a Plan B.
Step Two: The Feature Flip-Flop—If the first round doesn’t knock it out of the park, switch gears to “Uninstall latest feature update”. This one goes after the latest feature update, offering another shot at smoothing things over and restoring your system’s happy place.
Alright, so you’ve tried the fancy built-in options, but they’ve left you hanging or maybe they’re just playing hard to get. No worries! It’s time to roll up those sleeves and dive into the Command Prompt (CMD) to take matters into your own hands. Think of it as the tech-savvy equivalent of taking the wheel when the autopilot’s acting up.
First things first, you’ll need to figure out which drive letter is playing host to your Windows installation. If you’re scratching your head at this point, don’t fret! Just hop back to Solution No. 3 for a quick refresher on how to sleuth out that elusive drive letter.
Armed with that vital intel? Great! Now, let’s get down to business. Fire up the Command Prompt and punch in the following command:
Hold up! Before you hit that Enter key, make sure to swap out the “D” in “/Image:D:” with the actual drive letter where your Windows magic happens.
What’s this command doing? It’s like hitting the pause button on any sneaky update processes that might be causing a ruckus.
Once you’ve unleashed this command, don’t forget to give your computer a little reboot. This lets all those changes sink in. After the reboot, take a spin around your system to see if the gremlins have been banished and everything’s back to smooth sailing.
When the usual fixes for registry woes just aren’t cutting it, it’s time to bring out the big guns: system-wide restoration using your trusty Windows installation media.
Think of it as giving your OS a full spa day—from head to toe, inside and out—to get it back to peak performance. Buckle up, because we’re diving into a comprehensive guide on using DISM and SFC tools to breathe new life into your Windows system.
Believe me, this will definitely fix your issue;
System Files Restoration Using DISM Tool: The Ultimate Guide
Ah, the DISM (Deployment Image Servicing and Management) Tool—that unsung hero of Windows system file restoration! But here’s the thing: DISM is a bit like a puzzle piece; it works best when it fits just right. So, when you’re gearing up to use DISM for some serious system file TLC, make sure your Windows installation media matches your installed Windows version.
If you’re rocking Windows 10 Professional, don’t go grab the installation media for Windows 11 Professional thinking they’re interchangeable. Nope, each version has its own special sauce, and using the wrong one is a recipe for compatibility headaches.
Matching your Windows version with the corresponding installation media isn’t just about playing it safe—it’s about optimizing system stability and squeezing every last drop of performance out of your OS. So, before you dive into that DISM restoration, double-check your media to make sure it’s a perfect match for your Windows version. Trust me, your system will thank you for it with smoother sailing and peak performance.
So, let’s get going;
Now you’re gearing up to use the DISM tool, but first things first—we need to play detective and identify some crucial drive letters. Think of it as getting your ducks in a row before diving into the restoration process. Knowing the drive letters for both your Windows drive and your Windows installation media is like having the right tools in your toolbox—it’s essential for a job well done.
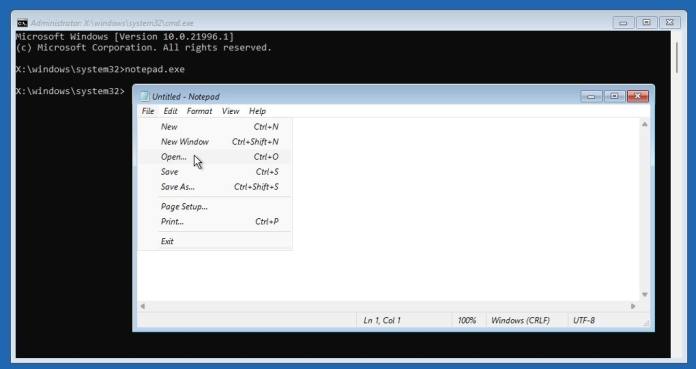
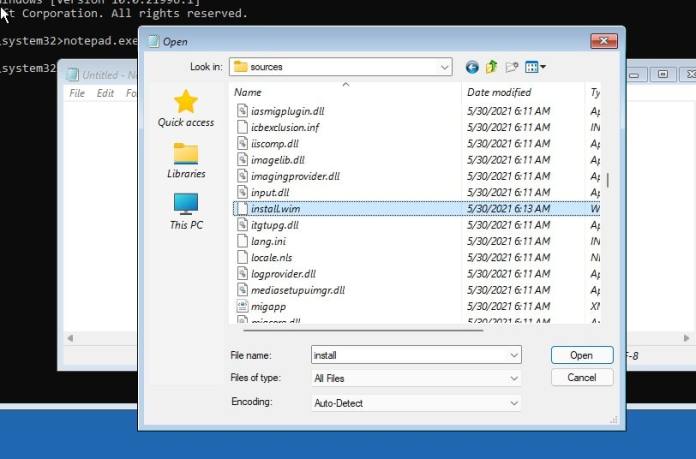
Fire up the Command Prompt (CMD) and summon Notepad with this nifty command: notepad.exe
Once you’re in Notepad, cast your eyes towards the top menu bar and hover over the ‘File’ option. A drop-down menu will unfurl before you, teeming with file-related options like a buffet for your tech-savvy soul.
Now, click on the ‘Open’ option from that tantalizing drop-down menu. Voila! A dialog box will pop up, revealing a smorgasbord of drives and directories like a tech treasure map.
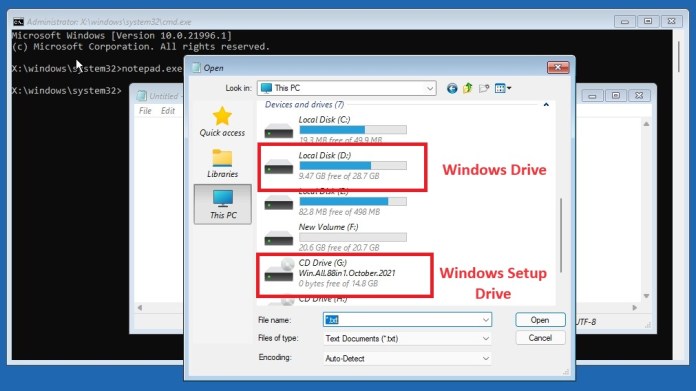
So, you’ve got those crucial drive letters locked down, and now it’s time to zero in on that all-important file for your DISM tool restoration. Think of this file as the secret sauce that makes the DISM restoration process sing—it’s the cornerstone that ensures your system’s integrity and performance stay top-notch.
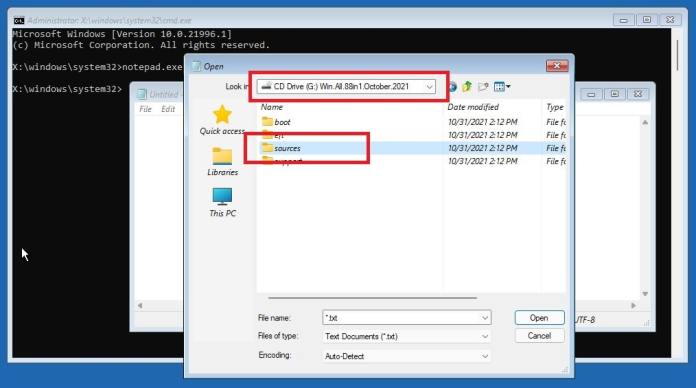
From this dialog box, navigate to your Windows setup drive. Once you’ve landed there, venture deeper into the ‘Sources’ folder. This is where the magic happens—it’s the vault holding the crucial installation files you need for system restoration.
Now, let’s cast our net wide. Within the ‘Sources’ folder, look for a drop-down menu labeled ‘files of types’. Click it and select “All files”. This move will reveal a comprehensive list of files and folders, opening the door to a treasure trove of tech goodness.
Time to put on your detective hat! Scan through this list with a keen eye, and look out for either “install.wim” or “install.esd”. These files are the crown jewels, the linchpins of the DISM tool’s restoration process. Spotting them means you’re on the right track to system file nirvana.
When diving into the adventure of installing Windows, you’re often greeted with a lineup of different Windows versions to choose from during the setup. These versions range from the basic Home edition to the more advanced ones like Professional, Ultimate, and the like.
But before you can start troubleshooting like a pro with the DISM tool, you’ve got to do a bit of detective work to find the index number that matches your chosen Windows variant. It’s like finding the right spice in a well-stocked kitchen; essential for cooking up the perfect fix.
Picture this: your Windows setup is chilling on drive “H:” and its setup file goes by the name “install.wim”. So, to dig up info about the version of Windows lurking in that “install.wim” file, you whip out this command: DISM /Get-Wiminfo /Wimfile:H:\Sources\Install.wim
Once you hit enter, DISM will churn out a nice list showing off all the different flavors of Windows stashed away in that “install.wim” file. Your mission here is to find and jot down the index number assigned to the exact Windows version you’ve got installed.
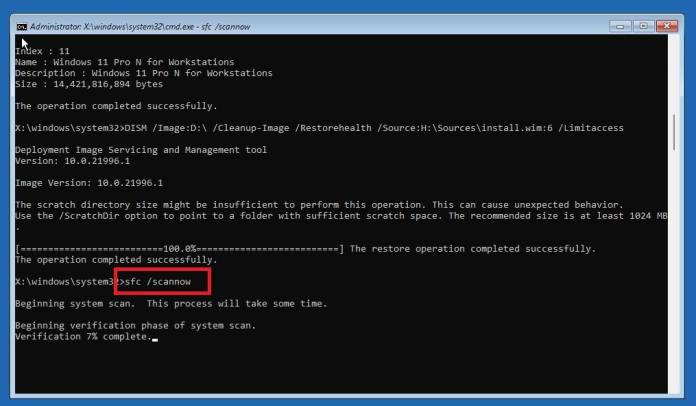
Take my setup, for example. I’m rocking Windows 11 Pro. When I ran that command, I found out that the index number for Windows 11 Pro is “6”. And guess what? That number is gold because it’s what we’ll use to target our restoration efforts with DISM, making sure we’re fixing up the right edition of Windows.
Alright, tech wizards, let’s get down to business. You’ve got all your gear ready for the Windows repair rodeo: your active Windows drive letter, your setup drive letter, the filename of your Windows install file (whether it’s “install.wim” or “install.esd”), and that all-important index number for your Windows flavor. Now, it’s time to roll out the DISM command that’ll kick off your repair adventure.
Here’s the magic spell you need to cast: DISM /Image:D:\ /Cleanup-Image /RestoreHealth /Source:H:\Sources\install.wim:6 /Limitaccess
Let’s decode this incantation, shall we?
**/Image:D:**: This pinpoints the target of the operation, with “D:” being your active Windows drive letter. Swap out “D:” with whatever letter your system is sporting.
/Cleanup-Image: This tells DISM to tidy up the image before making any changes. Think of it as decluttering your PC’s digital closet before trying on new fixes.
/RestoreHealth: This kicks off the repair, using your specified source to nurse your system back to health and sort out any issues.
/Source:H:\Sources\install.wim:6: This tells DISM where to find the goodies it needs to work its magic. “H:” is your setup drive letter, “Sources” is the folder housing the install file, “install.wim” is your filename, and “6” is your Windows version’s index number. Make sure to tweak these to match your setup.
/Limitaccess: This keeps DISM’s focus on just the source you’ve specified, making sure the repair stays on track and efficient.
So, by tweaking those drive letters and index number in the DISM command, you’re all set to perform a surgical repair operation. You’ll be tapping into your Windows setup’s resources to iron out any kinks and get your system back to its chipper self.
System Files Restoration Using SFC Tool: The Ultimate Guide
Alright, tech maestros, once DISM wraps up its repair dance, it’s time to call in the next troubleshooter: the System File Checker (SFC). This Windows native tool is your system’s integrity watchdog, sniffing out corrupted or AWOL system files and patching things up.
The SFC is like the Gandalf of Windows utilities—keeping a watchful eye over your system’s well-being. It scans your system files, spots any that are corrupted or missing, and swaps in pristine Microsoft-approved versions. This helps keep your system stable, snappy, and on its best behavior.
Ready to wield the SFC tool like a pro? Here’s your cheat code that you’ll need to put inside the CMD: sfc /scannow
Now, Sit back and let SFC do its thing. It’ll methodically check all those precious system files, fixing or replacing any that are playing hooky with corruption or tampering.
So, by teaming up DISM’s repair prowess with an SFC scan, you’re not just putting band-aids on system issues—you’re performing a full-system tune-up. You’ll be nurturing a harmonious tech ecosystem where stability and peak performance aren’t just buzzwords; they’re a way of life.
Happy troubleshooting, and may your system be forever glitch-free!
When I use Command #3 and #4 in Solution #3, a window(?) called “cmd.exe – Corrupt File” pops up. It says “Exception Processing Message 0xc0000 102 Parameters 0x7571EC 0x757157CE 0x7571EC 0x757157CE”. Is there a way to fix this? I’m trying to find a way out of a Startup Repair loop. Thank you.
I tried solution #1 and like one other commenter stated, it then said missing BOOTMGR. But then after it kept restarting, it shut down and now won’t even start up anymore (which it never did before). Now I can’t even get back to my cmd to try other solutions since the computer is now dead and won’t turn back on. So obviously solution #1 has this effect on some computers and is dangerous to even attempt.
Now try to use startup repair with your Windows USB or Disc, and that will work for you.
Use this link if you don’t know about, how to do that?
>>http://www.deskdecode.com/startup-repair/
Solution 3# – Fixing Windows Files Manually worked for me , Thank you so much for such a precise and detailed solution. you are bookmarked for ever on my PC
hello, thanks very much for your article having a problem with my window 10, Bootmgr is missing so I tried your instructions no luck tried manual repair and realize that files on Sam, Security, Software, System are 0 what does it means thank you
I will try startup repair with a bootable Windows USB, but the point is that using your solution #1 is what caused a worse issue with the missing BOOTMRG file and I followed it exactly step by step. I looked up that missing BOOTMGR issue and came to multiple websites stating that when changing the partition to active drive C will cause the BOOTMGR file to go missing and then giving ways to fix that. So the solution #1 you gave will likely cause the BOOTMGR file to go missing, thus causing another issue to fix for those who attempt it. You should edit this post and at least state this could happen in the solution #1 and the reason why it could happen so people know before they attempt it.
I have blue screen STOp: c000021a {fatal system error} The initial session process or system process terminated unexpectedly with a status of 0x0000000000 (0xc0000001 0x00090448)
Problem Event Name: StartupRepairV2
Problem Signature 01: externalmedia
Problem Signature 02: 6.0.6000.16386.0.0.0.0
Problem Signature 03: 0
Problem Signature 04: 65537
Problem Signature 05: unknown
Problem Signature 06: missing boot mgr
Problem Signature 07: 0
Problem Signature 08: 2
Problem Signature 09:wrprepair
Problem Signature 10:21 OS Version: 6.0.6000.2.0.0.256.1
Locale ID: 1033
What’s the solution for this problem???? Please help me
My computer was showing low disk running space. I deleted some files for more space from C: and when I restart my computer than after “starting windows” option computer restarts everytime. What should I do? I don’t want to install new windows.
Hi I have tried all 3 of the options and all of the cmd all seem ok when I type them in but when I restart after each of the options the startup repair comes back again and windows still does not boot. Please help thanks
I just had to deal with this. After restoring an older registry (didn’t help), confirming the partition was active (didn’t help), I finally got a specific message – one of the drivers was not getting its digital signature verified. My client had installed a security program that his bank had given him. Since I couldn’t boot into Window (7) at all, even command prompt, and using the install disk “repair” option didn’t help, I booted in with a Hiren’s Repair CD. Then I used System Startups (comes with Hiren’s), used the “offline computer” option, and disabled every instance of this program running at startup. There were about five separate things it did at startup, some of which didn’t appear in the “all” section – I had to go through each tab of System Startups to uncheck all of them.
However, upon a reboot the system came up normally! Saved me the time and trouble of backing up all of his stuff and reinstalling Windows, not to mention the hassle of reinstalling all his programs.
Hopefully, this will help someone else.
I used “Solution 3# – Fixing Windows Files Manually”.
This did not work for me.
In the command “Command 8# – DIR”, i found that the DEFAULT, SAM and SECURITY files must be about 762,000 bytes, 25,375 bytes, 30, 380 bytes in their size.
How can i make each one equal to about 262,000 bytes in their size ?
Pl. explain this.


 & HDD (Hard Disk Drive)?")


 Error in Middle of Computer Startup")


does not work when i push shift+f-10 it shows 0xc0000034
use windows installer disk or USB to open “Startup Repair”.
I used to solution 1, however after I restart my comp, it can out BOOTMGR is missing. and the loop start over and over agn, can you help me pls!!
Maybe you need to reinstall your operating system.
When I use Command #3 and #4 in Solution #3, a window(?) called “cmd.exe – Corrupt File” pops up. It says “Exception Processing Message 0xc0000 102 Parameters 0x7571EC 0x757157CE 0x7571EC 0x757157CE”. Is there a way to fix this? I’m trying to find a way out of a Startup Repair loop. Thank you.
Did you try to use startup repair by using a Windows installer disc or USB?
Solution 1 how will get work since I installed without portions
If I have to do portions now ,may I chance to lost the data
When I did command #3, I typed in ‘cd\windows\system32\config’ but when I pressed enter it told me “The system cannot find the path specified.”
Maybe you need to reinstall your operating system.
Worked third solution for me. Thank you!!!
Solution 3# – Fixing Windows Files Manually – worked for me! Thank you!
I tried solution #1 and like one other commenter stated, it then said missing BOOTMGR. But then after it kept restarting, it shut down and now won’t even start up anymore (which it never did before). Now I can’t even get back to my cmd to try other solutions since the computer is now dead and won’t turn back on. So obviously solution #1 has this effect on some computers and is dangerous to even attempt.
Now try to use startup repair with your Windows USB or Disc, and that will work for you.
Use this link if you don’t know about, how to do that?
>>http://www.deskdecode.com/startup-repair/
Solution 3# – Fixing Windows Files Manually worked for me , Thank you so much for such a precise and detailed solution. you are bookmarked for ever on my PC
hello, thanks very much for your article having a problem with my window 10, Bootmgr is missing so I tried your instructions no luck tried manual repair and realize that files on Sam, Security, Software, System are 0 what does it means thank you
Reinstall your Windows, that’s the only thing what you can do right now.
I will try startup repair with a bootable Windows USB, but the point is that using your solution #1 is what caused a worse issue with the missing BOOTMRG file and I followed it exactly step by step. I looked up that missing BOOTMGR issue and came to multiple websites stating that when changing the partition to active drive C will cause the BOOTMGR file to go missing and then giving ways to fix that. So the solution #1 you gave will likely cause the BOOTMGR file to go missing, thus causing another issue to fix for those who attempt it. You should edit this post and at least state this could happen in the solution #1 and the reason why it could happen so people know before they attempt it.
Can’t express my gratitude 3 option save my hard drive i dont have words for this….
GOD BLESS YOU!!
Why I can’t type shift +f10?
shift+f10 only works while using startup repair via Windows installation disc.
Omg I did it!!! Thanks!!!
Yesssssss! thanks for your help. i use Solution 3 and problem is solved
Yesss!!! I used method 3.. and problem is solved. Thanks!!!!!
I did solution #3 everything work besides when I go and log in with my password I get Can’t sing into account
if I dismiss it I get critical error
Hi Madhur, your Solution 1 really helped me. Thanks.
I have blue screen STOp: c000021a {fatal system error} The initial session process or system process terminated unexpectedly with a status of 0x0000000000 (0xc0000001 0x00090448)
Problem Event Name: StartupRepairV2
Problem Signature 01: externalmedia
Problem Signature 02: 6.0.6000.16386.0.0.0.0
Problem Signature 03: 0
Problem Signature 04: 65537
Problem Signature 05: unknown
Problem Signature 06: missing boot mgr
Problem Signature 07: 0
Problem Signature 08: 2
Problem Signature 09:wrprepair
Problem Signature 10:21 OS Version: 6.0.6000.2.0.0.256.1
Locale ID: 1033
What’s the solution for this problem???? Please help me
https://www.google.co.in/search?num=100&newwindow=1&rlz=1C1CHBD_enIN756IN756&q=“StartupRepairV2″+”externalmedia”&oq=”StartupRepairV2″+”externalmedia”&gs_l=psy-ab.3..0i13i30k1l2.26810.37098.0.37320.6.6.0.0.0.0.163.852.0j6.6.0….0…1.1.64.psy-ab..0.6.851…0j0i30k1j0i22i10i30k1.0.OLpGP3NLrS0
Thanks Madhur! Solution#3 worked flawlessly
you are a lifesaver brother!!!! option #2 worked for me. Thank you!!!!
My computer was showing low disk running space. I deleted some files for more space from C: and when I restart my computer than after “starting windows” option computer restarts everytime. What should I do? I don’t want to install new windows.
what type of files did you delete from the C: drive.
thank you so much!
Your my hero. I spent three hours then came across your solution. Using the Manual Fix it worked a treat.
Thank You
Solution no 3 helped me.
Thank u very much for helping me get back my windows and content safely..
Hi I have tried all 3 of the options and all of the cmd all seem ok when I type them in but when I restart after each of the options the startup repair comes back again and windows still does not boot. Please help thanks
I think you should need to reinstall your OS now.
I just had to deal with this. After restoring an older registry (didn’t help), confirming the partition was active (didn’t help), I finally got a specific message – one of the drivers was not getting its digital signature verified. My client had installed a security program that his bank had given him. Since I couldn’t boot into Window (7) at all, even command prompt, and using the install disk “repair” option didn’t help, I booted in with a Hiren’s Repair CD. Then I used System Startups (comes with Hiren’s), used the “offline computer” option, and disabled every instance of this program running at startup. There were about five separate things it did at startup, some of which didn’t appear in the “all” section – I had to go through each tab of System Startups to uncheck all of them.
However, upon a reboot the system came up normally! Saved me the time and trouble of backing up all of his stuff and reinstalling Windows, not to mention the hassle of reinstalling all his programs.
Hopefully, this will help someone else.
Thank you so much. #3 worked.
#1 and #2 didn’t work, but #3 did. Thanks a lot.
Third solution worked!! Thanks much! 😍
Your method of rolling back the registry from command line saved my ass. Thank you!
I used “Solution 3# – Fixing Windows Files Manually”.
This did not work for me.
In the command “Command 8# – DIR”, i found that the DEFAULT, SAM and SECURITY files must be about 762,000 bytes, 25,375 bytes, 30, 380 bytes in their size.
How can i make each one equal to about 262,000 bytes in their size ?
Pl. explain this.
Good day
i am working on Option 3 but md myback up says there is not enough space. What should i do
you can boot any live operating system by using a Hiren boot cd and can easily make some space in your boot drive.
https://www.deskdecode.com/hirens-boot-cd/
MANUAL last option worked great for me thank you