


 & HDD (Hard Disk Drive)?")


This Tutorial is for – Windows XP, Windows 7, Windows 8, and Windows 10
So, you’re minding your own business, cruising the internet highway with Internet Explorer, when suddenly, bam! You’re hit with that dreaded message: “Internet Explorer Has Stopped Working”.
It’s like the internet’s way of saying, “Hey, I need a break!” Or worse, you might get slapped with the more direct “Internet Explorer isn’t working” notification, followed by Windows solemnly promising to close the program and maybe, just maybe, notify you if it finds a solution.
Now, when this annoyance rears its ugly head, you’re usually faced with a few options:
- Frantically search online for a fix while hoping for the best.
- Take the “close/restart” route.
- Or, if luck isn’t on your side, you might only get the option to “Close program”.
Regardless of your choice, brace yourself because that pesky Internet Explorer Appcrash message might just keep popping up.
So, what’s causing all this commotion? Well, it could be a bunch of things—conflicts with “.dll” files, unruly toolbars, and a whole host of other gremlins lurking in your browser’s shadows. It’s like trying to solve a mystery with a dozen possible suspects.
But fear not, my fellow internet adventurers, because I’ve scoured the digital realm to bring you a treasure trove of solutions. This article is your roadmap through the labyrinth of Internet Explorer errors, offering up every trick, tip, and tweak imaginable to kick that “Internet Explorer Has Stopped Working” message to the curb. From simple fixes to more intricate maneuvers, each solution is laid out in plain English, so you don’t need a degree in computer science to make sense of it all.
So, roll up your sleeves, dive in, and try each step until victory is yours. With these battle-tested solutions at your disposal, you’ll soon banish that pesky error message for good.
# So, Let’s Fix The “Internet Explorer Has Stopped Working” Error
Alright, so diving into the intricate world of Internet Explorer crashes, let’s break things down nice and neat to make sense of the chaos. Picture it like a tidy desk amidst a cluttered room—organized, efficient, and ready to tackle the task at hand.
First up, we’ll zoom in on a couple of common scenarios you might encounter:
- Internet Explorer Crashes While Accessing Media Files: Ever had IE bail on you right in the middle of enjoying some sweet tunes or binge-watching cat videos? Yep, that’s what we’re talking about here.
- Internet Explorer Crashes Upon Browser Launch: You click that iconic blue “e” expecting a smooth ride through cyberspace, but instead, you’re greeted with a crash landing before you even get off the ground. Not cool, IE, not cool.
Now, each of these scenarios could have its own sneaky culprit lurking in the shadows. Let’s shine a light on some potential suspects:

By neatly categorizing these potential troublemakers, we’re giving you the detective’s toolkit you need to crack the case. Whether it’s a glitchy plugin, a wonky setting, or something else entirely, this organized approach is all about making your troubleshooting journey smoother and your victory over those pesky IE crashes sweeter.
Let’s start with the solutions for;
# Condition No. 1: IE Crash While Watching Or Playing Media Files
If you’re experiencing a problem like this, it’s possible that some aspects of your Windows operating system, hardware drivers, or browser plugins require updating to resolve the issue.
Drivers Problem: Picture this, your Video Drivers are like the unsung heroes behind the scenes, making sure everything runs smoothly in the graphics department. But when they’re corrupted or outdated, it’s like having a glitchy actor in a blockbuster movie – not a good look. Specifically, if you’re rocking a Nvidia or AMD Graphics Card, chances are updating the driver associated with it could be the magic fix you need. Or hey, why stop there? Updating all your drivers might just do the trick.
- How to Update Drivers Directly From the Device Manager?
- What Is Computer Hardware Drivers & Why We Need It?
- Motherboard Drivers – What It is & Mainly, How To Install It?
- Install Computer Drivers Automatically For Free & DriverPack Solution
- DriverIdentifier: A Great Way To Find & Download Drivers Online
Plugin Problem: Ever heard of Java, Flash Player, Shockwave Player, or Silverlight? These guys are the backstage crew for your Internet Explorer, helping it run smoothly and handle all those fancy multimedia tasks. But if they’re outdated or acting up, it’s like having stagehands who keep dropping the props. Not ideal. The solution? Get those plugins updated ASAP. Just hit up the link below to snag the latest versions, and you’ll be back in business in no time.
Here’s the list of those software programs that I’m talking about:
- Click To Download JAVA
- Click To Download Flash Player
- Click To Download Silverlight
- Click To Download Shockwave Player
If you’re still grappling with the issue even after giving all those steps a shot, it’s time to face the music: your Internet Explorer might be stuck in a bigger pickle. But fear not! There’s still hope on the horizon.
You can keep soldiering on by following the instructions laid out in Condition No.2 (coming right up after this paragraph), and fingers crossed, that should do the trick to set your browser straight. Stay strong, and let’s tackle this challenge head-on!
# Condition No. 2: Crash While Opening Or Using The Browser
Sometimes, this pesky problem just won’t quit, rearing its ugly head the moment you fire up Internet Explorer. And what makes it even more frustrating is how these errors come at you from all angles—crashing apps, ominous error messages flashing on your screen—you name it.
The root of the issue often lies in corrupted or conflicting files lurking within your trusty old Internet Explorer. But fear not, because below, you’ll find a treasure trove of settings and techniques to kick this problem to the curb once and for all. It’s crucial to go through each solution meticulously, one by one, until your computer is back to its old, reliable self. After all, figuring out which fix will work for your particular setup is like solving a puzzle—it requires patience and persistence. So buckle up and let’s get cracking!
Solution #1: Troubleshooting Internet Explorer Add-Ons


Checking “[_] Use software rendering instead of GPU rendering” option: This little checkbox, nestled snugly in the accelerated graphics section, calls the shots on how your browser tackles graphical tasks.
- If checked, your browser will task your computer’s CPU with handling graphical processing.
- If unchecked, your browser will put your computer’s GPU to work on those graphical tasks.
Now, here’s my two cents: I recommend flipping this setting to the opposite of its current state. If it’s checked, uncheck it, and if it’s unchecked, give it a checkmark. This switcheroo ensures that your browser taps into the right hardware for peak performance.
Once you’ve made the adjustment, don’t forget to seal the deal by clicking on the “Apply” button down at the bottom of the Internet Properties window. This ensures your changes stick and come into play the next time you fire up Internet Explorer.
Solution #3: Fixing Security Setting
Sometimes, unexpected tweaks to your Internet Explorer’s security settings can throw a wrench in the works. But fear not—resetting these settings can often work wonders in getting things back on track and restoring peace to your PC.
Here’s the game plan:
- Again, hop into the Internet Properties window, slide on over to the Advanced tab from the menu—it’s where the magic happens.
- In the Advanced tab, keep your eyes peeled for a setting labeled “Enable Protected Mode” or “Enable Enhanced Protected Mode”. Make sure this setting is switched on or checked.

- Enabling Protected Mode or Enhanced Protected Mode acts like your trusty guardian angel, keeping the nasties at bay and protecting your system from any shenanigans.
- With that setting confirmed, seal the deal by hitting the “Apply” button down at the bottom of the Internet Properties window. This ensures your changes are locked in and ready to roll.
This simple tweak might just be the key to kissing those pesky problems goodbye and enjoying a smoother browsing experience all around.
Solution #4: Resetting Internet Explorer
Congratulations! You’ve reached the final frontier of troubleshooting within the realm of Internet Explorer settings, and this step is often the golden ticket for about 95% of users. But if, by some stroke of bad luck, this fix doesn’t do the trick, it’s time to face the music—the issue might be deeper than just your browser, hinting at a potential hiccup in your computer’s operating system. Let’s dive deeper:
Resetting Internet Explorer: To kickstart this process, head back to the Advanced tab within the Internet Properties window. There, you’ll spot the trusty “Reset” button—go ahead and give it a click. But here’s the crucial part: make sure you tick the box labeled “Delete personal settings” before taking the plunge. This move will whisk Internet Explorer back to its default state, wiping away any pesky configurations or settings that might have stirred up trouble.
Now, while resetting Internet Explorer often works like a charm, it’s crucial to come to terms with the fact that if the problem sticks around despite your best efforts, there’s a good chance your Windows operating system might be on the fritz. Blame it on recent software installations or maybe even a sneaky virus playing hide and seek.
But hey, don’t throw in the towel just yet! Even in the face of such daunting odds, it’s crucial to stay proactive and persistent in your quest for a solution. With the right attitude and approach, even the toughest challenges can be conquered.
Solution #5: Removing Toolbar
Just like browser add-ons, those sneaky toolbars lurking in your Operating System (OS) can also stir up trouble, especially when fake or corrupted ones slip past your defenses.
To weed out the troublemakers and pinpoint which toolbar is causing a ruckus in Internet Explorer, you’ll need to bid farewell to all installed toolbars on your computer. Here’s the game plan:
- Kick things off by summoning the Run dialog box on your Windows system with a swift Windows key + R Key combo. Once it’s up and running, type in “appwiz.cpl” and hit Enter. This move opens up the Programs and Features settings – your battleground for tackling those pesky toolbars.

- Now, within the Programs and Features settings, you’ll come face to face with a list of all the programs and toolbars hanging out on your system. Your mission? Locate and uninstall every single toolbar listed here.

- Roll up your sleeves and dive in systematically, bidding farewell to each toolbar one by one. Make sure no potential source of conflict slips through the cracks.
By giving those toolbars the boot, you’re wiping out any potential triggers for trouble within Internet Explorer. And hey, don’t worry—you can always reinstall any toolbar you genuinely need later on. Just tread cautiously and bring back only the ones you absolutely can’t live without.
- Once you’ve cleared the battlefield, it’s time to give your computer a breather. Restart that bad boy and let the changes sink in.
- After your computer has had its power nap, fire up Internet Explorer and give it a spin. With those troublemaking toolbars out of the picture, you might just find yourself enjoying a smoother browsing experience in no time.
This proactive approach to troubleshooting cuts through the clutter, making it easier to identify and resolve conflicts. Here’s to a browser that runs like a well-oiled machine!
Solution #6: Resetting TCP/IP
To tackle the problem head-on, let’s dive into resetting the TCP/IP (Transmission Control Protocol/Internet Protocol).
Here’s the step-by-step guide:
- Open Command Prompt: First things first, let’s open up the Command Prompt. You can do this by searching for “Command Prompt” in the Windows search bar and selecting it from the results. > 20 Different Ways To Open CMD On Your Computer
- Reset TCP/IP: In the Command Prompt window, type in the following command: “netsh int ip reset” and hit Enter. This command works its magic by resetting the TCP/IP stack.

- Verify Reset: Keep an eye on the Command Prompt for any response after executing the command. If it throws back a message like “Resetting , OK!” and kindly suggests a computer reboot, you’re in the clear—the TCP/IP reset was a success.
- Reset Winsock Catalog: Now, let’s tackle the Winsock Catalog. Type in the following command: “netsh winsock reset” and hit Enter. This little trick resets your computer’s Winsock Catalog settings, which can be a lifesaver for networking woes.

- Restart Your Computer: With both commands executed like a boss, it’s time to give your computer a well-deserved reboot. Let those changes sink in.
- Test Internet Explorer: Once your computer wakes up from its nap, fire up Internet Explorer and put it through its paces. With the TCP/IP and Winsock Catalog settings reset, you might just find yourself browsing without a hitch.
Resetting the TCP/IP and Winsock Catalog settings works wonders for ironing out network-related kinks that might be causing trouble with Internet Explorer. It’s a straightforward troubleshooting that could be the key to restoring harmony to your browsing experience.
Solution #7: Remove Recently Installed Windows Updates
If you suspect that recent updates might be throwing a wrench in the works for your Internet Explorer, fear not – uninstalling them could be the ticket to restoring harmony. Here’s the lowdown on how to get it done:
- Access Windows Update Settings: Start off by opening the Windows Update Settings from your Windows Control Panel. You can do this by clicking on the Start menu, selecting Settings, and then choosing Update & Security.
- View Update History: Once you’re in the Windows Update Settings, shift your gaze to the left side panel and give a click to the “View Update History” option. This will take you to the main setting where the magic happens.
- Select Recent Update: Now, scan through the list of updates displayed and pinpoint the recent troublemaker. You can scroll through or use the search function to track it down. Keep an eye out for details like the installation date to confirm you’ve got the right one.
- Uninstall Update: Once you’ve got your target in sight, click on it to select it. Then, look for the “Uninstall” or “Uninstall updates” option typically hanging out at the top of the window. Give it a click and follow the prompts to bid farewell to the pesky update.

By hitting the uninstall button, you’re essentially rolling back your system to a time before the troublesome update came along. This move could help iron out any clashes between the updated files and your trusty old Internet Explorer.
- Restart Your Computer: With the deed done, give your computer a moment to catch its breath. Restart it to let the changes sink in and work their magic.
- Test Internet Explorer: Once your computer springs back to life, fire up Internet Explorer and give it a whirl. With the troublesome update out of the picture, you might just find yourself cruising through cyberspace without a hitch.
If the problem persists, don’t throw in the towel just yet. Consider seeking further assistance or exploring additional troubleshooting steps to get to the bottom of the issue. With a bit of persistence, we’ll crack this nut wide open!
Solution #8: Update Internet Explorer
Updating your browser can often work wonders in resolving issues by replacing outdated or corrupted files with the latest versions available. Follow these straightforward steps to update Internet Explorer:
- Open Internet Explorer: Kick things off by launching Internet Explorer on your computer.
- Access Tools Menu: Now, hunt down the Tools button situated in the top-right corner of the browser window. If you don’t see the Tools button, fret not – you can also access the Tools menu by clicking on “Help” in the Menu bar.
- Navigate to About Internet Explorer: From the Tools menu, give a click to “About Internet Explorer”. You’ll usually find this option towards the bottom of the menu.
- Enable Automatic Updates: In the About Internet Explorer window, keep your eyes peeled for an option labeled “Install new versions automatically”. Check the box next to this option to give Internet Explorer the green light to update automatically whenever new versions are available.
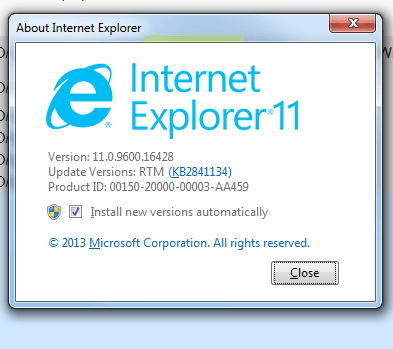
- Close Window: With automatic updates enabled, click on the “Close” button to bid adieu to the About Internet Explorer window.
Alternatively, you can also utilize the Windows Update feature to update Internet Explorer. Here’s how:
- Access Windows Update: Open up the Windows Update settings on your computer. You can do this by clicking on the Start menu, selecting Settings, and then choosing Update & Security.
- Check for Updates: Within the Windows Update settings, give a click to the “Check for updates” button. Windows will spring into action, scouring the digital realm for any available updates, including those for Internet Explorer.
- Install Updates: If updates for Internet Explorer are found, don’t hesitate—click on the “Install updates” button to kickstart the download and installation process. Just follow any on-screen prompts to complete the installation smoothly.
By giving Internet Explorer a little update, you’re ensuring that your browser is armed with the latest features and security enhancements, which can work wonders in boosting performance and nipping any pesky issues in the bud.
Solution #9: Virus Scan
As I said, a virus might be the culprit behind the scenes! Yup, it’s a common scenario. But fear not! You’ve got the power of antivirus software on your side.
First things first, make sure your antivirus is not just sitting there looking pretty but is actually up to date with all the latest virus definitions. Then, roll up your sleeves and give your system a thorough scan to root out any sneaky malware.
Now, if you’re currently rocking a subpar antivirus or, worse, none at all (gasp!), it might be time to invest in something more robust. Think of it as upgrading your system’s bodyguard.

Remember, staying proactive about cybersecurity not only keeps your system safe but also ensures you can enjoy a smoother, crash-free computing experience. Stay savvy, folks!
Solution #10: Use System Restore
Ever wish you could turn back time on your computer? Well, with System Restore, you kinda can! This nifty feature lets you roll your system back to a previous point in time, undoing any changes that caused havoc along the way.
- So, how does it work? Glad you asked! First off, fire up the System Restore utility. Just type “System Restore” into the Windows search bar, and voila! You’ll find it waiting for you.
- Next, take a peek at the list of available restore points. These are like snapshots of your system at different moments. Pick one from before the appcrash chaos began.
- Now, follow the on-screen prompts to kick off the restoration process. Sit back and let your computer do its thing—it’ll soon be back in its happy place.

One thing to keep in mind: System Restore won’t mess with your personal files, like your cat memes or vacation photos. But it might bid adieu to any programs or drivers you’ve recently installed. So, make sure to back up anything important beforehand.
For more detailed guidance tailored to your specific version of Windows, check out these handy articles:
- How To Use System Restore In Windows 11/10/8/8.1 & 7?
- How To Use System Restore In Windows XP? – Explained
They’ll walk you through the process step by step, ensuring you breeze through your system’s time-travel adventure.
Solution #11: Find The Core Of This Problem
Alright, let’s dive into the nitty-gritty of this appcrash error, shall we? One cool thing about it is that it’s pretty chatty—it actually gives you some specific info about the file that’s causing all the trouble. Just click on “View problem details” to expand the error message and get the scoop.
Now, onto the hunt to locate the file causing the problem:
- View Problem Details: Click that “View problem details” button and scout for the “Fault Module Name”. It’s usually chilling on the right side of the problem signatures, outing the troublemaker.
- Conduct Research: Once you’ve got the name (mine was a sassy little “.dll” named “ntdll.dll”), it’s time to hit up Google. Type in the file name and sift through the results to uncover its dark secrets—like its purpose and why it’s misbehaving.

- Identify Causes: Your detective work might reveal which program or driver is buddy-buddy with the rogue file and why it’s throwing a tantrum. Sometimes, it’s just a corrupted Windows component, thanks to life’s little curveballs.
- Implement Fixes: Armed with knowledge, it’s time to kick butt. Maybe a Windows update is all you need to slap those corrupted files back into shape. Or perhaps you’ll encounter other troublemakers like “aswWebRepIE.dll”, “MSHTML.dll”, or “IEFRAME.dll”. Each one demands its own special treatment, so research is key.

- Utilize SFC and DISM Tools:If things get hairy, call in reinforcements. Whip out the System File Checker (SFC) and Deployment Image Servicing and Management (DISM) tools. They’re like your tech-savvy sidekicks, scanning for corrupted files and restoring order to the chaos. >> 20 Different Ways To Open CMD On Your Computer
-
- System File Checker (SFC): To kick off with the SFC, first, let’s elevate our privileges by opening Command Prompt as an administrator. You can do this by finding “Command Prompt” in the Start menu, right-clicking on it, and selecting “Run as administrator”. Once you’re in, type in “sfc /scannow” and hit Enter. This nifty command will comb through your system, hunting down and patching up any corrupted files it finds.

- Deployment Image Servicing and Management (DISM): Now, onto the DISM. Again, let’s strut into Command Prompt with our admin cape on. Type in “DISM /Online /Cleanup-Image /RestoreHealth” and press Enter. This command does a deep dive into your system’s components, sniffing out any corruption and giving your system image a good old spa day to restore its vitality.
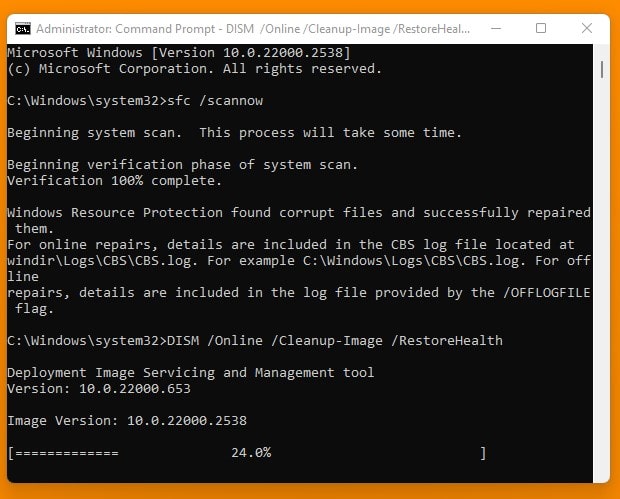
- System File Checker (SFC): To kick off with the SFC, first, let’s elevate our privileges by opening Command Prompt as an administrator. You can do this by finding “Command Prompt” in the Start menu, right-clicking on it, and selecting “Run as administrator”. Once you’re in, type in “sfc /scannow” and hit Enter. This nifty command will comb through your system, hunting down and patching up any corrupted files it finds.
By getting to the bottom of what’s causing the problem and exploring possible fixes, you can tackle the appcrash error head-on and get your system back to its usual self. This proactive method gives users the power to nip issues in the bud and keep their computing experience running smoothly.
Solution #12: Try Internet Explorer In Different User Account
Still, stumbled upon that pesky appcrash error while using Internet Explorer? Don’t sweat it just yet—it might just be a hiccup in your user account settings or configurations. To sleuth out the truth, why not give Internet Explorer a spin in a different user account on your trusty ol’ computer? And if you’re scratching your head wondering how to conjure up a new user account, fear not! Here’s the lowdown:
- First off, head to your computer’s Control Panel or Settings menu and sniff out the “User Accounts” or “Accounts” section.
- Next up, scout around for that golden ticket labeled “Add a user” or “Create a new account”.
- Once you’ve located the treasure, follow the prompts to input all the deets for your shiny new user account—you know, like username, password, and maybe even sprinkle in some account permissions and preferences if you’re feeling fancy.
- With all the info punched in, hit that create button, sit back, and watch the magic happen. Once the account is cooked up, you might need to bid adieu to your current user account and hop on over to the fresh one.
- Now comes the fun part—fire up Internet Explorer within your newfound user haven and put it through its paces. Test out all those nifty features and tasks to see if that pesky appcrash error is still crashing the party.
So what’s the verdict? If Internet Explorer behaves like a well-behaved pup in the new user account, it’s a good sign that the issue might be tied to your original user profile’s settings or configurations. But if the error still rears its ugly head across multiple user accounts, well, it’s time to roll up your sleeves and dive deeper into the troubleshooting abyss.
# What To Do If Nothing Works?
If you’ve tried everything under the sun to squash that stubborn appcrash error in Internet Explorer but it just won’t budge, don’t throw in the towel just yet. There’s one last trick up your sleeve: give a different web browser a whirl.
Sometimes, the gremlins haunting Internet Explorer are just too stubborn to be tamed easily. That’s where swapping to another browser can save the day, at least temporarily, while you hunt down a more permanent fix.
Luckily, the internet is brimming with alternatives like Google Chrome, Mozilla Firefox, Microsoft Edge, Safari, and Opera. Each one comes with its own bag of tricks—features, performance boosts, and customization galore. By switching over to one of these alternatives, you might just dodge that pesky appcrash error and get back to surfing the web hassle-free.
Sure, it might not be the ultimate solution to all your Internet Explorer woes, but it’ll keep you sailing smoothly until you can tackle the root cause head-on. And hey, there’s no shame in seeking out tech forums or pros for a helping hand in the meantime. The internet’s a vast place, and there’s always someone out there with the know-how to lend you a hand.
So go ahead, download that shiny new browser and bid adieu to those appcrash blues—at least for now.


 Error in Middle of Computer Startup")


Problem signature:
Problem Event Name: APPCRASH
Application Name: ajf98127kja.exe
Application Version: 0.0.0.0
Application Timestamp: 5b75d107
Fault Module Name: ajf98127kja.exe
Fault Module Version: 0.0.0.0
Fault Module Timestamp: 5b75d107
Exception Code: 40000015
Exception Offset: 000c44e6
OS Version: 6.1.7601.2.1.0.256.1
Locale ID: 16393
Additional Information 1: 2f19
Additional Information 2: 2f1957d9b4072c66e0a4761e484035bd
Additional Information 3: d3e6
Additional Information 4: d3e60380bb4a8e008795017d8bf44576
Read our privacy statement online:
If the online privacy statement is not available, please read our privacy statement offline:
C:\Windows\system32\en-US\erofflps.txt
plz relpy jarur dana sir
look like some virus to me.
This is the most thorough analysis I’ve come across. Thanks you so very much. I’ve been looking for a solution for nigh on 2 years and have no idea how I missed your solution, Madhur. I’ll let you know if it works. Again, thank you.
I’m new to your blog and i really appreciate the nice posts and great layout.