


 & HDD (Hard Disk Drive)?")


Ah, the notorious “Element Not Found” Explorer.exe error—a riddle wrapped in a Windows enigma that’s all too familiar to those of us in the tech trenches. Picture this: Windows Explorer (Explorer.exe), the unsung hero of our Windows GUI, scratching its virtual head because it can’t find a specific file or element it desperately needs. It’s like a chef missing a crucial ingredient for their signature dish.
When this glitch rears its ugly head, you might find yourself staring at a ghost town of a desktop or playing a game of hide-and-seek with your taskbar icons. In extreme cases, it’s like your files and apps have pulled a Houdini act.
Many users have found themselves face-to-face with this pesky error right after a fresh install or upgrade, almost like a not-so-welcome mat rolled out by Windows. It’s like the universe’s way of saying, “Welcome to your new OS! Now, let’s play a game of hide-and-seek with your essential system components”.
Whether you’re greeted with an “Element not found” or a “The group or resource is not in the correct state to perform the requested operation” pop-up, one thing’s for sure: Windows is trying to tell you something, and it’s not singing your praises.
These elusive error messages often rear their heads when you’re trying to launch Windows apps or other preinstalled programs, turning what should be a seamless experience into a head-scratching saga. But fear not, intrepid tech explorer! There’s more than one culprit behind these pesky pop-ups.
So, what’s the culprit behind this digital drama? It could be corrupt system files, rogue software installations, or even malware throwing a party on your system. Pinpointing the exact trigger requires some Sherlock-level sleuthing, but fear not—we’ve got a playbook for that.
In the upcoming sections, we’ll roll up our sleeves and dig into the potential gremlins causing this error, along with some tried-and-true strategies to kick them to the curb. Armed with this knowledge, you’ll be well-equipped to face the Explorer.exe error head-on.
So, Let’s See How To Fix This Error;
This Explorer.exe error is actually a tech puzzle that refuses to be pigeonholed into a one-size-fits-all solution. It’s like trying to find the perfect pair of jeans; what works for one brand might not cut it for another. Whether you’re rocking a sleek gaming rig or a trusty workhorse PC, the road to error resolution is paved with unique challenges.
So, how do we tackle this Windows enigma? First off, forget the cookie-cutter fixes—we’re going full detective mode here. From diving into system logs and running diagnostic tests to sniffing out sneaky software conflicts and checking the integrity of your system files, we’re leaving no stone unturned.
And let’s not forget the power of hindsight! Identifying any recent tweaks, installations, or updates that coincided with the error’s debut can be the golden ticket to unraveling this mystery. It’s like retracing your steps to find that lost sock—difficult but oh-so-rewarding when you finally spot it.
Ready to roll up your sleeves and dive into the world of Windows troubleshooting? Let’s get cracking!
First Things First;
When Windows Explorer decides to take an unscheduled break, your first move is to gently prod it back to life using the Task Manager. To open this versatile digital tool, simply press Ctrl + Alt + Del. Once the Task Manager window appears, navigate to the “Processes” tab. Here, you’ll find a comprehensive list of all the digital entities currently active on your system.
Scroll down until you locate our elusive companion, “Windows Explorer”. Right-click on it, and presto! A menu will emerge, presenting you with two choices: “Restart” and “End Task”.
For users on Windows 8 or later, the “Restart” option is the way to go. It’s akin to pressing the reset button on a misbehaving device—swift and painless. Unfortunately, those using Windows 7 or older don’t have this option. In this case, select the “End Task” button for explorer.exe and then proceed to the “Run new task” option.
Alternatively, choose the “Run new task” option if you can’t find “Windows Explorer” running.
Clicking on the “File” button on the top menu and then choosing “Run new task” will open a small dialog box where you can enter a command. This is where you perform your digital wizardry—type “explorer.exe” and press Enter. This command instructs your operating system to generate a brand-new instance of Windows Explorer. It’s a bit more hands-on, but sometimes you need to get your hands dirty to resolve issues.

Whichever method you opt for, rest assured that Windows Explorer will soon be up and running again, poised to handle your digital tasks with renewed enthusiasm. Peace and order will once again prevail in your digital realm.
Solution #1: Deleting Some Particular Apps (Only For Lenovo Laptop Or Desktop Users)
Sometimes it turns out that not even the software wizards at computer manufacturers are immune to the occasional hiccup. Take Lenovo, for instance—their well-intentioned utilities like Lenovo CapOSD and OneKey Theater have been caught red-handed, triggering the infamous “Element Not Found” error. It’s like finding out your favorite chef accidentally sprinkled salt instead of sugar in your dessert—well-intentioned but a recipe for disaster.
So, how do we deal with these rogue programs? It’s all about playing detective and going through a process of elimination. If you suspect that Lenovo CapOSD or OneKey Theater is the culprit behind your error woes, it might be time to show them the door.
Here’s your step-by-step guide to uninstalling these troublemakers:
- Press the Windows key + R to summon the Run dialog box.
- Type “appwiz.cpl” and hit Enter. Voila! You’ve just opened the Programs and Features Control Panel, showcasing all the players on your software stage.
- Hunt down Lenovo CapOSD and/or OneKey Theater in the lineup.
- Highlight the program(s) you want to bid farewell to and click “Uninstall” or “Remove”.
- Follow the on-screen prompts like a seasoned IT maestro to complete the uninstallation symphony.

Once you’ve given Lenovo CapOSD and/or OneKey Theater the boot, don’t forget to restart your PC and play a quick game of “Spot the Error”. With these pesky programs out of the picture, you might just find that your Explorer.exe error has vanished into thin air.
Solution #2: Delete Bloatware Apps
Bloatware! Those sneaky pre-installed apps that gatecrash your shiny new computer, often courtesy of the manufacturer or some third-party mischief-makers. These apps, with their trial versions of software, tempting promotions, or duplicate utilities, are like the unwanted party guests who never leave. While a few might find them handy, most folks see them as the party crashers who hog the snacks, clutter the place, and slow down the music (and your system).
Nuking these bloatware culprits can be your secret weapon against pesky issues like the Explorer error. Sometimes, these apps play the villain, messing with crucial system bits or picking fights with other software, causing unexpected tech tantrums. Clearing out these unwanted guests can tidy up your system, reclaim some storage space, and dodge those pesky compatibility hiccups and sluggish performance.
Ready to give your computer a bloatware detox? Here’s the game plan:
- Pop open the Control Panel or the Settings app—your choice, they both get the job done.
- Head over to the “Programs” or “Apps” section, the graveyard of installed software.
- Scan the lineup and spot those bloatware troublemakers. You know, the apps you never asked for and never use.
- Pick ’em out, hit “Uninstall” or “Remove”, and follow the bouncing ball of on-screen instructions.
- Once you’ve shown those bloatware apps the door, give your computer a reboot and see if that pesky error has been banished.

Solution #3: Troubleshoot App Compatibility
So, you’ve hit a snag with a specific app, huh? No worries, sometimes apps can be a bit finicky. If you’re facing issues while using a particular app, here’s a nifty trick to try out: the Troubleshoot Compatibility tool.
Here’s your step-by-step guide to get your app back in line:
- Spot the app’s shortcut—it’s either chilling on your desktop or hanging out in the Start menu.
- Give that shortcut a right-click to summon the context menu—think of it as the app’s secret command center.
- In the menu, you’ll see an option called “Troubleshoot Compatibility”. Click on it, and boom! The Windows Program Compatibility Troubleshooter springs into action.
- Now, just follow the breadcrumbs of on-screen prompts and instructions. The Troubleshooter’s got your back, guiding you through the maze to diagnose and fix those pesky compatibility hiccups.
- The Troubleshooter might suggest a few tweaks—like applying recommended settings or flipping the app into a different compatibility mode. Trust the process; it’s all about getting your app to play nice with your operating system.
Solution #4: Try Updating Windows
Ah, the age-old wisdom of keeping your Windows OS up-to-date—it’s like giving your computer a regular health check-up! Trust me, no one likes a sluggish, glitchy computer, and outdated software is often the culprit behind the dreaded “Element Not Found” error. Think of updating Windows as a magical fix-it potion that zaps bugs, smooths out compatibility wrinkles, and sprinkles a bit of stability dust over your system.
But hey, don’t just stop at the essentials! Optional updates are the hidden gems that can give your system that extra sparkle—think driver updates, nifty new features, and performance boosts. While Windows Update won’t shove these optional goodies down your throat, you can cherry-pick and install them to level up your computing game.
Ready to roll up those digital sleeves? Here’s your action plan:
- Kick things off by firing up the Settings app—hit the Start menu, spot the Settings gear icon, and give it a click.
- Head over to “Update & Security”, then cozy up to “Windows Update”.
- Hit that “Check for updates” button and let Windows do its thing—scouring the digital universe for updates tailor-made for your system.

- Once the essentials are in place, scroll down and peek at the “View optional updates” section.
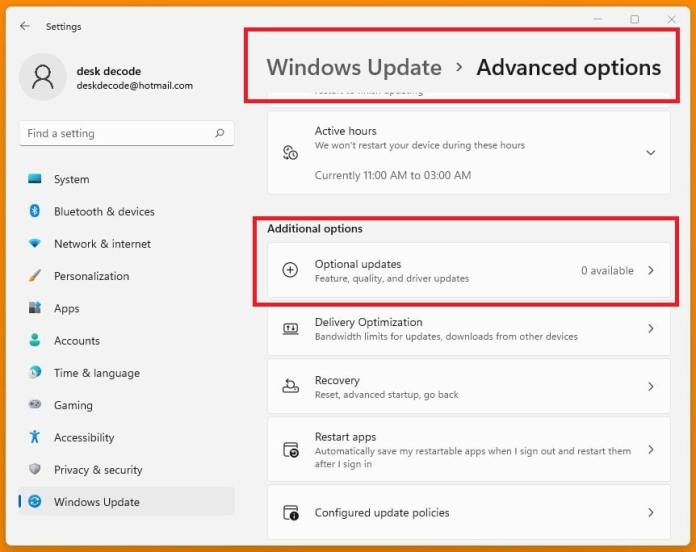
- Browse through the optional updates buffet and pick your favorites—be it driver updates, snazzy features, or performance tweaks.
- Ready to take the plunge? Hit “Download and install” and watch as your system gets a shiny new makeover.
- Last but not least, give your computer a reboot to let all those updates settle in and work their magic.
Solution #5: Try Updating All Hardware Drivers
Hardware drivers—the unsung heroes of your computer’s daily grind! Think of them as the translators in a bustling tech conference, making sure your operating system and hardware components like the motherboard, graphics card, sound card, and more, speak the same language.
When these drivers are up-to-date and playing nice, your computer hums along like a well-oiled machine. But let them fall behind or mismatch, and you’re in for a wild ride of glitches, slowdowns, and pesky system errors.
Here’s your step-by-step guide to keep those drivers in tip-top shape:
- Know Your Hardware: First up, play detective! Identify all the hardware components snuggled up inside your computer—think motherboard, graphics card, sound card, network card, and Wi-Fi card.
- Hit the Manufacturer’s Website: Time to play matchmaker! Head over to the manufacturer’s website or support page for your laptop or desktop. Your mission? Find and download the latest driver updates for all those hardware love interests.
- Download & Save: Once you’ve found your matches, hit that download button! Save the driver files for each hardware component right on your computer’s desktop or a dedicated folder.
- Installation Dance: Now comes the fun part! Fire up those driver installation wizards and follow the on-screen dance moves—err, instructions—to install each driver. It’s like a tech ballet, but with fewer tutus.
- Don’t Forget the Extras: Got any external hardware devices playing wingman to your computer? Think external sound cards or graphics cards. They need driver love too! Head back to the respective manufacturer’s websites or support pages to snag the latest updates for these external gems.
- Reboot & Revel: After all that driver updating hustle, give your computer a well-deserved break. Restart your system to let those updates settle in and work their magic.
Suggested Articles:
- Install Computer Drivers Automatically For Free – DriverPack Solution
- DriverIdentifier: A Great Way To Find & Download Drivers Online For Free
- WiFi Driver – What It Is & Why We Need It, And Mainly How To Install It?
- What Is a Network Driver, And How To Install It?
- What Is A Printer Driver, And How To Install It?
- Motherboard Drivers – What It is & Mainly, How To Install It?
- How to Update Drivers Directly From the Device Manager?
Solution #6: Try Clean Boot
A clean boot is actually a nifty troubleshooting trick tech-savvy folks use to sniff out software conflicts, startup snags, and other pesky system glitches on a Windows-based PC.
Here’s the lowdown: when you do a clean boot, you’re basically firing up your computer with the bare essentials. Imagine it as a tech detox, stripping away all the unnecessary processes and services that might be throwing a spanner in the works. This isolation act lets you zero in on what’s really going haywire, be it a rogue driver or a misbehaving startup program.
And, if you have a PC that’s acting like a sleepyhead during boot-up, a clean boot can be your wake-up call, revealing which drivers or startup programs are playing hard to get. Perfect for banishing that “Explorer.exe Element Not Found” glitch during system startup.
To perform a clean boot on a Windows-based computer, you can follow these general steps:
- Press the Windows key + R to open the Run dialog box.
- Type “msconfig” into the text field and press Enter to open the System Configuration utility.
- Navigate to the “Services” tab and check the box next to “Hide all Microsoft services”.
- Click on “Disable all” to disable all non-essential services.

- Go to the “Startup” tab and click on “Open Task Manager”.

- Disable all startup programs listed in Task Manager.

- Click OK and restart your computer to apply the clean boot configuration.
After your clean boot rendezvous, keep an eye on your PC’s behavior. If that explorer hiccup or any other glitches vanish into thin air, you’re on the right track! From here, you can start reintroducing services and startup programs one by one to pinpoint the troublemaker. It’s all about methodically sleuthing your way to a happier, glitch-free PC.
Solution #7: Try Fixing Internal System Files
Ah, the mysterious world of Windows system files—the backbone of your PC that sometimes decides to throw a tantrum. Enter DISM and SFC, our dynamic duo of diagnostic and repair tools. These trusty sidekicks are your go-to when you’re dealing with corrupted or missing system files causing havoc, like that pesky “Element Not Found” error.
DISM (Deployment Image Servicing and Management) Tool
Think of DISM as the Swiss Army knife of Windows repair. This command-line wizard is your ticket to servicing and prepping Windows images, whether it’s for Windows PE, Recovery Environment, or Windows Setup. With a few well-chosen commands, DISM can scan your system for corruption and whip your Windows image back into shape.
How to unleash the power of DISM:
- Summon the Command Prompt as an admin—your techy magic wand.
- Type in:
DISM /Online /Cleanup-Image /RestoreHealth - Sit back and let DISM work its mojo, scanning and repairing any system image hiccups.

SFC (System File Checker) Tool
Meet SFC, the Sherlock Holmes of system files. This command-line sleuth is on a mission to scan and replace corrupted system files with their shiny, correct counterparts from Microsoft. It’s like sending in the cleanup crew for your system files!
How to deploy SFC on your case:
- Elevate Command Prompt to admin status—the detective’s office.
- Type:
sfc /scannow - Wait patiently as SFC digs through your system, sniffing out and fixing corrupted files.

For the ultimate system file TLC, it’s often best to unleash DISM first to tackle the broader Windows image issues. Once that’s done, bring in SFC to mop up any lingering corrupted files. It’s like a tag team of tech support, working together to banish that error and restore peace to your PC kingdom.
After this dynamic duo has done their work, hit that restart button to seal the deal. Keep a close eye on your PC’s behavior. If the gremlins have been banished, cheers to a job well done! If they’re still causing mischief, don’t fret—there’s always more troubleshooting wizardry to explore or tech support to summon.
Solution #8: Fix For, If Having Problem Related To Windows App Store
The Windows App Store—the digital marketplace where dreams of app updates and installations can sometimes turn into nightmares of error messages and glitches. Fear not, intrepid tech explorer! With the power of PowerShell, you can perform a little app exorcism to banish those pesky issues.
Decoding the PowerShell Magic that you’ll need to perform:
- Retrieve App Manifest Location:
(Get-AppxPackage Microsoft.WindowsStore).InstallLocation
This part is all about finding out where the Windows Store app has made its home on your PC. - Navigate to App Manifest:
'\AppxManifest.xml'
Here, we’re pinpointing the AppxManifest.xml file—the blueprint that tells Windows how the Store app should behave. - Combine Paths:
$manifest = ... + '\AppxManifest.xml'
Now, we’re joining forces with the installation location and the manifest path to form a complete path to the manifest file. - Re-register App:
Add-AppxPackage -DisableDevelopmentMode -Register $manifest
This is where the magic happens! We’re re-registering the Windows Store app using our complete manifest path. The-DisableDevelopmentModeensures we’re not messing with developer settings, while-Registertells PowerShell to do its registration thing.
Now, get ready to perform this tech ritual and re-register the Windows Store app? Here’s how:
- Summon Command Prompt: Search for “cmd” in your Start menu, right-click on “Command Prompt”, and choose “Run as administrator”. 20 Different Ways To Open CMD On Your Computer
- Enter the PowerShell Command: In the Command Prompt window, unleash this command – “$manifest = (Get-AppxPackage Microsoft.WindowsStore).InstallLocation + ‘\AppxManifest.xml’ ; Add-AppxPackage -DisableDevelopmentMode -Register $manifest”
- Watch the Magic: Sit back and observe as PowerShell works its mojo. You might see some mystical output in the Command Prompt window—don’t be alarmed!
- Seal the Spell with a Restart: After the command completes its enchantment, restart your PC to ensure the changes take full effect.
Once your PC reawakens from its digital slumber, venture forth to the Windows App Store. Has the issue been banished into the tech abyss? With any luck, re-registering the Windows Store app will have cleared the path for seamless app installations and updates.
Solution #9: Fix For, If Having Problem Related To Edge or Internet Explorer
Stuck in the endless maze of Internet Explorer or Microsoft Edge glitches? Fear not! Sometimes, giving your browser a little reboot is all it takes to get back on track. Resetting the browser’s settings is like hitting the refresh button on a stubborn page—it wipes out those pesky customizations, cached files, and any other gremlins causing havoc.
How to Perform a Browser Configuration Reset
Step 1: Open Internet Properties
- Ready for some keyboard gymnastics? Press
Win + Rto summon the Run dialog box. - Type
inetcpl.cplinto this magical box and hit Enter. Voila! The Internet Properties window should appear, like a genie granting your browser-wish.
Step 2: Navigate to the Advanced Tab
- Inside the Internet Properties window, spot the “Advanced” tab—your gateway to the browser’s secret lair of settings.
Step 3: Reset Those Browser Settings
- Still with me? Great! In the “Advanced” tab, look for the “Reset” button under the “Reset Internet Explorer settings” section.
- Click that bad boy and watch the reset magic unfold.

Final Touches: Restart & Rejoice
- After hitting the reset button, give your computer a well-deserved nap. Restart it to let the changes sink in.
- Once it’s up and running, fire up your browser to see if the gremlins have been banished for good. Fingers crossed, no more “Explorer.exe Element Not Found” or other pesky errors!
Solution #10: At Last, Vrus Scan
Ever thought about giving your computer a spa day? Well, a boot-time virus scan is pretty much that—a deep cleanse for your system, minus the cucumber slices.
Why Boot-Time Virus Scans Are Your System’s Best Friend
- Deep System Dive: Think of it as a full-body scan for your computer. A boot-time scan delves into every nook and cranny, even those secret hideaways regular scans can’t reach. Say goodbye to those sneaky viruses playing hide-and-seek!
- Early Bird Catches the Worm: Catching malware during boot-up is like spotting a party crasher at the door. Your antivirus kicks them out before they can ruin the fun—or your data.
- Boost Your System’s Mojo: Banishing viruses isn’t just about security; it’s about performance too. Free up your system’s resources from those pesky background processes and watch it run smoother than a greased lightning.
How to Perform a Boot-Time Virus Scan: A Quick Guide
- Arm Yourself with Elite Antivirus: Got your antivirus game on point? Make sure you’ve got a top-tier antivirus program that’s always on its A-game. No slacking allowed! What’s A Good Antivirus And How To Pick The Perfect One?
- Schedule Your Spa Day: Open up your antivirus hub and find the scheduling options. Look for the boot-time or offline scan feature. Set it up like you would a reminder for your favorite show—don’t miss it!
- Reboot and Relax: Time to kick back! Restart your computer and let your antivirus do its thing during boot-up. No peeking—let it finish the job.
- Review and Rejoice: Once the scan’s done, take a peek at the results. Any unwelcome guests caught? Your antivirus will guide you on kicking them out or putting them in timeout.

So, there you have it—a boot-time virus scan is like a VIP security check for your computer, ensuring it stays safe, snappy, and savvy. Make it a regular part of your cybersecurity routine, and you’ll browse, download, and game with peace of mind. Happy scanning, tech warriors!


 Error in Middle of Computer Startup")


Ilike the lecture MR your very special in IT